


A stuck shower faucet plastic insert can turn a simple repair into a frustrating ordeal. When the cartridge or plastic component inside your shower valve refuses to budge, forcing it can crack the housing, strip threads, or cause a leak that requires expensive wall repairs. Knowing the right approach—and when to call a licensed plumber—helps you avoid damage and get your shower working again without unnecessary stress.
This guide walks you through safe removal techniques, common causes of stuck inserts, and the tools you’ll need. You’ll also learn when DIY methods reach their limit and how Antons Plumbing & Gas can step in with same-day service to protect your plumbing and your home.
Key Takeaways
- Always shut off the water supply and release pressure before attempting to remove a stuck plastic insert.
- Heat, penetrating lubricant, and gentle leverage are safer than brute force.
- Corrosion, mineral buildup, and cross-threading are the most common reasons plastic cartridges seize in Sydney bathrooms.
- Using the wrong tools or excessive force can crack the valve body and lead to costly wall repairs.
- Under NSW law, plumbing work connected to the water supply should be carried out by a licensed plumber. Antons Plumbing & Gas holds NSW Lic. 210933C, and our licensed plumbers carry specialised extraction tools and can diagnose valve damage on the spot.
What Is a Shower Faucet Plastic Insert and Why Does It Get Stuck?
The plastic insert—often called a cartridge, valve stem, or mixing unit—sits inside your shower tap body and controls water flow and temperature. Most modern single-lever taps use a cylindrical cartridge made from reinforced nylon or ABS plastic, sealed with rubber O-rings. Over time, mineral deposits from Sydney’s hard water, corrosion on the brass housing, and dried-out seals cause the insert to bond to the surrounding metal.
When you try to pull or twist the cartridge, it won’t move. Forcing it can snap the plastic stem or crack the valve body, turning a simple seal replacement into a full valve rebuild — and, in a tiled Sydney bathroom, a much bigger bill.
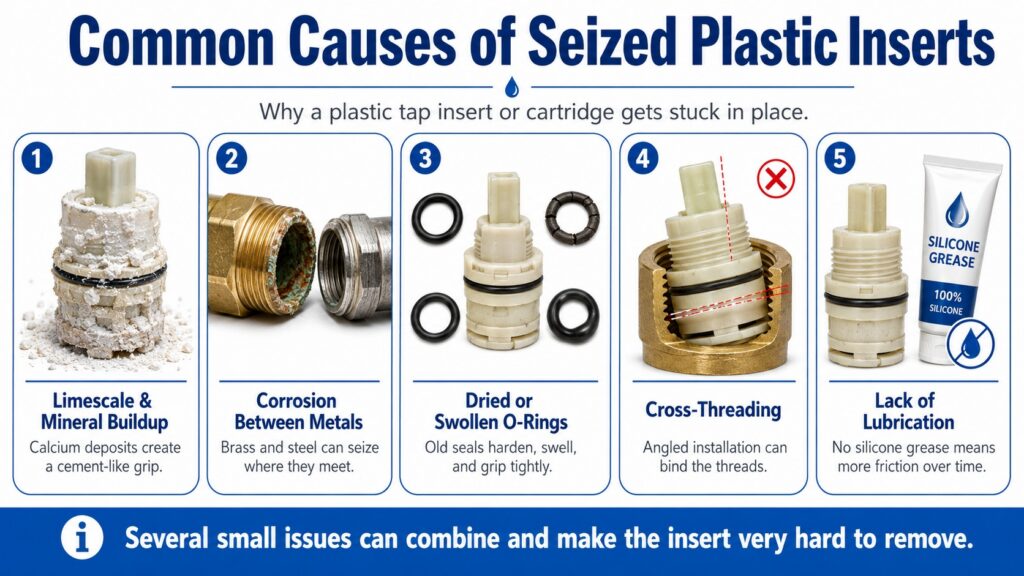
Common Causes of Seized Plastic Inserts
- Limescale and mineral buildup: Sydney tap water contains calcium and magnesium that precipitate onto metal and plastic surfaces, forming a cement-like layer around the cartridge.
- Corrosion between dissimilar metals: brass valve bodies and steel retaining clips can corrode where they meet, locking the plastic insert in place.
- Dried or swollen O-rings: rubber seals lose elasticity over time, expanding or hardening and gripping the cartridge tighter than intended.
- Cross-threading during installation: if the previous installer forced the cartridge in at an angle, the threads bind and the insert won’t back out cleanly.
- Lack of lubrication: installers who skip silicone grease on threads and seals create friction points that seize after a few years of heat cycling.
Tools and Materials You’ll Need for Safe Removal
Before you start, gather the right equipment. Using improvised tools or the wrong size spanner increases the risk of cracking the valve or damaging the wall tile around the trim plate. Here’s what professional plumbers recommend for a safe extraction.
| Tool or Material | Purpose |
|---|---|
| Adjustable spanner or cartridge puller | Grip the cartridge stem without crushing plastic |
| Penetrating lubricant (e.g. WD-40, CRC) | Dissolve mineral deposits and free corroded threads |
| Heat gun or hair dryer | Expand metal housing slightly to break the seal |
| Flathead screwdriver | Remove trim screws and pry off decorative caps |
| Vinegar or citric acid solution | Soak and dissolve limescale around the cartridge |
| Silicone grease | Lubricate O-rings and threads during reassembly |
If you don’t already own a cartridge puller, many hardware stores around Sydney stock them. The tool threads onto the cartridge stem and uses mechanical advantage to pull the insert straight out without twisting. It’s a small investment that prevents expensive mistakes.
Step-by-Step Guide to Removing a Stuck Shower Faucet Plastic Insert
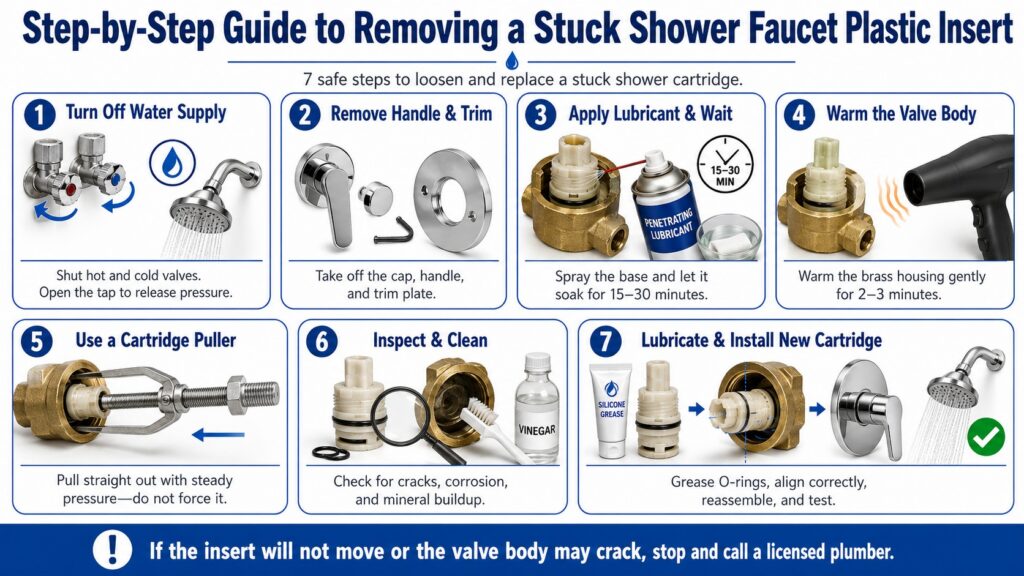
Follow these steps in order. Skipping ahead or rushing the process increases the chance of breakage. If you encounter strong resistance at any stage, stop and consider calling a licensed plumber rather than risking damage to the valve body or tile.
1. Turn Off the Water Supply and Release Pressure
Locate the isolation valves for your bathroom, usually in the roof space, under the house, or behind an access panel. Turn both hot and cold supplies fully clockwise. Open the shower tap to drain residual water and release any trapped pressure. This step prevents a sudden spray when you remove the cartridge.
2. Remove the Handle and Trim Plate
Pry off the decorative cap on the handle using a flathead screwdriver. Unscrew the handle screw (often a Phillips or Allen key) and pull the handle straight off the cartridge stem. Remove the escutcheon or trim plate by unscrewing any visible screws or twisting it counter-clockwise. You should now see the valve body and the top of the plastic cartridge.
3. Apply Penetrating Lubricant and Wait
Spray penetrating lubricant around the base of the cartridge where it meets the brass housing. Let it soak for at least 15 minutes—longer if the valve hasn’t been serviced in years. The solvent needs time to creep into microscopic gaps and dissolve mineral crust. For heavy limescale, soak a rag in white vinegar, wrap it around the cartridge, and leave it for 30 minutes.
4. Apply Gentle Heat to the Valve Body
Use a heat gun on low setting or a hair dryer to warm the brass valve body for two to three minutes. Metal expands faster than plastic, so heating the housing can break the bond without melting the cartridge. Keep the heat moving and avoid prolonged contact with any plastic parts or nearby tile grout, which can crack under thermal stress.
5. Attach the Cartridge Puller and Extract the Insert
Thread the cartridge puller onto the stem according to the manufacturer’s instructions. Turn the tool’s handle clockwise to draw the cartridge straight out of the valve body. Apply steady, even pressure—jerking or twisting can snap the stem. If the cartridge still won’t move after a full turn of the puller, stop and re-apply lubricant. Forcing it risks cracking the valve housing, which means cutting into your wall to replace the entire assembly.
6. Inspect the Cartridge and Valve Body
Once the insert is out, check for cracks, worn O-rings, or mineral buildup on the cartridge. Examine the inside of the valve body for corrosion, pitting, or debris. If the brass shows deep pitting or the seat is scored, the valve may need replacement rather than just a new cartridge. Clean all surfaces with a soft brush and vinegar solution before installing a new insert.
7. Lubricate and Install the New Cartridge
Coat the new cartridge’s O-rings with silicone grease—never petroleum jelly, which degrades rubber. Align the cartridge according to the manufacturer’s markings (usually a flat side or notch) and push it firmly into the valve body. Replace the retaining clip, escutcheon, handle, and decorative cap. Turn the water supply back on slowly and test for leaks and correct hot-cold orientation.
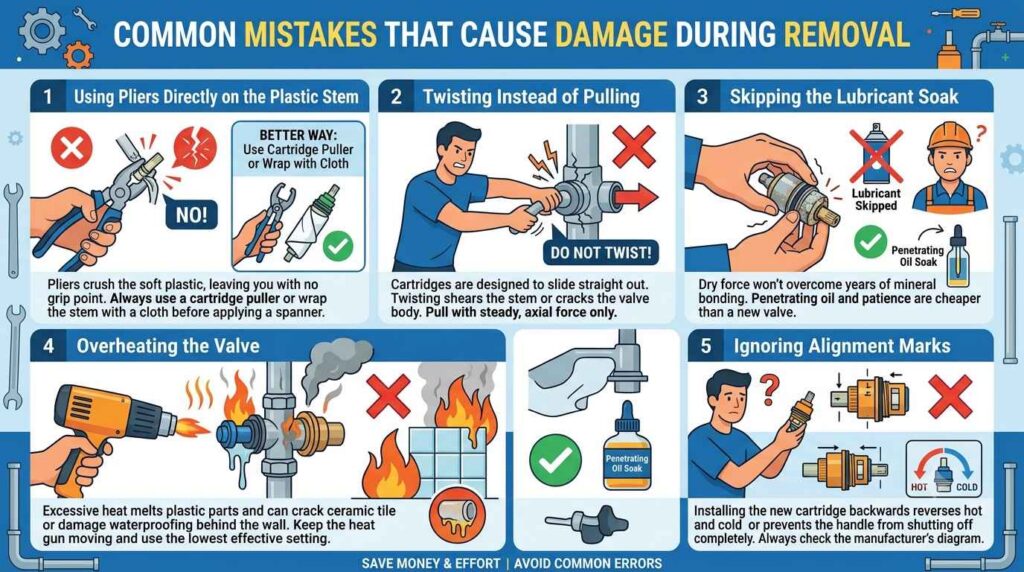
Common Mistakes That Cause Damage During Removal
Even experienced DIYers can make errors that turn a straightforward cartridge swap into a major repair. Here are the pitfalls our team at Antons Plumbing & Gas sees most often when we’re called out across Sydney to fix botched attempts.
- Using pliers directly on the plastic stem: Pliers crush the soft plastic, leaving you with no grip point. Always use a cartridge puller or wrap the stem with a cloth before applying a spanner.
- Twisting instead of pulling: Cartridges are designed to slide straight out. Twisting shears the stem or cracks the valve body. Pull with steady, axial force only.
- Skipping the lubricant soak: Dry force won’t overcome years of mineral bonding. Penetrating oil and patience are cheaper than a new valve.
- Overheating the valve: Excessive heat melts plastic parts and can crack ceramic tile or damage waterproofing behind the wall. Keep the heat gun moving and use the lowest effective setting.
- Ignoring alignment marks: Installing the new cartridge backwards reverses hot and cold or prevents the handle from shutting off completely. Always check the manufacturer’s diagram.
Avoiding these mistakes can make cartridge replacement safer, cleaner, and much more successful. A careful approach protects the valve assembly and reduces the chance of creating a bigger repair than the one you started with. When the cartridge refuses to move or the valve shows signs of damage, professional help is often the better option.
When to Call a Licensed Plumber Instead of DIY
DIY removal works well for cartridges that are only lightly stuck and when you have the right tools. But some situations demand professional intervention to avoid costly damage or breaches of NSW plumbing regulations. Here’s when to pick up the phone instead of the spanner.
- The cartridge won’t budge after heat and lubricant: excessive force can crack the valve body, requiring wall demolition to replace the rough-in. Our plumbers carry hydraulic pullers and can assess whether the valve itself has failed.
- You see cracks or corrosion in the valve body: a damaged housing won’t seal properly even with a new cartridge. We’ll recommend a full valve replacement and can source quality units that meet Australian Standards.
- Water leaks from behind the wall after removal: this indicates a compromised solder joint or cracked pipe. Same-day response from our team prevents water damage to your ceiling or floor below.
- You’re unsure which cartridge model to buy: dozens of brands and sizes exist, and installing the wrong one causes leaks or handle malfunction. We identify the exact part and carry common replacements on our vans.
- The shower is part of a heritage home or high-end renovation: older fixtures and designer taps require specialised knowledge. We’ll preserve the original trim and source compatible internals where possible.
Antons Plumbing & Gas is a fully licensed NSW plumbing business (Lic. 210933C) operating across Sydney—Inner West, Eastern Suburbs, North Shore, Northern Beaches, Hills District, and beyond. We offer same-day service and a lifetime labour warranty on all repairs. Call us on 0493 824 176 if you’d rather leave the stuck cartridge to the professionals.
Understanding Shower Valve Types and Cartridge Compatibility
Not all shower taps use the same insert design. Knowing your valve type helps you source the correct replacement and apply the right removal technique. Here’s a quick overview of the most common systems found in Sydney homes, alongside imported cartridges and locally available brands such as Dorf, Caroma, and Methven.
- Single-lever cartridge valves: one lever controls both flow and temperature. The cartridge is a cylindrical plastic unit with internal ceramic discs or rubber seals. Different manufacturers use proprietary cartridge shapes, so the exact part must match your existing tap.
- Two-handle compression valves: separate hot and cold taps use threaded stems with rubber washers. These older designs are less common in modern builds but still turn up in heritage terraces and older Sydney homes. The stems can corrode onto the seat, requiring a stem puller.
- Thermostatic mixing valves: high-end showers use a cartridge that maintains constant temperature even when pressure fluctuates. These units are more complex and costly to replace. Incorrect removal can damage the thermostatic element, so professional service is recommended.
- Pressure-balance valves: required in many NSW installations to prevent scalding by balancing hot and cold pressure, the insert is usually larger and heavier than a standard cartridge, and forcing it can crack the valve body.
If you’re unsure which type you have, check the manufacturer’s logo on the trim plate or take a photo and send it to our team. We’ll identify the valve and confirm the correct cartridge part number before you buy.
Compliance, Standards, and Safety Considerations
All plumbing work in New South Wales must meet the requirements of the Plumbing and Drainage Act and relevant Australian Standards, including AS/NZS 3500. When you attempt a DIY cartridge replacement, you’re responsible for ensuring the repair doesn’t introduce cross-connections, backflow risks, or non-compliant parts. Sydney Water also requires that any plumbing alteration connected to the water supply or sewerage network be carried out by a licensed plumber, and certain jobs must be lodged as a Notice of Work before the work proceeds.
Licensed plumbers carry current qualifications and insurance — our NSW licence number is 210933C. We source cartridges and valves that carry WaterMark certification, meaning they’ve been tested for Australian conditions. If your shower valve is part of a thermostatic or pressure-balance system, incorrect installation can lead to scalding or pressure imbalances that breach the Plumbing Code of Australia.
Our team documents every repair with photos and part numbers, so you have a compliance record if you ever sell your property or lodge an insurance claim. We also test water temperature and pressure after installation to confirm safe operation, especially in homes with young children or elderly residents.
Real-World Example: Inner West Townhouse Cartridge Seizure
Last month we attended a job in the Inner West where the homeowner had spent two hours trying to remove a stuck cartridge. The plastic stem had snapped, leaving the base wedged in the valve body. Because the valve was recessed in a tiled feature wall, any further damage would have meant cutting through expensive mosaics.
Our plumber used a specialised screw extractor to grip the remaining cartridge stub and applied heat to the brass housing. After 20 minutes of careful work, the insert came free without cracking the valve. We installed a new cartridge, tested for leaks, and left the bathroom exactly as we found it—tiles intact, no mess. The homeowner avoided a full valve replacement and a tiling bill, all for a fixed-rate service call.
Stories like this highlight why the right tools and experience matter. A relatively inexpensive cartridge, say around AU$15–$30, can turn into a repair costing well over AU$1,500 if you crack the valve body or damage the wall. When in doubt, let a licensed Sydney plumber handle the extraction.
Why Antons Plumbing & Gas Is Your Best Choice for Shower Repairs

We’ve spent more than 25 years solving plumbing problems across Sydney, from simple tap washers to complex gas installations and bathroom renovations. Our approach is built on transparency, quality parts, and respect for your home.
Every plumber on our team holds current NSW licensing and insurance. We arrive in marked vans stocked with common cartridges, O-rings, and specialty tools, so most repairs are completed in one visit. You’ll receive upfront pricing in AUD before we start, and our lifetime labour warranty means you’re covered long after we leave.
We serve the entire Sydney Metro—Inner West, Eastern Suburbs, North Shore, Northern Beaches, Hills District, Western and South-Western Sydney, Sutherland Shire, and beyond. Whether you need a quick cartridge swap or a full shower valve replacement, we’re ready to help with same-day service and no call-out fee during weekday business hours.
Call 0493 824 176 or book online to schedule your repair. We’ll diagnose the root cause, present your options in plain English, and get your shower working safely and reliably.
Conclusion
Removing a stuck shower tap plastic insert requires patience, the right tools, and a clear understanding of when to stop and call for help. Heat, lubricant, and a proper cartridge puller can free most inserts without damage, but forcing a seized cartridge risks expensive valve and wall repairs. When you’re unsure or the job exceeds your tools, Antons Plumbing & Gas is here with licensed NSW expertise (Lic. 210933C), same-day response, and a lifetime labour warranty to protect your investment.
Antons Plumbing & Gas offers expert shower and tap repairs across Sydney Metro for residential and emergency jobs. Our licensed team safely handles stuck taps and complex bathroom fixes with a lifetime labour warranty. Call 0493 824 176 to get started today.
Related Articles
- Sink Only Drains When Garbage Disposal Runs? Here’s Why
- DIY Plumbing Repair Mistakes Homeowners Should Check
- Garbage Disposal in Shower Drains: Common Myths and Facts
FAQs
How Do You Remove A Stuck Shower Tap Plastic Insert?
To remove a stuck shower tap plastic insert, first turn off the water supply at the isolation valve. Use a flathead screwdriver to gently pry around the edges of the insert. If it doesn’t budge, apply some penetrating oil and let it sit for a few minutes before trying again. For stubborn inserts, a pair of pliers wrapped in cloth can provide extra grip without damaging the plastic.
What Tools Do I Need To Remove A Stuck Shower Tap Insert?
You will typically need a flathead screwdriver, pliers, and possibly some penetrating oil. These tools will help you gently pry and grip the stuck insert without causing damage.
Can I Replace A Stuck Shower Tap Plastic Insert Myself?
Yes, you can replace a stuck shower tap plastic insert yourself if you feel comfortable with basic plumbing tasks. However, if you encounter difficulties or are unsure about the process, it’s wise to contact a professional like Antons Plumbing & Gas for assistance, ensuring the job is done correctly and safely.
What Causes A Shower Tap Plastic Insert To Get Stuck?
A shower tap plastic insert can get stuck due to mineral buildup, corrosion, or simply age and wear. Regular maintenance can help prevent these issues, but if you encounter a stuck insert, our experienced team can help diagnose and resolve the problem effectively.
Is There A Way To Prevent A Shower Tap Insert From Getting Stuck?
To prevent a shower tap insert from getting stuck, perform regular maintenance by cleaning the tap and checking for any signs of wear. Using quality, WaterMark-certified parts and ensuring proper installation can also reduce the chances of inserts becoming stuck. If you need help with maintenance or repairs, Antons Plumbing & Gas is here to assist you.
How Much Does It Cost To Fix A Stuck Shower Tap In Sydney?
Cost depends on the tap brand, whether the cartridge is readily available, and whether the valve body itself needs replacing. We provide upfront, obligation-free quotes in AUD before any work begins, so there are no surprises. Call 0493 824 176 for a quote for your specific tap.
Do You Offer Same-Day Shower Tap Repairs In Sydney?
Yes, Antons Plumbing & Gas offers same-day service across Sydney Metro for stuck or damaged shower taps. Call 0493 824 176 and we’ll do our best to get a licensed plumber to you today.
Are You Licensed To Carry Out Plumbing Work In NSW?
Yes, Antons Plumbing & Gas holds current NSW plumbing licence 210933C. Every plumber we send is qualified, insured, and familiar with the Plumbing and Drainage Act and AS/NZS 3500 requirements that apply in Sydney.
What Suburbs Across Sydney Do You Service?
We cover the Inner West, Eastern Suburbs, North Shore, Northern Beaches, Hills District, Western and South-Western Sydney, and the Sutherland Shire. If you’re unsure whether we service your suburb, call 0493 824 176 to check.
Do You Charge A Call-Out Fee For Shower Tap Repairs?
We don’t charge a call-out fee during weekday business hours. Simply book online or call 0493 824 176 and we’ll confirm any charges relevant to your specific job before we attend.
Can I Book A Plumber Online For A Stuck Shower Cartridge?
Yes, you can book directly through our website or call 0493 824 176 to arrange a same-day or next available appointment for your stuck shower tap.
Do You Offer A Warranty On Shower Tap And Cartridge Repairs?
Yes, all repairs completed by Antons Plumbing & Gas come with a lifetime labour warranty, giving you peace of mind that the job has been done correctly and will be backed if any issue arises.
Is It Safe To Keep Showering If The Tap Is Stuck?
A stuck cartridge on its own is usually not dangerous, but if the tap won’t shut off fully, is leaking behind the wall, or the temperature can’t be controlled safely, stop using the shower and call a licensed plumber. Continuing to force it yourself risks a sudden leak or scalding.
Can You Match My Existing Tap Brand When Replacing The Cartridge?
In most cases, yes. Our vans carry common cartridges and O-rings, and we can source specific parts to match your existing tap brand and model, including WaterMark-certified replacements.
Do You Carry WaterMark-Certified Parts On Your Vans?
Yes, we use WaterMark-certified cartridges and valves wherever possible, ensuring the replacement parts meet Australian Standards and NSW compliance requirements.
What Happens If The Valve Is Damaged And Needs Full Replacement?
If the valve body is cracked, corroded, or pitted beyond repair, we’ll explain the options, provide an upfront quote, and carry out the replacement in line with AS/NZS 3500 and Sydney Water requirements, minimising disruption to your tiles where possible.
Do I Need To Be Home For The Repair?
We generally recommend someone is home to confirm access, discuss the quote, and test the shower once the repair is complete. If that’s not possible, call us to discuss access arrangements.
Can You Also Check For Other Plumbing Issues While You’re On-Site?
Absolutely. While we’re fixing your shower tap, our licensed plumbers can check other fixtures, water pressure, and general compliance, and flag anything that needs attention.
Do You Provide Obligation-Free Quotes Before Starting Work?
Yes, we always provide upfront pricing in AUD before starting any repair, so you know exactly what to expect with no hidden costs.
What Payment Methods Do You Accept?
We accept standard payment methods for residential plumbing jobs across Sydney. Ask our team when you book for full details relevant to your job.
How Quickly Can A Licensed Plumber Attend My Home In Sydney?
We offer same-day service across Sydney Metro in most cases. Call 0493 824 176 now and we’ll let you know the fastest available appointment for your suburb.