Water pooling around your outdoor tap or dripping from the wall behind it is more than a nuisance. A hose bib leaking from the wall can signal damaged pipe connections, frost cracks, or failed seals that waste water and risk structural damage. Ignoring it often turns a simple washer replacement into a wall cavity repair.
This guide explains the root causes of wall leaks at your hose bib, when DIY fixes work, and when you need a licensed plumber. You’ll learn how to diagnose the leak point, what repair options exist, and how to prevent future problems with winterizing and proper installation.
Key Takeaways
- Leaks at the wall usually mean the hose bib body, pipe threads, or wall flange has failed, not just a worn washer.
- Frost damage is the most common cause in Sydney’s occasional cold snaps, cracking internal valve seats or pipe connections.
- Diagnosing where water appears—spout, handle, or wall joint—determines whether you repair or replace the entire unit.
- Modern frost-proof hose bibbs with backflow prevention reduce long-term leak risk and protect your drinking water supply.
- Professional replacement ensures correct pipe sealing, wall re-flashing, and compliance with AS/NZS 3500 plumbing standards.
Why Your Hose Bib Leaks from the Wall Instead of the Spout
Most homeowners expect drips from the spout when a tap wears out. When water seeps from the wall connection or runs down the siding, the fault lies further back in the assembly. The hose bib body threads into a pipe elbow inside the wall cavity, sealed by Teflon tape, pipe dope, or a rubber gasket depending on the fitting type.
Over time, thermal expansion, vibration from overtightening garden hose reels, or corrosion can break that seal. You might see a slow weep during use or a steady drip even when the handle is closed.
Frost is the silent culprit in many Sydney properties. Water left in the pipe expands when temperatures drop below zero, cracking the valve body or pushing the threaded connection apart. Even a hairline fracture lets pressurized water escape into the wall every time you turn on the tap.
Damaged Threads or Cracked Valve Body
If the brass or plastic threads inside the wall have stripped or cross-threaded during installation, no amount of tightening will seal the joint. Likewise, a cracked hose bib body—often invisible from the outside—allows water to bypass the valve seat and leak at the mounting flange. Replacement is the only reliable fix.
Loose or Missing Wall Flange Seal
The decorative escutcheon plate that covers the hole in your siding should sit flush and be caulked. When that seal fails or the plate loosens, water tracks along the pipe shank and drips out at the wall. This looks like a pipe leak but may only need re-caulking if the threads themselves are sound.
Worn Packing Nut or Stem O-Ring
Water leaking from around the handle stem when the tap is open points to a failed packing nut or O-ring. While this is technically a handle leak, it can run down the body and appear at the wall joint. Tightening the packing nut or replacing the stem seal often stops the drip without removing the entire hose bib.
Backflow Preventer Failure
Many modern hose bibbs include an integral vacuum breaker or backflow device. If the internal diaphragm cracks, water can weep from the breather vent or the connection between the valve and the breaker body. This type of leak usually requires replacing the entire assembly to maintain compliance with plumbing codes.
Common Causes of Hose Bib Leaking from Wall
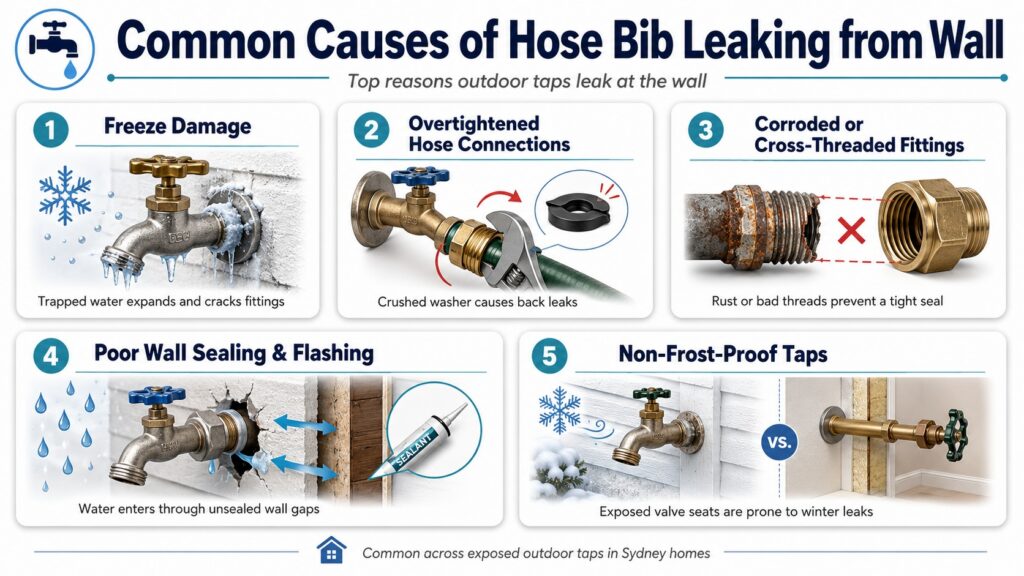
Understanding what triggers a wall leak helps you prevent repeat failures. Most issues trace back to installation quality, seasonal stress, or accessory misuse. Here are the top culprits we see across Sydney.
1. Freeze Damage from Winter Cold Snaps
Sydney’s winter nights occasionally dip below freezing, especially in the Hills District and Western Sydney. If you leave a garden hose reel connected or forget to drain the pipe, trapped water expands and cracks the valve seat or pipe threads. The damage may not show until spring when you turn the tap back on and find water inside the wall cavity.
2. Overtightened Hose Connections Deforming Gaskets
Cranking down a water hose reel coupling too hard crushes the rubber washer inside the hose bib spout. That deformed gasket no longer seals properly, letting water backtrack through the threads and emerge at the wall joint. Always hand-tighten hose fittings and check for drips before adding extra torque.
3. Corroded or Cross-Threaded Pipe Fittings
Older homes with galvanized steel supply lines can develop rust that weakens the threads. During a hose bib replacement, cross-threading the new brass fitting into a corroded elbow creates an imperfect seal. We often find this in heritage properties where original plumbing has been patched over decades without upgrading the supply stub.
4. Improper Wall Penetration and Flashing
If the installer didn’t seal the wall hole correctly or skipped the flashing step, rainwater can enter the cavity and mix with any minor seepage from the tap. This makes a small leak look catastrophic and accelerates timber rot. Proper re-sealing with silicone or polyurethane caulk is essential during any hose bib service.
5. Using Non-Frost-Proof Taps in Exposed Locations
Standard hose bibbs have the valve seat close to the outdoor wall, right where cold air hits. Frost-proof models extend the valve stem so the seat sits inside the heated wall cavity, protecting it from freezing. Installing a basic tap on an exterior wall without insulation almost guarantees winter leaks.
How to Diagnose Where the Leak Starts
Before you grab a wrench, pinpoint the exact leak source. This saves time and prevents unnecessary disassembly. Turn on the hose bib and watch carefully as pressure builds.
If water drips only from the spout when the handle is closed, you have a worn stem washer or valve seat—a straightforward internal repair. If water seeps from around the handle while the tap runs, the packing nut or stem O-ring needs attention. But if you see moisture at the wall flange, behind the escutcheon, or running down the siding, the problem lies in the pipe connection or valve body.
| Leak Location | Likely Cause | Typical Repair |
|---|---|---|
| Spout drip when closed | Worn stem washer or valve seat | Replace washer and re-seat valve |
| Handle stem weep during use | Loose packing nut or failed O-ring | Tighten nut or replace packing |
| Wall flange or siding drip | Cracked body, bad threads, or loose seal | Replace hose bib and re-seal wall |
| Backflow vent drip | Failed vacuum breaker diaphragm | Replace entire backflow assembly |
Dry the area completely and run the tap again. Use a flashlight to trace the water path. Sometimes what looks like a wall leak is actually a leaking shower hose or weeper hose connection nearby, with runoff pooling at the hose bib.
Repair Options for a Hose Bib Leaking from Wall
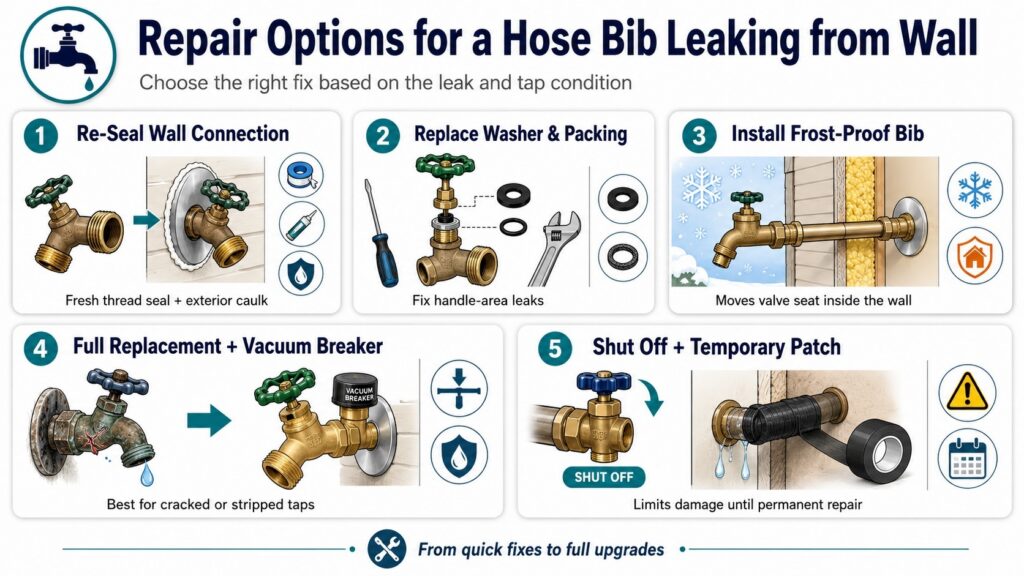
Once you’ve identified the leak point, you can choose between a quick fix and a full replacement. Your decision depends on the age of the tap, the extent of damage, and whether you want a frost-proof upgrade.
Tighten or Re-Seal the Wall Connection
If the threads are sound but the seal has failed, you can sometimes shut off the water, unscrew the hose bib from inside (or outside if accessible), clean the threads, apply fresh Teflon tape or pipe sealant, and re-install. This works best on newer installations where corrosion hasn’t set in. Don’t forget to re-caulk the escutcheon plate against the wall to keep moisture out.
Replace the Stem Washer and Packing
For leaks that appear to start at the handle but drip down to the wall, replacing the internal washer and packing can stop the flow. Shut off the supply, remove the handle screw and stem assembly, swap the rubber washer at the tip, and replace the packing string or O-ring around the stem. Reassemble and test. This is a low-cost fix if the valve body itself is intact.
Install a Frost-Proof Hose Bib
Upgrading to a frost-proof model moves the valve seat 150–300 mm inside the wall, where it stays warm. These units cost more upfront but eliminate freeze damage and reduce the chance of wall leaks. Installation requires cutting back the supply pipe and may involve opening the wall, so it’s a job best handled by a licensed plumber to ensure correct pitch and drainage.
Full Hose Bib Replacement with Backflow Prevention
When the body is cracked, threads are stripped, or you’re dealing with multiple leak points, replacement is the safest choice. Modern code-compliant hose bibbs include an integral vacuum breaker to prevent garden hose reel contaminants from siphoning back into your drinking water. We remove the old unit, inspect the supply stub for corrosion, fit a new brass or stainless hose bib with proper thread sealant, and re-flash the wall penetration. Same-day service means your outdoor tap is back in action without the wait.
Emergency Shut-Off and Temporary Patch
If the leak is severe and you can’t get a plumber immediately, locate the isolation valve for that line—often in the garage, laundry, or under the house—and turn it off. Wrap the leaking joint with self-fusing silicone tape as a temporary measure. This won’t hold under full pressure but can minimize water damage until a permanent repair is completed.
Preventing Future Hose Bib Leaks at the Wall
A little seasonal maintenance goes a long way. Most wall leaks are preventable if you winterize your outdoor taps and use accessories correctly. Here’s what we recommend to every Sydney homeowner.
- Disconnect garden hose reels and water hose reels before winter. Trapped water in the hose backfills the hose bib and freezes, cracking the valve.
- Shut off the indoor isolation valve and open the outdoor tap to drain. Even a few milliliters of water can cause damage when it turns to ice.
- Insulate exposed pipes and add a foam hose bib cover. Pipe lagging and a simple polystyrene cap provide extra protection during cold snaps.
- Avoid overtightening hose fittings. Hand-tight plus a quarter turn is usually enough. Over-torquing deforms gaskets and stresses threads.
- Check the wall seal and caulking annually. Cracked caulk lets moisture in, accelerating corrosion and rot around the penetration.
- Upgrade to a frost-proof or anti-siphon hose bib if you’re in a cold-prone area. The extra cost pays off in avoided repairs and peace of mind.
If you use a weeper hose or soaker hose system for garden beds, install a separate shutoff and backflow preventer. These low-flow devices can create vacuum conditions that pull soil and fertilizer back through the hose bib, contaminating your water supply and damaging internal seals.
When to Call a Licensed Plumber for Hose Bib Leaking from Wall
DIY repairs work well for simple washer swaps and packing adjustments. But when water appears at the wall joint, you’re often dealing with hidden damage that requires proper tools, parts, and compliance knowledge. Here’s when professional help makes sense.
If you see water staining on the interior wall or ceiling below the hose bib, the leak has been active long enough to soak timber framing or plasterboard. That means potential mold growth and structural weakening. Our team uses moisture meters and thermal imaging to map the extent of water intrusion, then coordinates the plumbing repair with any necessary building work.
Cracked valve bodies and stripped threads can’t be patched reliably. Trying to seal a fractured casting with epoxy or overtightening a damaged fitting usually makes the problem worse. We replace the unit with a quality brass or stainless hose bib, verify the supply pipe condition, and ensure the new installation meets AS/NZS 3500 standards for backflow prevention and wall penetration sealing.
Frost-proof hose bib installation involves cutting and re-routing the supply line so the valve seat sits inside the wall cavity. This requires soldering or push-fit connections, correct pipe slope for drainage, and sometimes opening the wall lining. Our licensed plumbers complete the job in a few hours, test for leaks under full pressure, and leave your wall neatly patched and painted if required.
Same-day service across Sydney means you don’t wait days for a quote or weeks for a repair slot. Call us at 0493 824 176 and we’ll send a qualified plumber to diagnose the leak, explain your options with upfront pricing, and complete the work on the spot whenever possible. No call-out fee from 7 am to 3 pm on weekdays, and our lifetime labor warranty backs every installation.
Real-World Example: Inner West Homeowner Saves Wall from Frost Damage
Sarah in the Inner West noticed a damp patch on her laundry wall one winter morning. The outdoor hose bib on the other side had been dripping for weeks, but she assumed it was just a worn washer. When the cold snap hit, the trapped water in the connected garden hose reel froze overnight, cracking the hose bib body and pushing water into the wall cavity.
Our plumber arrived the same day, shut off the supply, and removed the failed tap. Inspection revealed the original fitting was a basic non-frost-proof model installed 15 years earlier with minimal thread sealant. We replaced it with a brass frost-proof hose bib featuring an integral vacuum breaker, re-sealed the wall penetration with marine-grade silicone, and advised Sarah to disconnect hoses before winter and drain the line.
The damp patch dried out over the following week with no mold development, and Sarah now winterizes her outdoor taps every May. The new hose bib has performed flawlessly through two winters, and she’s confident her wall is protected. Total time on site was under two hours, with a fixed-rate quote provided before work began.
How Hose Bib Leaks Relate to Other Plumbing Issues
A leaking shower hose inside the bathroom and a hose bib leaking from the wall outside share common failure modes: worn washers, cracked fittings, and poor thread seals. Both benefit from the same preventive steps—regular inspection, gentle handling, and timely replacement of rubber components.
If your shower hose is leaking at the handset connection, the internal cone washer has likely perished. Swapping it takes minutes and costs cents. But if water seeps from the hose itself or the wall bracket, you’re looking at a split hose or a failed wall elbow, much like the hose bib scenario. We carry a range of quality hoses and fittings on every van, so repairs happen on the first visit.
Weeper hoses and soaker hoses used in garden beds can also cause confusion. These intentionally leak water along their length, but if you see pooling at the hose bib connection, check that the hose bib washer isn’t deformed and that you haven’t overtightened the coupling. A dripping connection wastes water and can backfill the hose bib with soil particles, damaging the valve seat over time.
Compliance and Safety Considerations for Hose Bib Replacement
Any work that involves cutting or joining water supply pipes in New South Wales requires a licensed plumber. Installing or replacing a hose bib falls under this rule, especially when backflow prevention devices are involved. Our team holds current licensing under NSW Fair Trading (Lic: 210933C) and follows AS/NZS 3500 plumbing standards for all installations.
Backflow prevention is critical when hose bibbs connect to garden hose reels, sprinkler systems, or weeper hoses. Without a vacuum breaker or non-return valve, a sudden drop in mains pressure can siphon contaminated water back into your drinking supply. Modern hose bibbs include an integral atmospheric vacuum breaker that opens to admit air if back-siphonage starts, protecting your household and the wider water network.
Wall penetrations must be sealed to prevent water ingress and pest entry. We use flexible sealants that accommodate thermal movement and won’t crack over time. If the hose bib passes through brick veneer, we install a proper flashing sleeve and ensure the escutcheon plate sits flat against the finished surface.
Our work is documented with photos before and after, and we provide a compliance statement for any new backflow device installation. You receive a lifetime labor warranty on our workmanship, so if a joint we’ve made ever leaks due to faulty installation, we’ll return and fix it at no charge.
Cost and Timing for Hose Bib Leak Repairs
Repair costs vary depending on whether you need a simple washer swap or a full frost-proof replacement with wall re-sealing. We provide upfront fixed-rate pricing after diagnosing the issue, so you know the total before we start. No hidden fees, no hourly rate surprises.
A basic washer and packing replacement on an accessible hose bib typically takes 30–45 minutes. If we need to replace the entire unit, allow 1–2 hours including shutoff, removal, thread preparation, installation, testing, and wall sealing. Frost-proof hose bib upgrades that require cutting the supply pipe and opening the wall may take 2–3 hours, with additional time if building repairs are needed.
Same-day service is our standard across the Inner West, Eastern Suburbs, North Shore, Northern Beaches, Hills District, and Western Sydney. Call us before 3 pm on a weekday and we’ll aim to have a plumber at your door within hours, with no call-out fee. For after-hours or weekend emergencies, our 24/7 team is ready at 0493 824 176, with transparent pricing for out-of-hours work.
We use quality brass and stainless fittings from trusted suppliers, not cheap hardware-store imports that corrode in months. Parts are included in our fixed quote, and we carry common sizes on every van to avoid delays. If your hose bib is an unusual thread size or you want a specific finish to match your home’s exterior, we’ll source it and schedule a return visit, keeping you informed every step of the way.
Why Choose Our Team for Hose Bib Repairs and Replacement
We’ve spent over 25 years diagnosing and fixing leaks across Sydney, from simple tap washers to complex pipe relining projects. A hose bib leaking from the wall might seem minor, but it can signal bigger issues—frost damage, corroded supply lines, or inadequate backflow protection. We don’t just swap parts; we investigate the root cause and recommend solutions that prevent repeat failures.
Every job is completed to Australian Standards, with licensed plumbers who understand Sydney’s building codes, water pressure variations, and seasonal challenges. We explain your options in plain English, provide fixed-rate quotes before starting work, and respect your property by cleaning up thoroughly. Our lifetime labor warranty means you’re covered long after we leave, giving you confidence in the repair.
From blocked drains and CCTV inspections to hot water installations and bathroom renovations, we’re a one-stop solution for residential and commercial plumbing. Whether you manage a strata block on the North Shore or own a café in the Eastern Suburbs, we deliver the same prompt, professional service. Same-day response, upfront pricing, and no call-out fee from 7 am to 3 pm weekdays make it easy to get help when you need it.
If your hose bib is leaking from the wall, don’t wait for the problem to spread. Call us at 0493 824 176 or book online for a fast quote and expert repair. We’ll protect your home, save you water, and give you peace of mind with work that’s done right the first time.
Conclusion
A hose bib leaking from the wall is a clear sign that the pipe connection, valve body, or wall seal has failed. Frost damage, worn threads, and improper installation are the usual culprits. Professional diagnosis and replacement ensure your outdoor tap works reliably and your home stays dry.
Antons Plumbing & Gas fixes hose bib leaks across Sydney Metro with expert leak detection and tap repairs. Our licensed team provides same-day service with upfront pricing and lifetime labour warranty. Get started today at 0493 824 176.
Related Articles
- Garbage Disposal in Shower Drains: Common Myths and Facts
- How to Remove a Stuck Shower Faucet Plastic Insert Safely
- Apartment Valve Moves When Neighbor Uses Water: What It Means
FAQs
What Causes A Hose Bib To Leak From The Wall?
A hose bib can leak from the wall due to various reasons, including worn washers, loose connections, or corrosion within the plumbing. Over time, changes in temperature can also cause materials to expand and contract, leading to leaks. At Antons Plumbing & Gas, our 25 years of experience enables us to accurately diagnose and address these issues.
How Do You Fix A Leaking Hose Bib From The Wall?
To fix a leaking hose bib, you may need to tighten loose connections, replace worn washers, or, in more severe cases, replace the entire hose bib. It’s best to consult a licensed plumber like those at Antons Plumbing & Gas, who can ensure the repair is done correctly and safely.
Can A Hose Bib Leak Cause Water Damage?
Yes, a leaking hose bib can cause water damage if left unaddressed. Continuous leaks can lead to mold growth, structural damage, and increased water bills. Our team at Antons Plumbing & Gas can quickly assess the situation and provide reliable solutions to prevent further damage.
Is It Normal For A Hose Bib To Leak?
While some minor dripping may occur, it’s not normal for a hose bib to leak continuously. Persistent leaks indicate an underlying issue that needs attention. With our expertise, we can identify the cause and provide effective repairs to ensure your hose bib operates properly.
How Do You Replace A Hose Bib That Is Leaking?
Replacing a leaking hose bib typically involves shutting off the water supply, removing the old bib, and installing a new one. This process can be complex, and we recommend seeking assistance from Antons Plumbing & Gas to ensure the replacement is done safely and up to code.