A dripping faucet after you’ve turned it off is more than a minor annoyance. It wastes water, drives up your bill, and signals that something inside your tap has worn out or shifted. Most homeowners notice the steady drip-drip-drip in the kitchen sink or bathroom basin, especially at night when the house is quiet. That sound is your plumbing asking for attention before a small leak becomes a bigger repair job.
This guide explains the root causes of why a faucet drips when turned off, walks you through the internal parts that fail, and shows you what to do next. You’ll learn which components to check, when a DIY fix makes sense, and when to call a licensed plumber for a fast, compliant repair.
Key Takeaways
- A dripping water faucet usually means a worn washer, O-ring, cartridge, or valve seat inside the tap body.
- Even a slow drip can waste thousands of litres per year and push up your water bill.
- Compression, cartridge, ball, and ceramic-disc taps each have different internal designs and repair steps.
- Fixing a leaking tap faucet early prevents water damage to cabinetry, benchtops, and flooring.
- Licensed Sydney plumbers diagnose the exact cause, supply quality parts, and back repairs with a lifetime labour warranty.
What Causes a Faucet to Drip When Turned Off
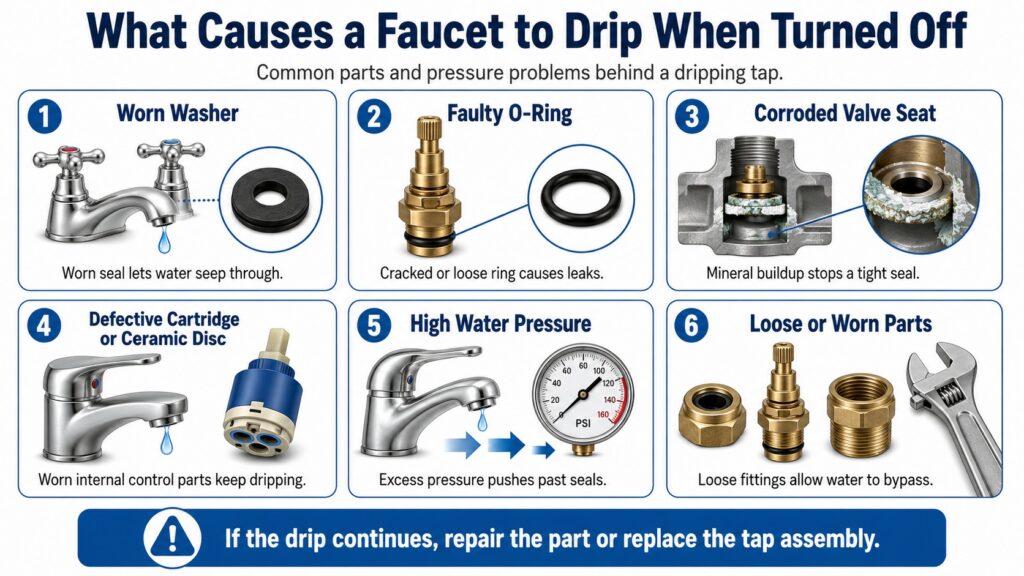
When you twist the handle to the off position, internal components should form a watertight seal that stops flow completely. If water continues to escape, one or more of those sealing parts has degraded, shifted, or corroded. The most common culprits are washers, O-rings, cartridges, and valve seats. Each plays a specific role in controlling water flow, and each wears out over time due to friction, mineral deposits, or water pressure.
Understanding which part has failed helps you decide whether to replace a single component or upgrade the entire tap assembly. Below are the primary causes of a dripping kitchen faucet or sink faucet after shutoff.
Worn or Damaged Washer
Compression taps rely on a rubber or fibre washer that presses against the valve seat every time you close the handle. Constant friction wears the washer down, creating gaps that let water seep through. You’ll often see this in older double-handle taps where each handle controls hot or cold independently. Replacing the washer is straightforward if you have the right size and a few basic tools.
Faulty O-Ring
O-rings sit around the stem or cartridge and keep water from leaking out of the handle assembly. When an O-ring cracks, hardens, or slips out of its groove, water drips from the base of the handle or spout. This type of leak is common in cartridge and ball-type taps. A quick O-ring swap usually solves the problem, but you need to match the diameter and thickness exactly.
Corroded Valve Seat
The valve seat connects the faucet body to the spout. Mineral buildup and corrosion can roughen the seat surface, preventing the washer from sealing properly. If you’ve replaced the washer but the drip persists, the valve seat is the likely cause. Cleaning or resurfacing the seat with a valve-seat wrench can restore the seal, but badly pitted seats need replacement.
Defective Cartridge or Ceramic Disc
Modern single-lever taps use a cartridge or ceramic-disc assembly to control temperature and flow. When the cartridge seals wear out or the ceramic discs crack, water leaks even when the handle is off. These assemblies are more durable than washers, but they do fail after years of use. Swapping the cartridge is usually faster than repairing individual seals inside it.
High Water Pressure
Excessive mains pressure can force water past seals that would otherwise hold. Sydney water pressure typically sits between 350 and 500 kPa, but some areas see spikes above 600 kPa. If your tap drips only at certain times of day, pressure fluctuations may be the trigger. Installing a pressure-limiting valve protects all your taps and appliances from stress.
Loose or Worn Parts
Over time, the packing nut, adjusting ring, or stem assembly can loosen, allowing water to bypass seals. Tightening these components may stop the drip temporarily, but if threads are stripped or parts are corroded, replacement is the permanent fix. Regular use and vibration from water hammer can accelerate wear on these fittings.
How Different Tap Faucet Designs Affect Repairs
Not all taps are built the same way. The internal mechanism determines which parts you’ll need and how you’ll access them. Knowing your tap type saves time and helps you order the correct spare parts. Most residential taps fall into one of four categories, each with its own repair pathway.
1. Compression Taps
These are the traditional two-handle designs found in many older Sydney homes. Each handle operates a separate stem that compresses a washer onto the valve seat. When the washer wears out, the tap drips. Repairs involve removing the handle, unscrewing the stem, and replacing the washer and O-ring. Parts are inexpensive and widely available at hardware stores like Bunnings.
2. Cartridge Taps
Single-lever and some double-handle taps use a cartridge to control flow and temperature. The cartridge contains internal seals that open and close water passages. When those seals fail, you’ll see drips or difficulty adjusting temperature. Cartridge replacement is the standard fix. You’ll need to identify the tap brand and model to source the correct cartridge, as they are not universal.
3. Ball Taps
Ball-type taps have a single lever that pivots a slotted ball inside the body. Springs, seals, and O-rings surround the ball to control water flow. These taps are less common in Australia but still appear in some kitchens. Repair kits include all the small parts you need, but reassembly requires patience. Misaligned springs or seals will cause drips even after a rebuild.
4. Ceramic-Disc Taps
These taps use two ceramic discs that slide over each other to regulate flow. They’re durable and long-lasting, but mineral deposits or cracks in the discs will cause leaks. Cleaning the discs with vinegar can sometimes restore the seal, but cracked discs require a full cartridge replacement. Ceramic-disc taps are popular in modern Sydney renovations for their smooth operation and reliability.
Step-by-Step Guide to Fixing a Dripping Faucet
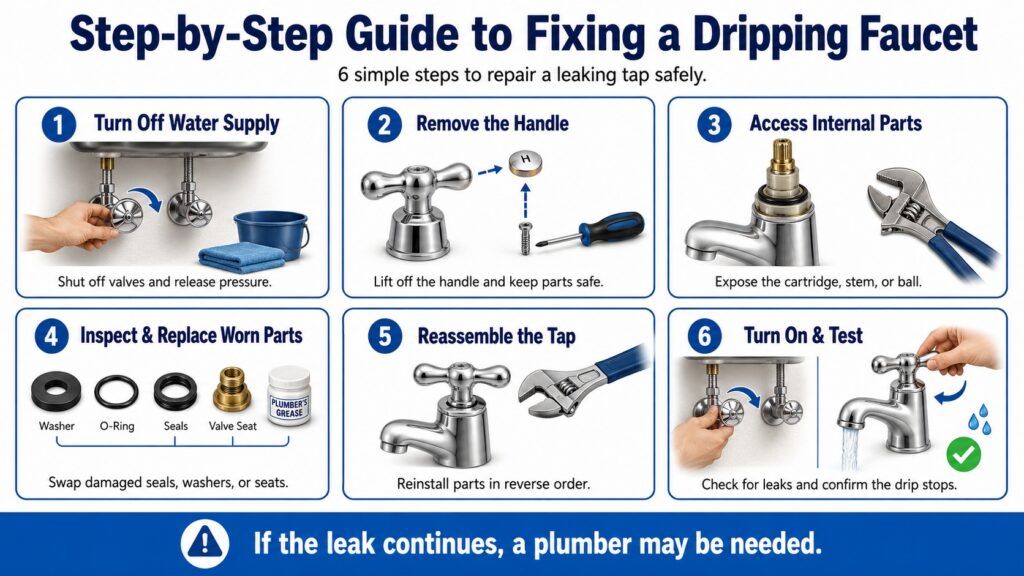
If you’re comfortable with basic tools and have identified the tap type, you can attempt a repair yourself. The process varies by design, but the general workflow is similar. Always turn off the water supply at the isolation valve under the sink before you start, and have a bucket and towel ready to catch residual water.
1. Turn Off the Water Supply
Locate the isolation valves under the sink and turn them clockwise until they stop. Open the tap to release any remaining pressure and water in the lines. If your sink lacks isolation valves, you’ll need to shut off the mains or call a plumber to install valves before proceeding.
2. Remove the Handle
Most handles are secured by a small screw hidden under a decorative cap or button. Pry off the cap with a flat-head screwdriver, then unscrew the handle screw. Lift the handle straight up. Some lever handles have a set screw on the side or base. Keep screws and caps in a container so you don’t lose them.
3. Access the Cartridge, Stem, or Ball Assembly
For compression taps, unscrew the packing nut with an adjustable wrench, then pull out the stem. For cartridge taps, remove the retaining clip or nut and pull the cartridge straight up with pliers. Ball taps require you to unscrew the cap and collar to expose the ball and seals. Take a photo before disassembly to help with reassembly.
4. Inspect and Replace Worn Parts
Check the washer, O-rings, seals, and valve seat for wear, cracks, or mineral buildup. Replace any damaged components with exact matches. Coat new O-rings with plumber’s grease to ease installation and extend their life. If the valve seat is corroded, use a valve-seat wrench to remove and replace it, or call a plumber if you’re unsure.
5. Reassemble the Tap
Reverse the disassembly steps, ensuring each part is seated correctly. Tighten the packing nut or retaining clip by hand first, then snug it with a wrench without over-tightening. Reattach the handle and secure the screw. Replace the decorative cap.
6. Turn On the Water and Test
Open the isolation valves slowly and check for leaks around the base and spout. Turn the tap on and off several times to confirm the drip has stopped. If water still leaks, double-check that all seals are in place and the valve seat is clean. Persistent drips suggest a part you missed or a more complex issue inside the tap body.
When to Call a Licensed Plumber for a Leaking Tap Faucet
DIY repairs work well for simple washer or O-ring replacements, but some situations call for professional help. If you’ve replaced parts and the drip continues, the problem may lie deeper in the tap body or supply lines. Corroded valve seats, stripped threads, or incompatible replacement parts can turn a quick fix into a frustrating cycle of trial and error.
We diagnose the root cause on the first visit, supply quality parts that match Australian Standards, and complete the repair with a lifetime labour warranty. Same-day service means you won’t wait days for a callback, and our fixed-rate pricing gives you cost clarity before work begins.
- Persistent drips after part replacement: The valve seat, cartridge housing, or tap body may be damaged beyond a simple seal swap.
- Multiple taps leaking: High water pressure or a problem with your mains supply could be affecting every fixture in your home.
- Corrosion or mineral buildup: Heavily scaled taps may need professional cleaning or replacement to restore a proper seal.
- Leaks from the base or handle: Water escaping from areas other than the spout indicates failed O-rings, loose fittings, or cracks in the tap body.
- Uncertainty about tap type or parts: If you can’t identify the cartridge model or don’t have the tools to remove it, a plumber can source and install the correct component.
- Water damage concerns: If the drip has stained cabinetry, warped benchtops, or pooled under the sink, you need a full assessment to prevent mould and structural issues.
Our team arrives with a van stocked with common tap parts, cartridges, and tools. We test water pressure, inspect supply lines, and explain your options in plain English. If a tap is beyond economical repair, we’ll recommend a replacement that suits your budget and style, installed to AS/NZS 3500 plumbing standards.
The Hidden Costs of Ignoring a Dripping Water Faucet
A single dripping tap can waste more than 20,000 litres per year if the drip rate is one drop per second. That’s enough to fill a small swimming pool and adds hundreds of dollars to your water bill. Beyond the financial hit, constant moisture around the sink creates conditions for mould growth, timber rot, and damage to cabinetry and benchtops.
Ignoring a drip also accelerates wear on other tap components. A worn washer puts extra stress on the valve seat, and a corroded valve seat damages new washers faster. What starts as a five-minute repair can escalate into a full tap replacement if left too long. Early action saves money, water, and the hassle of emergency repairs.
| Drip Rate | Litres Wasted per Year | Approx. Cost (Sydney Water Rates) |
|---|---|---|
| 1 drip/second | 20,000 L | $40–$60 |
| 10 drips/minute | 3,000 L | $6–$10 |
| Steady trickle | 50,000+ L | $100–$150+ |
Water damage to cabinetry and flooring can run into thousands of dollars if moisture seeps through joins and swells particle board or warps timber. Mould remediation adds further cost and disruption. Fixing the drip as soon as you notice it protects your home and your wallet.
Choosing Quality Tap Parts and Brands
Not all replacement washers, O-rings, and cartridges are created equal. Generic kits from discount bins may fit loosely or degrade faster than original equipment. When you replace parts, match the brand and specifications of your existing tap whenever possible. Major tap brands sold in Australia include Methven, Caroma, Dorf, and Milli. Each has specific cartridge designs that are not interchangeable.
If you’re unsure which parts to buy, bring the old cartridge or washer to a plumbing supplier or hardware store. Staff can match the size and thread pitch. For ceramic-disc and cartridge taps, check the manufacturer’s website for exploded diagrams and part numbers. Using the correct parts the first time avoids repeat trips to the store and ensures a watertight seal.
We stock genuine and high-quality aftermarket parts for common tap brands. Our suppliers meet Australian Standards for materials and performance, so you get a repair that lasts. If a part is obsolete or unavailable, we’ll recommend a modern replacement tap that fits your existing sink holes and plumbing.
Preventive Maintenance to Stop Future Drips
Regular maintenance extends the life of your taps and reduces the chance of sudden leaks. Simple habits and periodic checks catch wear before it turns into a drip. Most preventive tasks take only a few minutes and require no special tools.
- Clean aerators and filters: Mineral deposits clog aerators and increase back-pressure on seals. Unscrew the aerator every few months, rinse it under water, and soak it in vinegar if scale is present.
- Check for leaks around the base: Wipe the base of the tap and the sink deck after use. Moisture or water pooling indicates a failing O-ring or loose connection.
- Avoid over-tightening handles: Forcing a tap closed damages washers and valve seats. Turn the handle just until water stops, not beyond.
- Test water pressure: If taps are hard to turn or water sprays forcefully, your pressure may be too high. A pressure-limiting valve protects all fixtures and appliances.
- Replace washers and O-rings proactively: If your tap is more than ten years old, consider replacing seals during a bathroom or kitchen refresh, even if no drip is present.
We offer tap inspections as part of routine plumbing maintenance visits. During a service call for another issue, we can check all your taps, test pressure, and flag any parts nearing the end of their life. Proactive repairs cost less than emergency callouts and prevent water waste.
Common Mistakes When Repairing a Sink Faucet
DIY tap repairs are achievable, but a few common errors can turn a simple job into a bigger problem. Knowing what to avoid saves time, money, and frustration. Here are the pitfalls we see most often when homeowners attempt their own fixes.
Using the Wrong Size Washer or O-Ring
A washer that’s too small won’t seal, and one that’s too large will compress unevenly or jam the stem. Measure the old washer’s diameter and thickness, or take it to the store for a match. Generic assortment packs rarely include every size you need.
Over-Tightening the Packing Nut
Excessive force can crack the tap body, strip threads, or crush O-rings. Tighten by hand until snug, then give it a quarter turn with a wrench. If the tap still drips, the issue is not tightness but a faulty seal or damaged valve seat.
Forgetting to Turn Off the Water
Skipping this step floods your kitchen or bathroom the moment you remove the handle. Always close the isolation valves and open the tap to release pressure before disassembly.
Mixing Up Hot and Cold Cartridges
Some double-handle taps use different cartridges for hot and cold sides. Installing them in the wrong position reverses temperature control or causes leaks. Label each cartridge as you remove it, or take a photo.
Ignoring Mineral Buildup
Cleaning the valve seat and cartridge housing removes scale that prevents a tight seal. A quick scrub with vinegar and a soft brush can make the difference between success and a persistent drip.
Reusing Old Seals
Even if an O-ring looks intact, it has likely hardened or lost its shape. Always replace seals when you have the tap apart. The cost is minimal, and new seals ensure a watertight result.
Why Antons Plumbing & Gas Is Your Best Choice for Tap Repairs in Sydney
When a dripping tap faucet disrupts your routine or racks up your water bill, you need a plumber who arrives on time, diagnoses accurately, and fixes it right the first time. We’ve spent more than 25 years solving tap leaks, burst pipes, and complex plumbing issues across the Sydney Metro. Our team holds current NSW licensing (Lic: 210933C), carries quality parts, and backs every repair with a lifetime labour warranty.
We serve the Inner West, Eastern Suburbs, North Shore, Northern Beaches, Hills District, Western and South-Western Sydney, and Sutherland Shire. Same-day service and 24/7 emergency response mean help is always a phone call away at 0493 824 176. No call-out fee from 7 am to 3 pm on weekdays, and fixed-rate pricing gives you cost certainty before we start.
Our process is simple: we listen to your concern, inspect the tap and supply lines, explain what’s failed and why, and present clear options with upfront pricing. If you choose to proceed, we complete the work on the spot when parts are in stock, test the repair, and clean up before we leave. You get a written summary of the work, any compliance documentation, and our contact details for follow-up questions.
From a single dripping kitchen faucet to a full bathroom renovation, we treat every job with the same care and precision. Our vans carry common tap cartridges, washers, O-rings, and tools, so most repairs finish in one visit. If a tap is beyond repair, we’ll recommend a replacement that suits your style and budget, installed to Australian Standards.
Call 0493 824 176 or book online for fast, reliable tap repairs across Sydney. We’re here to stop the drip, save your water, and protect your home.
Conclusion
A faucet that drips when turned off is a clear signal that internal seals, washers, or cartridges have worn out. Fixing the leak early stops water waste, lowers your bill, and prevents damage to cabinetry and flooring. For fast, licensed repairs backed by a lifetime labour warranty, contact our team today.
Antons Plumbing & Gas offers expert tap repairs to fix persistent drips fast. Our licensed team diagnoses the root cause and restores your faucet properly. Contact us today to get started.
Related Articles
- How to Tell if a Pipe is Leaking in Your Wall: Simple Signs
- Pipe Leaking Under Kitchen Sink? Signs You Need a Plumber
- DIY Plumbing Repair Mistakes Homeowners Should Check
FAQs
What Causes A Faucet To Drip When Turned Off?
A faucet may drip when turned off due to worn-out washers, O-rings, or seals, which can prevent a proper seal. Mineral buildup or corrosion in the faucet can also contribute to leaks. Our experienced team at Antons Plumbing & Gas can quickly diagnose the issue and recommend the best solution.
How Do You Fix A Dripping Faucet?
To fix a dripping faucet, you typically need to replace the worn components, such as washers or O-rings. This may involve disassembling the faucet and reassembling it with new parts. For a hassle-free experience, consider calling our skilled professionals who can efficiently handle the repair for you.
Is A Dripping Faucet A Sign Of A Bigger Problem?
A dripping faucet can be a sign of a larger plumbing issue, such as increased water pressure or deterioration in your plumbing system. If you notice persistent dripping, it’s wise to consult our experts at Antons Plumbing & Gas to assess the situation and prevent potential damage.
Can A Dripping Faucet Waste A Lot Of Water?
Yes, a dripping faucet can waste a significant amount of water over time, leading to higher water bills and unnecessary waste. Addressing the issue promptly with our professional plumbing services can help conserve water and save you money.
How Much Does It Cost To Repair A Dripping Faucet?
The cost to repair a dripping faucet can vary based on the complexity of the repair and the parts needed. At Antons Plumbing & Gas, we provide upfront pricing and a commitment to quality, ensuring you understand the costs involved before we begin any work.