Standing water in your yard after heavy rain can damage foundations, kill grass, and create breeding grounds for mosquitoes. Installing drainage pipe helps redirect excess water away from problem areas, protecting your property and keeping outdoor spaces usable year-round. While some homeowners tackle this project themselves, understanding the process—and knowing when to call a licensed plumber—can save time, money, and future headaches.
This guide walks you through the basics of yard drainage pipe installation, from planning your trench to choosing the right materials. You’ll learn practical steps, common mistakes to avoid, and when a professional assessment makes sense for Sydney properties with clay soils, tree roots, or complex stormwater requirements.
Key Takeaways
- Proper slope—at least 1% grade (1 inch drop per 10 feet)—is essential for gravity-fed drainage to work correctly.
- Perforated pipe with holes facing downward sits on gravel, wrapped in filter fabric to prevent soil clogging.
- Trenches typically need to be 18–24 inches deep and 9–12 inches wide for effective residential drainage.
- Outlet points must discharge to daylight, retention ponds, or council-approved stormwater systems, not neighbouring properties.
- Licensed plumbers in Sydney can assess root intrusion, clay pipe compatibility, and compliance with AS/NZS 3500 plumbing standards.
Understanding How to Install Drainage Pipe in Yard
Yard drainage systems work by capturing surface water and channelling it through perforated pipe surrounded by gravel. Gravity pulls water into the pipe through small holes or slots, then carries it downhill to an approved outlet. The system relies on three elements: correct slope, adequate gravel bedding, and a clear discharge point that won’t flood neighbouring land or violate local stormwater rules.
Before you dig, check with your local council about permits and stormwater connection requirements. Sydney councils often have specific rules about where you can discharge water, especially in flood-prone areas or heritage zones. Dial Before You Dig (1100) to locate underground utilities—hitting a gas line, water main, or electrical cable can be dangerous and expensive.
You might be wondering whether to use PVC or corrugated flexible pipe. PVC offers better durability and smoother interior walls that resist sediment buildup, while flexible corrugated pipe bends around obstacles more easily. For most residential French drains, rigid PVC with pre-drilled holes provides reliable long-term performance, though corrugated options work well for shorter runs or tight curves.
Step-by-Step Process for How to Install Outdoor Drainage Pipe
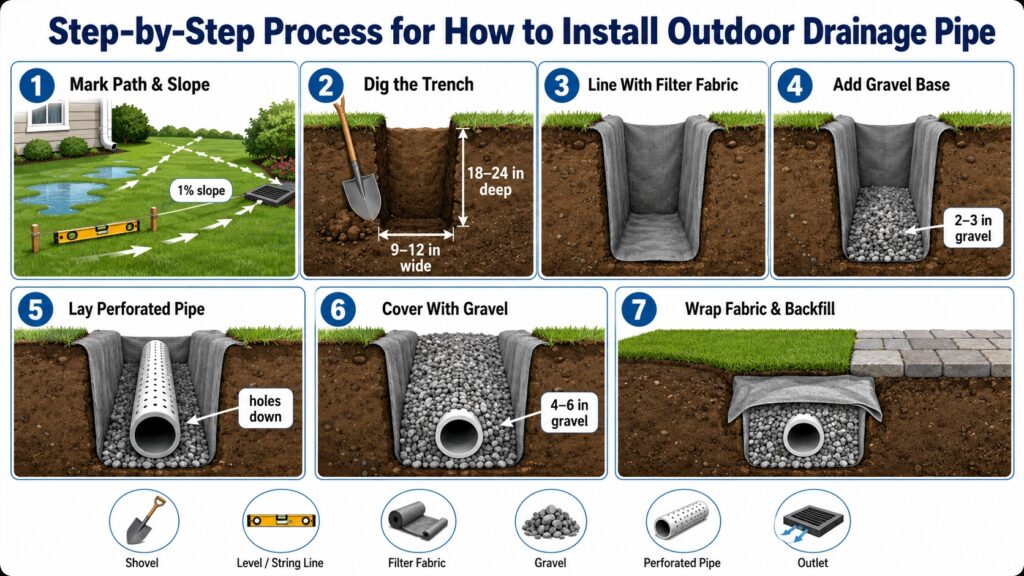
Installing outdoor drainage pipe involves careful planning, precise excavation, and layered materials that filter water while preventing soil from clogging the system. Each step builds on the last, so taking time to measure slope and prepare the trench pays off in a system that works for years. Skipping steps or rushing the gravel layer often leads to poor drainage or pipe collapse.
The process below outlines a typical residential French drain installation. Adjust depths and widths based on your soil type, rainfall intensity, and local building codes.
1. Mark Your Drainage Path and Measure Slope
Walk your yard after heavy rain to identify where water pools or flows. Mark the starting point (usually the lowest or wettest spot) and trace a path to your chosen outlet—a garden bed, roadside kerb, or existing stormwater drain. Use string lines and a line level or laser level to confirm at least 1% slope along the entire route. One percent means the pipe drops 1 inch for every 10 feet of horizontal distance. If your yard is flat, you may need to dig deeper at the outlet end or choose a different discharge location.
2. Dig the Trench to Proper Depth and Width
Excavate a trench 18–24 inches deep and 9–12 inches wide, following your marked path. Keep the bottom as smooth and evenly sloped as possible—high spots or dips create standing water inside the pipe. Remove rocks, roots, and debris as you go. In Sydney’s clay soils, digging can be tough; a mattock or narrow trenching shovel helps. If you encounter large tree roots, consider whether cutting them will harm the tree or if pipe relining techniques might offer a less invasive solution for existing drains.
3. Line the Trench with Filter Fabric
Lay geotextile filter fabric (also called landscape fabric) along the bottom and up both sides of the trench, leaving enough overhang to wrap over the top later. This fabric lets water pass through while blocking fine soil particles that would otherwise clog the gravel and pipe holes. Overlap seams by at least 6 inches and avoid cheap woven tarps—they tear easily and don’t filter properly.
4. Add a Gravel Base Layer
Pour 2–3 inches of clean gravel (10–20 mm diameter) onto the fabric at the trench bottom. Spread it evenly and check that the slope remains consistent. This gravel layer cushions the pipe, provides initial filtration, and creates a reservoir for water to enter the perforations. Crushed rock with angular edges locks together better than smooth river pebbles, reducing settling over time.
5. Lay Perforated Pipe with Holes Facing Down
Place your perforated drainage pipe on the gravel bed with the holes or slots pointing downward. This orientation prevents sediment from falling directly into the pipe while still allowing water to seep up from the gravel. Connect pipe sections with couplings or glued fittings (for PVC), ensuring each joint is secure and maintains the overall slope. If you’re installing catch basins for downspouts or paved areas, connect them now using solid (non-perforated) pipe between the basin and the perforated drain line.
6. Surround the Pipe with More Gravel
Cover the pipe with another 4–6 inches of gravel, filling the trench to within a few inches of ground level. The gravel jacket around the pipe creates a porous zone where water can flow freely before entering the perforations. Pack lightly by hand or with a tamper—don’t compact so hard that you crush flexible pipe or shift the slope.
7. Wrap Fabric Over the Gravel and Backfill
Fold the overhanging filter fabric over the top gravel layer, overlapping edges to form a complete envelope. This cap prevents topsoil from washing down into the gravel. Backfill the remaining trench depth with excavated soil (remove large clods and rocks first) and tamp gently. Top with sod, mulch, or pavers to match your landscaping. Water the area thoroughly to settle the soil and test that water flows toward the outlet without pooling.
Choosing the Right Materials for How to Install Drainage Pipe with Holes
Material selection affects system lifespan, ease of installation, and maintenance needs. Perforated pipe comes in several types, each suited to different soil conditions and budget constraints. Gravel size, fabric quality, and fitting types also influence performance, so it’s worth comparing options before you buy.
| Material | Pros | Cons | Best Use |
|---|---|---|---|
| Rigid PVC (perforated) | Durable, smooth interior, resists crushing, easy to glue | Less flexible, requires more fittings for curves | Long straight runs, high-traffic areas |
| Corrugated flexible pipe | Bends around obstacles, faster to lay, lower cost | Ridges trap sediment, can collapse under weight | Short runs, garden beds, light-duty drainage |
| Slotted ag pipe | Continuous slots for high flow, flexible | Slots can admit fine soil, requires good fabric wrap | Agricultural or large-area drainage |
| Solid PVC (non-perforated) | No holes to clog, ideal for conveyance | Doesn’t collect water along length | Connecting catch basins to main drain line |
Gravel should be clean, angular, and free of sand or clay fines. A 10–20 mm crushed rock mix provides good drainage and structural support. Avoid using builder’s sand or decomposed granite—they pack too tightly and reduce water flow. Filter fabric must be non-woven geotextile rated for drainage applications; landscape weed mat from the garden centre often lacks the right pore size and strength.
Fittings and connectors depend on your pipe type. PVC systems use solvent-weld couplings, elbows, and tees for permanent joints. Corrugated pipe relies on snap-together couplings or hose clamps, which can loosen over time. If you’re connecting to an existing stormwater pit or council main, check whether you need an approved adaptor or tradie certification—Sydney Water and local councils enforce strict rules on unauthorised connections.
Common Mistakes When Installing Yard Drainage Pipe
Even experienced DIYers can overlook details that compromise drainage performance. Small errors in slope, fabric placement, or outlet design often don’t show up until the next heavy rain, when water backs up or the system fails to drain properly. Knowing what to avoid saves rework and prevents damage to your property.
- Insufficient slope: A flat or reverse-sloped trench leaves water sitting in the pipe, which can freeze in winter (less common in Sydney but possible in the Blue Mountains) or breed mosquitoes. Always verify slope with a level before laying pipe.
- Holes facing up: Perforations on top let soil fall directly into the pipe, clogging it quickly. Flip the pipe so holes face downward or sideways, depending on the manufacturer’s design.
- Skimping on gravel: A thin gravel layer or using the wrong aggregate reduces the system’s ability to capture and move water. Aim for at least 6 inches of gravel around the pipe.
- Forgetting filter fabric: Without fabric, fine soil migrates into the gravel and pipe, clogging perforations within a year or two. Wrap the entire gravel envelope, not just the pipe.
- Poor outlet placement: Discharging onto a neighbour’s land, into a stormwater system without approval, or onto a steep slope that erodes can create legal and environmental problems. Confirm your outlet complies with local rules.
- Ignoring existing utilities: Cutting through power, gas, or water lines is dangerous and expensive. Always call Dial Before You Dig (1100) at least two business days before starting.
Another common issue in Sydney is underestimating clay soil behaviour. Clay expands when wet and shrinks when dry, which can shift pipe alignment or crack rigid fittings over time. If your yard has heavy clay, consider flexible joints or consult a plumber about soil stabilisation options. We’ve repaired many DIY drains where clay movement caused pipes to sag or separate, leading to pooling water and soggy lawns.
When to Call a Licensed Plumber for Drainage Work
Some drainage projects are straightforward enough for a capable homeowner with basic tools. Others involve complex site conditions, council approvals, or connections to public stormwater systems that require licensed tradies and compliance documentation. Knowing the difference helps you avoid fines, failed inspections, or systems that don’t work.
Call a licensed plumber if your project involves any of the following:
- Connecting to council stormwater drains or Sydney Water assets
- Installing drainage near or under building foundations
- Dealing with tree roots that have invaded existing pipes
- Working in flood-prone areas or on sloping sites with erosion risk
- Needing CCTV drain inspection to diagnose blockages or damage
- Replacing old clay or earthenware pipes with modern materials
- Obtaining permits or compliance certificates for strata, council, or insurance
At Antons Plumbing & Gas, we handle drainage assessments and installations across Sydney Metro—from simple French drains in backyard garden beds to complex stormwater tie-ins under driveways and footpaths. Our team uses CCTV cameras to inspect existing lines, acoustic leak detection to find hidden problems, and pipe relining to repair damaged drains without digging up your entire yard. Every job meets AS/NZS 3500 plumbing standards, and we provide clear documentation for council or strata sign-off.
We also offer same-day service for urgent drainage issues—blocked pits, overflowing grates, or sudden pooling that threatens your foundation. No call-out fee applies for weekday bookings between 7 am and 3 pm, and our 24/7 emergency line (0493 824 176) is always available when you need help fast. Because we’re licensed (Lic: 210933C) and insured, you get peace of mind that the work is compliant, safe, and backed by our lifetime labour warranty.
Maintaining Your Yard Drainage System
A well-installed drainage pipe can last decades with minimal maintenance, but periodic checks keep it flowing freely. Leaves, silt, and root intrusion can gradually reduce capacity, especially if your system drains large areas or sits under trees. Simple inspections and cleanouts prevent small blockages from becoming expensive repairs.
Once a year—ideally before the wet season—flush your drainage line with a garden hose inserted at the inlet or catch basin. Watch the outlet to confirm water flows freely and doesn’t back up. If flow is slow or stops, you may have a blockage from sediment, roots, or a collapsed section. Remove the grate from any catch basins and scoop out leaves, dirt, and debris. Check that the filter fabric hasn’t torn or shifted, exposing gravel to soil infiltration.
For systems with multiple inlets or long runs, consider a professional CCTV inspection every few years. A camera reveals cracks, root penetration, or sediment buildup that you can’t see from the surface. We perform CCTV drain inspections across Sydney, providing video footage and a written report that highlights any issues. If we find damage, we’ll explain your options—spot repair, full replacement, or pipe relining—with upfront pricing so you can decide what makes sense for your budget and timeline.
Comparing DIY Installation vs Professional Drainage Services
Deciding whether to install drainage pipe yourself or hire a licensed plumber depends on your skills, tools, site complexity, and tolerance for risk. A small garden drain in flat, sandy soil is manageable for most handy homeowners. A system that crosses under a driveway, connects to council infrastructure, or deals with reactive clay and tree roots often justifies professional help.
| Factor | DIY Installation | Professional Service |
|---|---|---|
| Cost | Materials only (pipe, gravel, fabric, tools) | Labour plus materials; varies by scope and site access |
| Time | Weekend project for simple runs; longer for complex sites | Typically completed in one day for standard residential drains |
| Compliance | Homeowner responsible for permits and approvals | Plumber handles council liaison, inspections, and certification |
| Warranty | No warranty on DIY work | Lifetime labour warranty on workmanship (materials covered by manufacturer) |
| Equipment | Shovels, level, wheelbarrow, basic hand tools | Excavators, CCTV cameras, boring machines, compaction gear |
| Risk | Utility strikes, incorrect slope, non-compliant outlets | Licensed, insured tradies with Dial Before You Dig clearance |
If you’re confident in your ability to maintain correct slope, source quality materials, and obtain any required permits, a DIY French drain can save money and give you hands-on satisfaction. Just be realistic about the physical effort—digging 20 metres of trench in clay soil is hard work, and mistakes can mean doing it twice. For anything involving council stormwater, building foundations, or underground utilities, the cost of professional installation is usually worth the assurance that it’s done right and meets legal requirements.
How Antons Plumbing & Gas Delivers Reliable Drainage Solutions

We’ve spent over 25 years solving drainage problems for Sydney homes, strata buildings, and local businesses. Our approach starts with a site assessment to understand your soil type, slope, existing infrastructure, and council requirements. We don’t offer one-size-fits-all solutions—every property is different, and we tailor our recommendations to your situation and budget.
When you call us for a drainage quote, we’ll arrange a same-day visit (subject to scheduling and location). Our plumber will inspect the problem area, check for underground utilities, and discuss your goals—whether that’s stopping a soggy lawn, protecting your foundation, or connecting a new downspout. We’ll explain your options in plain English, outline the steps involved, and provide upfront fixed-rate pricing so there are no surprises. If permits or council approvals are needed, we handle the paperwork and liaise with authorities on your behalf.
Our team uses quality materials from trusted suppliers and installs every system to AS/NZS 3500 standards. We bed pipes properly, verify slope with laser levels, and test flow before backfilling. For complex jobs—like boring under driveways or connecting to existing stormwater—we bring specialised equipment and the experience to get it right the first time. After we finish, we clean up thoroughly, leaving your property tidy and your drainage system ready for the next storm. All our work is backed by a lifetime labour warranty, so if a fitting fails or a joint leaks due to our workmanship, we’ll return and fix it at no charge.
We serve the entire Sydney Metro region: Inner West, Eastern Suburbs, North Shore, Northern Beaches, Hills District, Western and South-Western Sydney, and Sutherland Shire. Whether you need a simple garden drain, a full stormwater upgrade, or emergency help with a blocked pit, we’re available 24/7 at 0493 824 176. No call-out fee applies for weekday bookings between 7 am and 3 pm, and we charge fixed rates—not hourly—so you know the cost before we start.
Conclusion
Installing drainage pipe in your yard protects your home from water damage and keeps outdoor spaces dry and usable. With the right materials, careful planning, and attention to slope and outlet requirements, many homeowners can tackle a basic French drain project. For complex sites, council connections, or when you want the confidence of licensed, compliant work, calling a professional plumber saves time and reduces risk. If you’re ready to solve your drainage issue the right way, our team is here to help—same-day service, clear pricing, and workmanship you can trust for years to come.
Antons Plumbing & Gas brings over 25 years of expertise in blocked drains and pipe installations across Sydney. Our licensed team ensures compliant, long-lasting drainage solutions with upfront pricing and lifetime labour warranty. Get started with a trusted local plumber today.
Related Articles
- How to Install Yard Drainage: DIY vs Professional Solutions
- How to Build a Drainage System: Essential Tips for Homeowners
- 5 Common Mistakes to Avoid When Putting a Drain in Your Yard
FAQs
What Type Of Drainage Pipe Should I Use In My Yard?
The type of drainage pipe you should use depends on your specific needs. Common options include PVC pipes for surface water drainage, corrugated pipes for subsurface drainage, and perforated pipes for areas needing water filtration. Our team at Antons Plumbing & Gas can help you choose the best solution for your yard’s drainage needs based on our extensive experience.
How Deep Should I Bury Drainage Pipe?
Generally, drainage pipes should be buried at least 6 to 12 inches deep to ensure proper functionality and avoid potential damage. However, the ideal depth can vary based on your yard’s conditions and local regulations. Our skilled professionals can assess your property and recommend the best depth for your drainage installation.
Can I Install Drainage Pipe Myself?
While it is possible to install drainage pipe yourself, it requires proper knowledge and tools to ensure effective drainage and compliance with local regulations. Hiring professionals like Antons Plumbing & Gas can save you time and ensure the job is done right the first time, backed by our 25 years of experience.
What Is The Best Way To Install Drainage Pipe?
The best way to install drainage pipe involves planning the layout, digging a trench at the appropriate slope, placing the pipe, and backfilling with gravel for proper drainage. It’s essential to follow local guidelines and best practices. Our expert team can handle the entire process for you, ensuring efficiency and compliance.
How Do I Connect Drainage Pipes Together?
To connect drainage pipes, use appropriate fittings, such as couplings or adapters, ensuring a snug fit to prevent leaks. It’s crucial to ensure that all joints are sealed properly. If you’re unsure, our experienced technicians at Antons Plumbing & Gas can expertly connect your drainage pipes for optimal performance.