Standing water in your yard can damage foundations, kill grass, and turn your outdoor space into a muddy mess. Installing proper yard drainage protects your property and keeps your landscape healthy. But should you tackle the job yourself or call a licensed professional?
This guide walks you through the essentials of how to install yard drainage, compares DIY methods with professional solutions, and helps you decide which approach suits your situation. You’ll learn the steps, the tools, the risks, and when to pick up the phone.
Key Takeaways
- Yard drainage systems redirect water away from structures using trenches, pipes, and gravel.
- DIY installation can save money but requires physical effort, tools, and a solid understanding of slope and permits.
- Professional installation ensures compliance with Australian Standards and reduces the risk of costly mistakes.
- Common drainage types include French drains, channel drains, and catch basins.
- Sydney properties often face tree roots, clay pipes, and variable soil conditions that complicate DIY work.
- We offer same-day service, upfront pricing, and a lifetime labour warranty on all drainage installations.
Comparing DIY vs Professional: Which Path Should You Take?
Choosing between DIY and professional installation depends on your skills, budget, and the complexity of your drainage problem. This table summarises the key differences to help you decide.
| Factor | DIY Installation | Professional Installation |
|---|---|---|
| Cost | $300–$800 for materials and tool hire | Varies by scope; upfront quote provided |
| Time | 1–2 weekends for a basic system | Same-day completion in most cases |
| Skill Required | Moderate to high; physical fitness essential | None; we handle all aspects |
| Permits | Your responsibility to research and apply | We manage all council approvals |
| Compliance | Risk of non-compliance if standards unknown | Guaranteed to meet AS/NZS 3500 and local codes |
| Warranty | None; you own any mistakes | Lifetime labour warranty on our work |
| Tools | Must buy or hire excavator, levels, etc. | All equipment included in service |
| Risk | Hitting services, incorrect slope, system failure | Insured and licensed; risk minimised |
If your yard has a simple, shallow drainage issue and you’re handy with tools, DIY might work. But if you’re dealing with tree roots, clay soil, steep slopes, or council stormwater connections, professional help is the safer, faster choice.
How to Install Outdoor Drainage: DIY Steps and What You Need
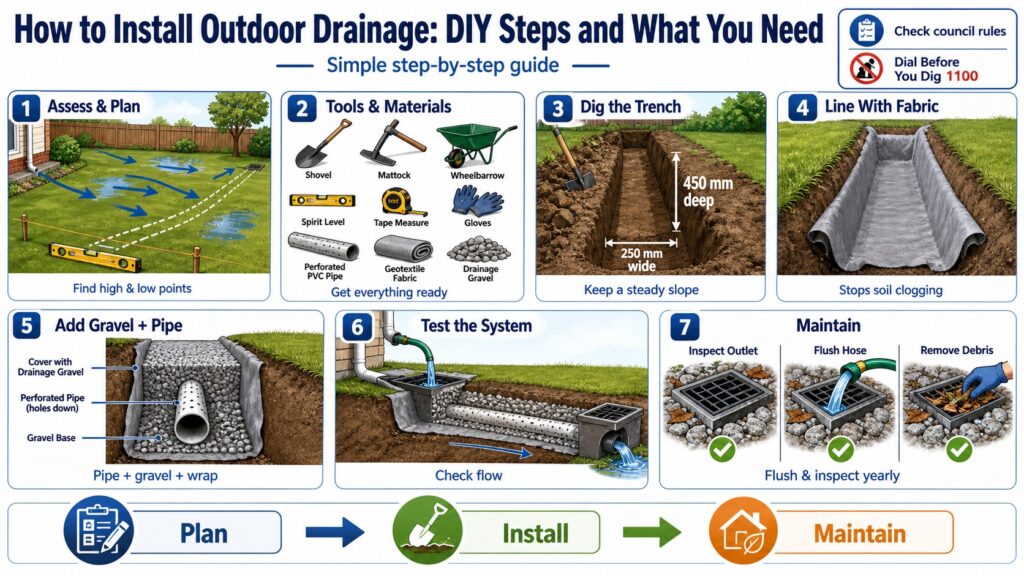
If you’re comfortable with manual labour and have a weekend to spare, DIY yard drainage is possible. You’ll need to assess the site, gather tools, dig accurately, and install materials correctly. Skipping any step can leave you with a system that clogs, overflows, or fails within months.
Before you start, check with your local council about permits. Some areas require approval for stormwater connections or excavation near boundaries. Ignoring this can lead to fines or forced removal of your work.
1. Assess the Problem and Plan Your Trench
Walk your yard after heavy rain and mark where water pools. Identify the highest point of the problem area and the lowest point where water can safely exit. Use a string line and spirit level to map a path with at least a 1 percent slope—that means a drop of 10 millimetres for every metre of trench.
Sketch your layout on paper. Note any obstacles like garden beds, paving, or underground utilities. Call Dial Before You Dig (1100) to locate cables, gas lines, and water pipes before you touch a shovel.
2. Gather Your Tools and Materials
You’ll need a shovel, mattock, wheelbarrow, spirit level, tape measure, and gloves. For the drain itself, buy perforated PVC pipe (usually 100 millimetres diameter), geotextile fabric, and drainage gravel (10–20 millimetre aggregate). A hand tamper helps compact soil, and a hacksaw cuts pipe to length.
Expect to spend a few hundred dollars on materials for a basic 10-metre French drain. Hiring a mini excavator can speed up digging but adds to the cost and requires some skill to operate safely.
3. Dig the Trench
Excavate a trench about 450 millimetres deep and 250 millimetres wide. Keep the sides as vertical as possible to reduce the amount of gravel you need. Pile the soil neatly to one side so you can backfill later.
Check the slope every couple of metres with your level. Even a slight uphill section will cause water to back up and overflow. If you hit rock or thick clay, you may need a crowbar or hire a jackhammer.
4. Line the Trench with Geotextile Fabric
Unroll the fabric along the bottom and sides of the trench, leaving enough overhang to wrap over the top later. This layer stops soil and silt from clogging the gravel and pipe. Without it, your drain will fail within a year or two.
Overlap joints by at least 300 millimetres and secure with landscape staples if the fabric shifts while you work.
5. Add Gravel and Lay the Pipe
Pour a 50-millimetre layer of gravel into the trench. Lay the perforated pipe on top with the holes facing down—this lets water enter from below and prevents debris from falling in. Connect sections with couplers and check the slope again.
Cover the pipe with another 150–200 millimetres of gravel. Fold the geotextile fabric over the top and backfill with soil, leaving a slight mound to allow for settling.
6. Test the System
Run a hose at the inlet for 10 minutes and watch the outlet. Water should flow steadily without pooling in the trench. If it backs up, you may need to adjust the slope or clear a blockage.
Wait for the next heavy rain to see how the system performs under real conditions. Be prepared to make adjustments if water still pools in the original problem area.
7. Maintain Your Drain
Flush the system once or twice a year with a hose to clear leaves and sediment. Inspect the outlet after storms to ensure it’s not blocked by debris. If tree roots are nearby, consider a CCTV inspection every few years to catch problems early.
Common Challenges When You Install Yard Drainage Yourself
DIY drainage can save money, but it’s not without risks. Many homeowners underestimate the physical effort, the precision required, or the hidden costs that crop up mid-project. Here are the issues you’re likely to face.
- Incorrect slope: A trench that’s too flat or too steep won’t drain properly. Water will pool or rush too fast, eroding the gravel and destabilising the pipe.
- Hitting underground services: Slicing through a power cable or gas line is dangerous and expensive. Even if you call 1100, locator services aren’t always perfect, especially for older properties.
- Poor material choices: Using solid pipe instead of perforated, or skipping the geotextile, leads to clogs and system failure within months.
- Tree root interference: Sydney’s native trees have aggressive root systems. Roots can crush or block pipes, especially if you plant the drain too close to a large gum or fig.
- Permit violations: Connecting to council stormwater without approval can result in fines and forced removal. Some areas also restrict how much hard surface you can add without a rainwater tank.
- Time and effort: Digging 10 metres of trench by hand can take a full weekend, longer if you hit rock or clay. Fatigue leads to mistakes, and mistakes lead to rework.
If any of these sound daunting, or if your property has complex grading or multiple problem areas, professional help is worth considering.
Why Professional Yard Drainage Installation Delivers Better Results
Hiring a licensed plumber or drainage specialist costs more upfront, but it eliminates guesswork and reduces long-term risk. Professionals bring experience, the right tools, and knowledge of local regulations. They also carry insurance, so if something goes wrong, you’re covered.
Site Assessment and Custom Design
We don’t rely on generic plans. Every property is different, so we walk your yard, check soil type, measure slopes, and identify any underground services. We use laser levels and drainage software to design a system that handles your specific water volume and site conditions.
If tree roots are a concern, we recommend pipe relining or root barriers. If your yard is steep, we may suggest terraced drains or multiple outlets. You get options, not a one-size-fits-all fix.
Compliance and Permits
We handle all council liaison and permit applications. Our work complies with NSW Fair Trading licensing requirements and AS/NZS 3500 plumbing standards. You won’t face fines or forced rework because we follow the rules from day one.
If your drainage connects to council stormwater, we ensure the connection meets local guidelines and is inspected where required. This protects your property value and avoids legal headaches down the track.
Quality Materials and Workmanship
We use commercial-grade PVC pipe, heavy-duty geotextile, and crushed aggregate that won’t compact or shift. Our installations include proper fall, secure joints, and cleanout points for future maintenance. We don’t cut corners, and we don’t leave a mess.
Every job is backed by our lifetime labour warranty. If a joint leaks or a trench settles due to our workmanship, we return and fix it—no questions, no charge.
Speed and Efficiency
What takes a DIYer two weekends, we complete in a day. We bring excavators, compactors, and a full crew, so your yard is back to normal fast. Minimal disruption, maximum results.
Same-day service is available across Sydney, from the Inner West to the Sutherland Shire. Call 0493 824 176 and we’ll assess your drainage problem and provide a clear, upfront quote.
Our team has installed hundreds of drainage systems across Sydney. We assess your property, design a solution that works with your landscape, and complete the job to Australian Standards. You get upfront pricing, same-day service, and a lifetime labour warranty—so if our workmanship fails, we fix it at no charge.
Maintaining Your Yard Drainage System for Long-Term Performance
Even the best-designed drainage system needs occasional attention. Leaves, silt, and debris can block inlets or outlets, reducing flow and causing water to back up. Regular maintenance keeps your system working and extends its lifespan.
Inspect surface grates and catch basins after every storm. Clear away leaves, twigs, and mud. If you have a French drain, flush the pipe annually with a garden hose to push out sediment. For deeper systems or those near trees, schedule a CCTV inspection every two to three years to check for root intrusion or pipe damage.
We offer maintenance packages for strata and commercial clients, including scheduled inspections, hydro jetting to clear blockages, and pipe relining to repair cracks without digging. Our work is backed by a lifetime labour warranty, so you can trust the repairs will last.
Real-World Example: Solving Drainage in Sydney’s Inner West
A homeowner in Marrickville called us after every storm turned her backyard into a pond. She’d tried a DIY French drain, but the trench was too shallow and the slope was wrong. Water still pooled near the back door, threatening to seep under the house.
We assessed the site and found heavy clay soil and a large fig tree with roots spreading under the lawn. We designed a new system with a deeper trench, proper fall, and root-resistant pipe. We also installed a catch basin near the door to collect surface water before it reached the house.
The job took one day. We removed the old drain, excavated with a mini excavator, laid new pipe with geotextile and gravel, and restored the lawn. The homeowner hasn’t seen a puddle since, even during Sydney’s heaviest downpours. She appreciated the upfront quote, the tidy work, and the peace of mind that comes with a licensed, insured installation.
When to Call a Licensed Plumber for Yard Drainage
Some drainage problems are beyond the scope of a weekend project. If you notice any of the following, it’s time to call us.
- Water pooling near your foundation: This can undermine footings and cause structural cracks. It requires precise grading and often a sump or agricultural drain.
- Recurring clogs or slow drainage: If your existing system backs up after every storm, tree roots or poor design are likely to blame. We use CCTV cameras to diagnose the issue and recommend pipe relining or replacement.
- Multiple problem areas: If water pools in several spots, you need a network of drains with a central outlet. Designing this correctly requires experience and survey equipment.
- Steep or uneven terrain: Properties on hills or with retaining walls need careful planning to prevent erosion and ensure water flows safely to an outlet.
- Council stormwater connection required: Any work that ties into public drainage must be approved and inspected. We handle the paperwork and ensure compliance.
- You’ve tried DIY and it didn’t work: If your first attempt failed, don’t waste more time and money. We’ll assess what went wrong and fix it properly.
We’re available 24/7 for emergencies, with no call-out fee from 7am to 3pm on weekdays. Call 0493 824 176 or book online for a fast quote and same-day service.
Conclusion
Installing yard drainage yourself can work for simple, shallow systems on flat ground. But most Sydney properties face clay soil, tree roots, and council rules that make professional help the smarter choice. We deliver same-day service, upfront pricing, and work that’s compliant, warrantied, and built to last. Call 0493 824 176 or book online to protect your property with drainage done right.
Antons Plumbing & Gas brings over 25 years of expertise in drainage solutions and leak detection across Sydney. Our licensed team diagnoses root causes and delivers compliant, lasting results with upfront pricing. Contact us today to get started.
Related Articles
- How to Build a Drainage System: Essential Tips for Homeowners
- How to Install a Drainage System in Your Yard the Right Way
- Beginner’s Guide on How to Install Drainage Pipe in Yard
FAQs
What Is The Best Way To Install Yard Drainage?
The best way to install yard drainage involves assessing your property’s slope, identifying areas where water accumulates, and creating a proper drainage system that may include French drains, surface drains, or dry wells. It’s essential to ensure that the drainage directs water away from your home’s foundation. For optimal results, consider consulting with professionals like Antons Plumbing & Gas, who can provide tailored solutions based on your specific needs.
How Deep Should Yard Drainage Be?
Yard drainage systems should typically be installed at a depth of 6 to 12 inches, depending on the type of drainage system and the specific landscape. Proper depth is crucial to ensure effective water flow and prevent flooding. Engaging experienced plumbers can help determine the right depth and configuration for your yard.
Can I Install Yard Drainage Myself?
While it’s possible to install yard drainage yourself, it requires careful planning and knowledge of drainage systems. DIY installation can lead to issues if not done correctly, such as improper water flow or damage to your property. For a reliable solution, consider hiring professionals from Antons Plumbing & Gas who have the expertise to ensure a proper installation.
What Materials Do I Need For Yard Drainage?
Common materials needed for yard drainage installation include perforated pipes, gravel, landscape fabric, and drainage basins. The specific materials may vary based on the type of system you choose. Our skilled team at Antons Plumbing & Gas can assist you in selecting the right materials for your drainage project.
How Much Does It Cost To Install Yard Drainage?
The cost to install yard drainage can vary widely based on factors such as the size of the area, the type of drainage system, and labor costs. It’s best to consult with a licensed plumbing professional like Antons Plumbing & Gas for an accurate assessment and quote tailored to your specific situation.