Installing a drain in your yard seems straightforward until water pools around your foundation or the system fails after the first heavy rain. Many Sydney homeowners attempt drainage projects without understanding slope requirements, soil conditions, or council regulations—and end up with expensive repairs. A poorly installed yard drain can damage your property, waste money, and create safety hazards that take years to surface.
This guide walks you through the five most common mistakes people make when putting a drain in their yard, from incorrect grading to choosing the wrong pipe material. You’ll learn how to avoid these pitfalls, what Australian Standards require, and when to call a licensed professional to ensure your drainage system works properly from day one.
Key Takeaways
- Incorrect slope is the number one reason yard drains fail, with a minimum 1% gradient required for proper water flow.
- Skipping filter fabric allows soil and tree roots to clog perforated pipes within months.
- Wrong pipe orientation, especially holes facing upward, causes sediment buildup and blockages.
- Ignoring council regulations can result in fines and mandatory removal of non-compliant drainage work.
- Poor discharge planning leads to water pooling in neighbour’s yards or re-entering your foundation.
Before you pick up a shovel, understanding these errors can save you thousands in remediation costs and protect your property value.
1. Getting the Slope Wrong When You Put a Drain in Your Yard
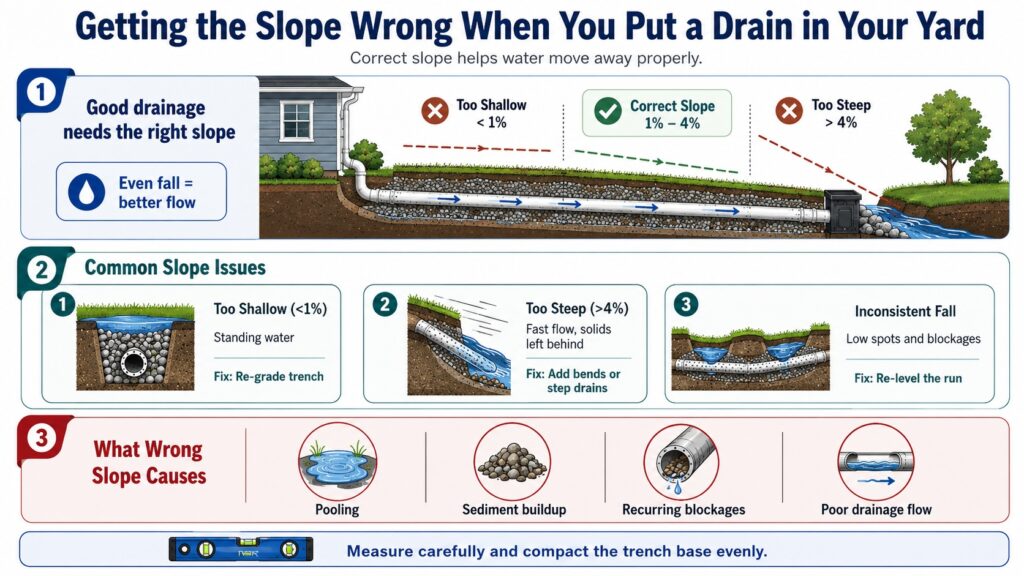
The slope of your drainage trench is one of the most important factors in whether your yard drain works properly or fails over time. If the gradient is too shallow, too steep, or uneven along the run, water will not move through the pipe the way it should, which can lead to pooling, sediment buildup, and recurring blockages. Understanding how slope affects drainage performance helps homeowners avoid one of the most common mistakes when putting a drain in the yard.
| Slope Issue | Consequence | Fix |
|---|---|---|
| Too shallow (< 1%) | Standing water and sediment buildup | Re-excavate to correct the gradient |
| Too steep (> 4%) | Turbulence that leaves solids behind | Add bends or step drains to slow and control flow |
| Inconsistent fall | Pooling in low spots and repeated blockages | Re-level the full run and compact the trench base evenly |
Getting the slope right requires more than visual guesswork because even minor grading mistakes can affect how well the drainage system performs. Proper measuring tools, stable trench preparation, and realistic planning are essential to create a drain that moves water away effectively and continues working in changing ground conditions. When the slope is wrong, repairs can become expensive, so careful installation from the start is the best way to avoid future drainage problems.
2. Skipping Filter Fabric and Gravel Wrapping
Skipping filter fabric and gravel wrapping is one of the most common mistakes when installing a perforated drainage pipe. These materials work together to stop soil, silt, and roots from entering the pipe while still allowing water to flow through properly. Without this protective layer, the drain can clog quickly and leave your yard waterlogged within months or a year.
Many homeowners skip filter fabric to reduce costs or because they assume gravel alone will do the job. Others confuse proper geotextile fabric with standard weed mat, even though weed mat is not designed for subsurface drainage and breaks down much faster underground. This shortcut becomes especially risky in clay-heavy soils, where fine particles move easily during wet conditions and fill the gravel voids over time.
Correct installation starts by lining the trench with overlapping filter fabric before adding a gravel base and setting the perforated pipe in place. The pipe should then be covered with more clean gravel, and the excess fabric should be folded over the top to create a complete protective wrap before backfilling. In areas with known root problems, it is often better to use root-resistant fabric or a more durable pipe type that can handle local site conditions more effectively.
3. Installing Perforated Pipe Upside Down
Perforated drainage pipe has holes arranged in specific patterns, and orientation matters. Most corrugated flexible pipe has two rows of perforations on the bottom half. Install it upside down and water enters from the top, bringing sediment and debris straight into the pipe instead of filtering through gravel first.
This mistake is surprisingly common because the pipe looks symmetrical. People assume any side works, but the design relies on water entering from below after passing through the gravel bed.
Consequences of Wrong Orientation
Sediment accumulates inside the pipe, reducing flow capacity and eventually causing blockages. You’ll notice slower drainage after rain, soggy patches that take days to dry, and eventually complete failure requiring excavation and replacement.
Roots also find their way in more easily when holes face upward. Once roots enter, they grow along the pipe seeking moisture and nutrients, creating dense mats that block flow entirely.
Correct Pipe Orientation
Perforations should face downward, typically at the 4 o’clock and 8 o’clock positions if you imagine the pipe as a clock face. This allows water to rise through the gravel, enter the pipe from below, and flow along the invert (bottom) of the pipe where velocity is highest.
Some rigid slotted pipe has slots all around, which is fine—but the principle remains the same. Slots should be on the lower half to encourage upward filtration through gravel.
Mark the top of your pipe with a permanent marker before laying it in the trench. It’s easy to lose orientation when you’re working in a deep, narrow excavation.
If you’re unsure which side is which, consult the manufacturer’s installation guide or call a licensed plumber for advice. We’ve replaced countless drains that failed simply because the pipe was upside down—an expensive lesson that’s easily avoided with correct installation from the start.
4. Ignoring Council Regulations and Stormwater Rules
Sydney councils have strict rules about where stormwater can discharge, how deep you can dig near boundaries, and whether you need a permit for drainage work. Ignoring these regulations can result in fines, orders to remove non-compliant work, and liability if your drain causes flooding on neighbouring properties.
Stormwater must discharge to the street gutter, an approved absorption trench, or a council stormwater main—not into your neighbour’s yard, a sewer line, or a natural watercourse without approval. Each council has different requirements, and some require licensed plumber certification for any work that connects to public infrastructure.
Common Regulatory Mistakes
Connecting stormwater to the sewer is illegal across NSW and can contaminate the wastewater system during heavy rain. It also overloads treatment plants and causes sewage overflows into waterways.
Discharging onto a neighbour’s property is a civil matter that can lead to disputes, legal action, and costly remediation. Even if your neighbour doesn’t complain immediately, they can pursue damages years later if your drain causes subsidence or water damage.
Digging near boundaries without checking for underground services is dangerous and illegal. Dial Before You Dig (1100) is a free service that maps water, gas, electricity, and telecom lines—but many DIYers skip this step and hit a pipe or cable.
How to Stay Compliant
Contact your local council before starting work. Most have online resources outlining drainage requirements, and some require a Construction Certificate or Complying Development approval for significant earthworks.
Hire a licensed plumber for any connection to council stormwater mains or sewer systems. Our team holds current licensing (Lic: 210933C) and completes all work to AS/NZS 3500 plumbing standards, with documentation you can provide to council if requested.
Locate all underground services before digging. We use plans, locators, and hand excavation near marked services to avoid strikes that can cause injury, property damage, and service outages.
If your property is heritage-listed or in a conservation area, additional approvals may apply. We’ve worked on heritage homes across the North Shore and Eastern Suburbs and understand the approval pathways that keep your project compliant and on schedule.
5. Poor Discharge Planning and Outlet Design
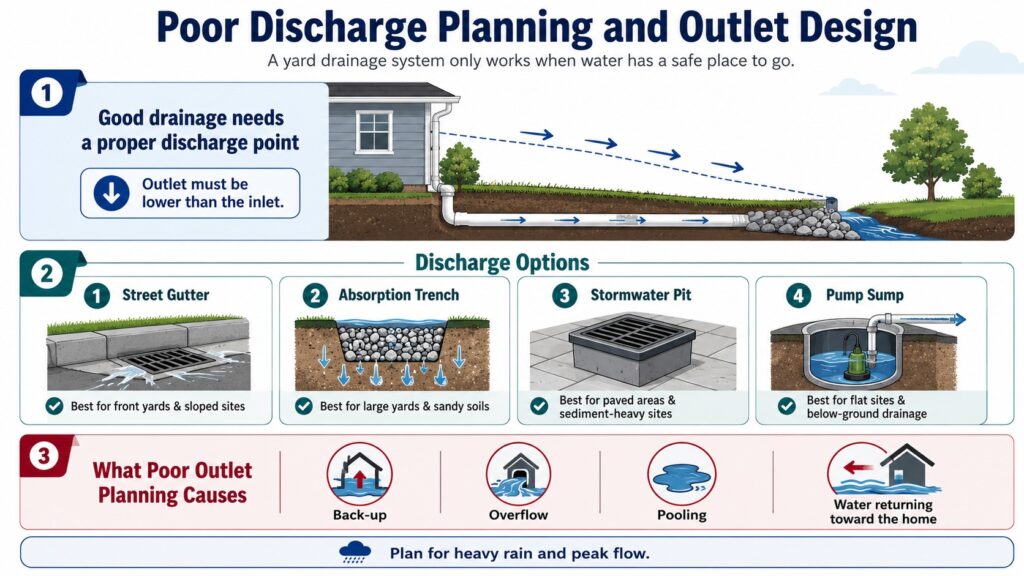
A yard drainage system will only perform properly if the water has a safe and effective place to go at the end of the run. Even when the pipe layout, slope, and gravel installation are done correctly, poor discharge planning can still cause water to back up, overflow, or return toward the home. Understanding outlet design is essential because the success of the entire drainage system depends on how well it handles water during heavy rainfall and peak flow conditions.
| Discharge Option | Best For | Considerations |
|---|---|---|
| Street gutter | Front yard drainage and sloped sites | Requires enough fall toward the street and may need council approval |
| Absorption trench | Large yards and sandy soils | Must be sized to suit soil type and may need multiple trenches in clay |
| Stormwater pit | Paved areas and sites with high sediment load | Requires ongoing maintenance and silt trap cleaning |
| Pump sump | Flat sites and below-ground drainage | Involves ongoing power costs and regular pump maintenance |
Poor outlet planning often leads to problems that may not appear until after a major storm or after the ground has settled over time. A properly designed discharge point must be lower than the inlet, sized for expected water volume, and suitable for the soil and layout of the property. By choosing the right discharge option and planning the outlet carefully, homeowners can reduce the risk of overflow, erosion, and recurring drainage failure.
When to Call a Licensed Plumber for Yard Drainage
Some drainage projects suit a capable DIYer with the right tools and research. Others require licensed expertise to ensure compliance, safety, and long-term performance. Knowing the difference protects your investment and avoids costly mistakes.
If your drainage work involves connections to council stormwater systems, you need a licensed plumber by law. If you’re digging deeper than 600mm, working near services, or installing drainage on a sloped site with retaining walls, professional design and installation reduce risk.
Complex sites—clay soils, high water tables, tree roots, or heritage homes—benefit from CCTV diagnostics, soil testing, and engineered solutions that DIY methods can’t provide. We’ve seen homeowners spend thousands on trial-and-error drainage attempts, only to call us when nothing works.
Our process is straightforward. You call 0493 824 176 or book online, and we schedule a same-day visit (7am–3pm weekdays, no call-out fee). Our plumber inspects your yard, checks fall and soil conditions, and provides a fixed-price quote for compliant installation. You’ll understand exactly what we’re doing, why, and what it costs before we start.
We excavate, install filter fabric and gravel, lay correctly oriented pipe at the right slope, and connect to approved discharge points. Every job is documented, and we clean up before we leave—no mess, no jargon, no surprises.
All our drainage work is backed by a lifetime labour warranty, so if installation issues arise, we’ll return and fix them at no charge. That’s the value of working with licensed professionals who take pride in getting it right the first time.
Conclusion
Yard drainage protects your home’s foundation, prevents water damage, and keeps your outdoor spaces usable after rain. Getting it right means understanding slope, using proper materials, and complying with regulations—not just digging a trench and hoping for the best. Call us on 0493 824 176 for same-day drainage solutions that work.
Antons Plumbing & Gas brings over 25 years of expertise in blocked drains and CCTV inspections across Sydney. We diagnose root causes and deliver compliant, lasting solutions with upfront pricing. Contact us today to get started.
Related Articles
- Beginner’s Guide on How to Install Drainage Pipe in Yard
- How to Install Yard Drainage: DIY vs Professional Solutions
- How Professional Drain Pipe Installation Prevents Water Damage
FAQs
What Is The Best Way To Install A Yard Drain?
The best way to install a yard drain involves planning the layout to ensure proper water flow and drainage. Start by identifying low spots where water tends to collect. Use a trenching method to create a sloped channel, ensuring the drain leads to an appropriate outlet. For optimal results, consider enlisting a professional like Antons Plumbing & Gas, who can guide you through the process with expertise and ensure compliance with local standards.
How Deep Should A Yard Drain Be?
A yard drain should typically be around 6 to 12 inches deep, depending on the specific drainage needs and the type of soil. It’s essential to ensure that the drain is deep enough to capture water effectively while allowing for proper slope. To achieve the best results tailored to your property, consulting with a licensed plumbing expert can be invaluable.
Can I Install A Drain In My Yard Myself?
While it is possible to install a drain in your yard yourself, it can be a complex task that requires proper knowledge of drainage systems and local regulations. Mistakes can lead to further water issues, so considering professional assistance from Antons Plumbing & Gas can ensure the job is done right the first time, saving you time and potential headaches.
What Materials Do I Need To Install A Yard Drain?
To install a yard drain, you will typically need perforated drainage pipe, gravel for drainage, a catch basin, and landscape fabric. Additional materials may include concrete or solid pipe depending on your design. For a tailored solution that fits your specific needs, it’s advisable to speak with a plumbing professional who can recommend the best materials for your project.
How Do I Determine Where To Put A Drain In My Yard?
To determine the best location for a drain in your yard, observe areas where water tends to pool after rain. Look for natural slopes in your yard and consider the direction of water flow. A professional assessment from Antons Plumbing & Gas can help identify the optimal placement for effective drainage, ensuring your yard remains safe and dry.