A dripping shower head can waste hundreds of litres of water each month and drive up your utility bills. That constant drip-drip sound is more than an annoyance—it signals an underlying problem that needs attention. Whether you have a rain shower head square design or a standard fixture, the causes are often the same: worn washers, mineral build-up, or loose connections.
In this guide, we walk you through the top five reasons your shower head is dripping and show you how to fix each one. You’ll learn which problems you can tackle yourself and when it’s time to call a licensed plumber for a permanent solution.
Key Takeaways
- A worn washer or O-ring is the most common cause of a shower head dripping water.
- Mineral deposits from hard water can block nozzles and create pressure that leads to leaks.
- Loose connections between the shower arm and head allow water to seep through and drip after use.
- High water pressure can damage internal seals and cause persistent dripping.
- Damaged cartridges or valve seats require professional diagnosis and replacement to stop leaks.
- Regular cleaning with vinegar helps prevent limescale build-up and maintains steady water flow.
Understanding why your shower head leaking water matters because it helps you choose the right fix and avoid repeat repairs.
Why Your Shower Head Is Dripping Water After You Turn It Off
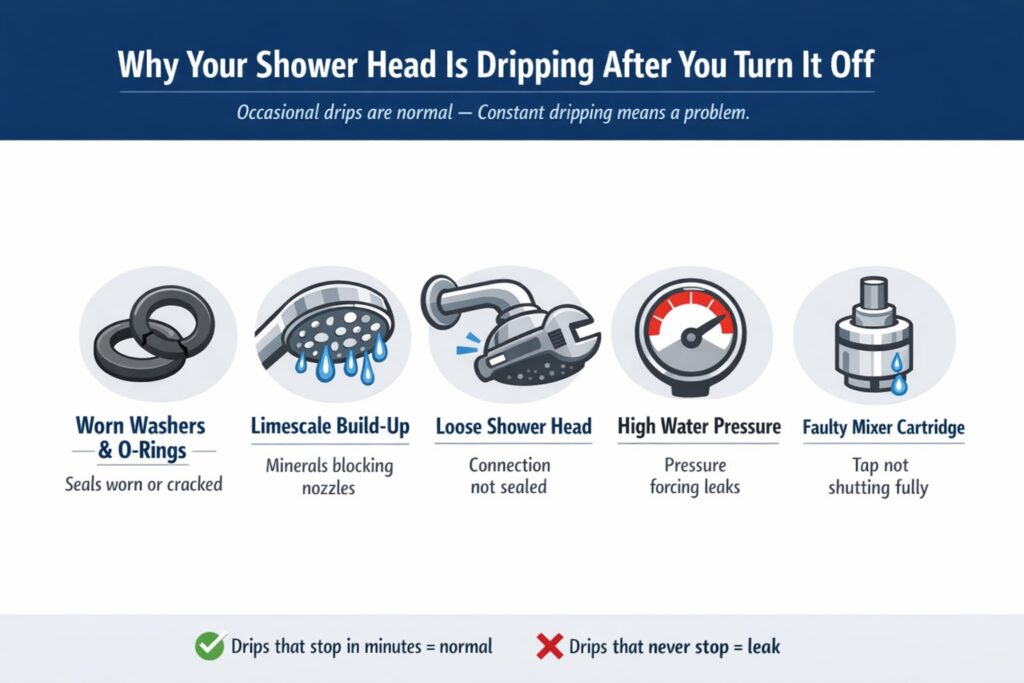
You turn off the tap, step out of the shower, and hear that familiar drip. It’s not always a sign of a serious fault. Sometimes a small amount of water remains trapped in the shower arm or head after you close the valve. That residual water drips out over the next few minutes and then stops.
If the dripping continues for hours or never stops, you’re dealing with a leak. The five causes below explain why your shower head is dripping water and what you can do to fix it.
1. Worn or Damaged Washers and O-Rings
Washers and O-rings are small rubber seals that sit inside the shower head and at the connection point between the head and the arm. Over time, hot water and constant pressure cause these seals to harden, crack, or lose their shape. When that happens, water sneaks past the seal and drips from the nozzles even when the tap is closed.
This is the most common reason for a shower head dripping. Replacing a washer or O-ring is straightforward and inexpensive, and you can often do it yourself with basic tools.
How to Fix a Worn Washer or O-Ring
Start by turning off the water supply to your bathroom or the entire house. Unscrew the shower head from the arm using an adjustable wrench or pliers. Wrap a cloth around the connection to protect the chrome finish.
Inspect the rubber washer inside the shower head and the O-ring on the threaded connection. If either looks flat, cracked, or brittle, replace it. Take the old washer to a hardware store to match the size. Slide the new washer into place, reattach the shower head, and turn the water back on. The drip should stop immediately.
If you’re not confident working with threaded fittings or you notice corrosion around the connection, our team at Antons Plumbing & Gas can complete the repair on the same day. We carry a range of washers and seals and will check for any other issues while we’re there.
2. Mineral Build-Up and Limescale Blocking the Nozzles
Sydney’s water supply contains dissolved minerals like calcium and magnesium. When water evaporates on the surface of your rain shower head or inside the nozzles, those minerals are left behind as limescale. Over time, the deposits harden and block the tiny holes that distribute water.
Blocked nozzles create uneven pressure inside the shower head. Water finds the path of least resistance, which can force it past seals and cause a persistent drip. You might also notice reduced water flow or a spray pattern that’s no longer even.
How to Remove Limescale from a Rain Shower Head
Fill a plastic bag with equal parts white vinegar and warm water. Secure the bag over the shower head using a rubber band so the nozzles are fully submerged. Leave it to soak for 30 minutes.
Remove the bag and scrub the nozzles with a soft brush or old toothbrush. Use a toothpick or safety pin to clear any stubborn deposits from individual holes. Rinse the shower head with clean water and turn on the tap to flush out loosened debris.
For a rain shower head square design with a large surface area, you may need to unscrew the entire unit and soak it in a basin of vinegar solution. Repeat this cleaning process once a month to prevent build-up and keep your shower performing at its best.
3. Loose Connection Between the Shower Head and Arm
The threaded connection between your shower head and the shower arm can work loose over time. Every time you adjust the angle of the head or bump it while showering, the fitting shifts slightly. Eventually, the seal no longer sits flush and water escapes around the threads.
A loose connection often causes water to drip from the base of the shower head rather than the nozzles. You might see water running down the arm or pooling on the shower floor after use.
How to Tighten a Loose Shower Head Connection
Turn off the water and dry the connection thoroughly. Use an adjustable wrench to tighten the shower head by turning it clockwise. Apply firm, steady pressure but don’t over-tighten—you can crack the fitting or damage the threads.
If tightening doesn’t stop the drip, unscrew the head completely and inspect the threads on both the arm and the shower head. Wrap two or three layers of plumber’s tape (also called PTFE tape) around the threads on the shower arm in a clockwise direction. Screw the head back on and test for leaks.
Plumber’s tape fills small gaps and creates a watertight seal. If the threads are stripped or corroded, tape won’t help. You’ll need to replace the shower arm or head. We can supply and fit quality replacements that match your existing fixtures and comply with Australian Standards.
4. High Water Pressure Damaging Internal Seals
Water pressure in Sydney homes typically sits between 350 and 500 kilopascals (kPa). If your pressure exceeds 500 kPa, it can strain washers, O-rings, and valve seats inside your shower. High pressure forces water past seals that would otherwise hold firm, leading to a shower head leaking water even when the tap is fully closed.
You might notice other signs of high pressure, such as noisy pipes, frequent leaks in multiple fixtures, or taps that are hard to turn off. High pressure also shortens the lifespan of appliances like dishwashers and washing machines.
How to Check and Reduce Water Pressure
You can measure water pressure using a gauge that screws onto an outdoor tap or laundry connection. These gauges are available at hardware stores and give an instant reading in kPa. If your pressure is above 500 kPa, consider installing a pressure-limiting valve (PLV) on your main water line.
A PLV reduces incoming pressure to a safe, consistent level and protects every fixture in your home. Installation must comply with AS/NZS 3500 plumbing standards and should be completed by a licensed plumber. Our team can assess your water pressure, recommend the right valve, and install it on the same day if parts are in stock.
Reducing pressure not only stops the drip but also extends the life of your taps, shower mixers, and hot water system.
5. Faulty Cartridge or Valve Seat Inside the Mixer
If your shower uses a mixer tap (the type with a single lever or two separate handles), the problem might not be the shower head at all. The cartridge or valve seat inside the mixer controls water flow and temperature. When these components wear out or become damaged, they fail to shut off completely and water continues to flow to the shower head.
A faulty cartridge often causes the shower head to drip constantly, even when the lever or handle is in the off position. You might also notice difficulty adjusting temperature or a tap that feels loose or gritty when you turn it.
When to Replace a Mixer Cartridge
Replacing a mixer cartridge requires dismantling the tap body and identifying the correct replacement part. Cartridges vary by brand and model, and using the wrong one can make the problem worse. If you’re comfortable with plumbing repairs, you can remove the old cartridge and take it to a supplier for matching.
If you’re unsure or the mixer is an older model, it’s safer to call a licensed plumber. We stock cartridges for most major brands and can source hard-to-find parts quickly. Our fixed-rate pricing means you’ll know the cost upfront, with no call-out fee and same-day service across Sydney.
A worn valve seat can sometimes be re-ground using a special tool, but replacement is often the more reliable option. We’ll inspect the entire mixer, explain your options, and complete the work to Australian Standards.
Comparing DIY Fixes and Professional Repairs
DIY fixes can solve simple shower head drips, but some problems need a licensed plumber to prevent leaks, damage, or compliance issues. The key is knowing whether the cause is a basic maintenance issue—like limescale or a loose fitting—or a component failure inside the tap system. Comparing DIY options with professional repairs helps you act faster, spend smarter, and avoid repeat drips.
| Issue | DIY Fix | When to Call a Plumber |
|---|---|---|
| Worn washer or O-ring | Replace with a matching part from a hardware store | If threads are corroded or you’re unsure of the size |
| Limescale build-up | Soak in a vinegar solution and scrub the nozzles | If cleaning doesn’t restore flow or stop the drip |
| Loose connection | Tighten with a wrench and apply plumber’s tape | If threads are stripped or leaking persists |
| High water pressure | Measure with a gauge | Always—PLV installation must be licensed and compliant |
| Faulty cartridge or valve | Only if you have the right part and experience | For mixer taps, older fixtures, or if you’re uncertain |
If the drip returns soon after a DIY fix, that’s often a sign the underlying part is worn beyond a simple adjustment or clean. Calling a plumber early can prevent water damage, protect your fittings, and ensure repairs meet Australian standards. When in doubt—especially with pressure issues or internal valves—professional diagnosis is usually the safest and most cost-effective path.
Preventing Future Drips and Leaks
Regular maintenance keeps your shower head working properly and helps you avoid repeat repairs. Clean your rain shower or standard head at least once a month using the vinegar method described earlier. This prevents mineral deposits from hardening and blocking nozzles.
Check all visible connections every few months. Look for signs of corrosion, loose fittings, or moisture around the shower arm. Tighten any loose parts before they start to leak.
If you notice reduced water flow, a change in spray pattern, or any dripping, address it straight away. Small problems become expensive repairs when left unattended. A dripping shower head can waste more than 10,000 litres of water per year, which adds up on your bill and puts unnecessary strain on Sydney’s water supply.
Consider upgrading to a quality rain shower head with easy-clean nozzles. Modern designs use silicone or rubber nozzles that resist limescale and can be wiped clean with a cloth. We can recommend fixtures that suit your water pressure and bathroom layout.
When to Call Antons Plumbing & Gas

Some drips are simple fixes. Others point to deeper issues like high pressure, worn mixer valves, or corroded pipework. If you’ve tried the DIY steps above and your shower head is still dripping water, it’s time to call a licensed plumber.
Our team at Antons Plumbing & Gas will diagnose the root cause, not just the symptom. We use quality parts from trusted brands and back every repair with a lifetime labour warranty. Whether you’re in the Inner West, Eastern Suburbs, North Shore, or anywhere across Sydney, we offer same-day service and 24/7 emergency response.
We’ll arrive on time, explain your options in plain English, and provide fixed-rate pricing before we start. No hidden fees, no mess left behind, and no call-out fee. Call 0493 824 176 or book online to request a fast quote.
Conclusion
A dripping shower head wastes water and signals a problem that won’t fix itself. Worn washers, limescale, loose connections, high pressure, and faulty valves are the five main causes. Many of these issues can be resolved with simple DIY steps, but when the drip persists or you’re unsure of the cause, a licensed plumber can diagnose and repair it properly. Call Antons Plumbing & Gas on 0493 824 176 for same-day service and fixed-rate pricing across Sydney.
Antons Plumbing & Gas offers expert leak detection and tap repairs across Sydney Metro. Our licensed team diagnoses dripping shower heads fast with upfront pricing. Call 0493 824 176 to get started today.
Related Articles
- 5 Reasons for Sewage Smell from Shower Drain and Solutions
- Why a Foul Smell from Your Shower Drain Signals Urgent Action
FAQs
What causes a shower head to drip?
A shower head usually drips due to worn washers, damaged O-rings, or a faulty cartridge inside the tap. Mineral buildup from hard water can also prevent internal components from sealing properly. In some cases, excessive water pressure can force water past seals even when the tap is off.
How do you fix a dripping shower head?
Fixing a dripping shower head typically involves replacing worn washers, O-rings, or the cartridge inside the tap. The shower head should be removed and cleaned to clear mineral deposits before reinstalling or replacing parts. If the drip continues after basic repairs, the issue may be deeper within the tap assembly.
Is a dripping shower head a sign of a bigger problem?
Yes, a persistent drip can indicate a failing tap valve, deteriorating pipe connections, or pressure issues within the plumbing system. Ignoring it may lead to internal leaks behind walls or accelerated wear on plumbing components. Addressing the issue early helps prevent more costly repairs later.
Can a dripping shower head waste water?
Even a slow drip can waste a significant amount of water over time. A single drip per second can add up to thousands of litres per year, increasing your water bill unnecessarily. Fixing the problem improves water efficiency and reduces long-term costs.
How do you stop a shower head from dripping?
Stopping a drip starts with identifying the cause, such as worn internal parts or mineral buildup. Replacing faulty components and ensuring all fittings are properly sealed usually resolves the issue. If the drip persists, professional plumbing inspection ensures the underlying cause is fixed correctly.
 February 2026