A drip under your kitchen or bathroom basin might seem harmless at first. But even a small leak can soak cabinetry, warp timber, and invite mould into your home. Catching it early saves you money and protects your property from hidden water damage that grows worse every day.
This guide walks you through the most common reasons pipes under sink start leaking, how to troubleshoot the problem yourself, and when to call a licensed plumber. You will also learn what to expect from a professional repair, how pricing works, and how to prevent the same leak from coming back.
Key Takeaways
- Most under-sink leaks come from worn washers, loose slip nuts, cracked P-traps, or failed sink drain flanges.
- Temporary fixes like epoxy putty or repair tape only delay the problem and may fail when you need them most.
- Tightening connections by hand and replacing rubber seals often stops minor drips without replacing the entire trap.
- Persistent leaks or corroded metal pipes require a full trap or tailpiece replacement to meet Australian Standards.
- Same-day service from a licensed Sydney plumber prevents water damage and gives you peace of mind with a lifetime labour warranty.
Why Pipes Under Sink Leaking Happens in the First Place
Under-sink plumbing is simple in design but exposed to constant moisture, temperature changes, and chemical residues from soaps and cleaners. Over time, these forces wear down rubber washers, corrode metal threads, and crack plastic fittings. The result is a slow drip that turns into a puddle if you ignore it.
Corroded or Cracked P-Trap
The P-trap is the curved pipe beneath your sink that holds a small amount of water to block sewer gas. Metal traps corrode from the inside out, especially in older homes with galvanised steel or brass fittings. Plastic traps crack when overtightened or dropped during cleaning. Once the material fails, no amount of tightening will stop the leak.
Worn Rubber Washers and Gaskets
Slip-joint connections rely on tapered nylon or rubber rings to create a seal. These washers harden, split, or flatten over years of use. When they lose their shape, water seeps past the threads even when the nut feels snug. Replacing the washer is inexpensive and takes minutes if you catch it early.
Loose Slip Nuts
Vibration from opening and closing cabinet doors, thermal expansion, or accidental bumps can loosen the large plastic or metal nuts that join your trap to the tailpiece and drain arm. A quarter-turn by hand often stops the drip. Overtightening, though, crushes the washer and makes the leak worse.
Failed Sink Drain Flange
The flange sits at the bottom of your basin and connects the sink to the tailpiece. If the plumber’s putty or rubber gasket beneath the flange dries out or shifts, water leaks around the drain opening and runs down the outside of the pipe. You will see drips forming at the very top of the tailpiece, not at the trap joints.
Cracked Tailpiece or Extension Tube
The tailpiece is the straight pipe that drops from the sink drain to the P-trap. Plastic tailpieces crack when you force a misaligned connection or when cleaning chemicals attack the material. Metal tailpieces corrode at the threads. Either way, water escapes before it reaches the trap.
Understanding the root cause helps you decide whether a quick DIY fix will hold or whether you need a licensed plumber to replace components and restore watertight connections.
How to Fix a Kitchen Sink Leaking Underneath: Step-by-Step
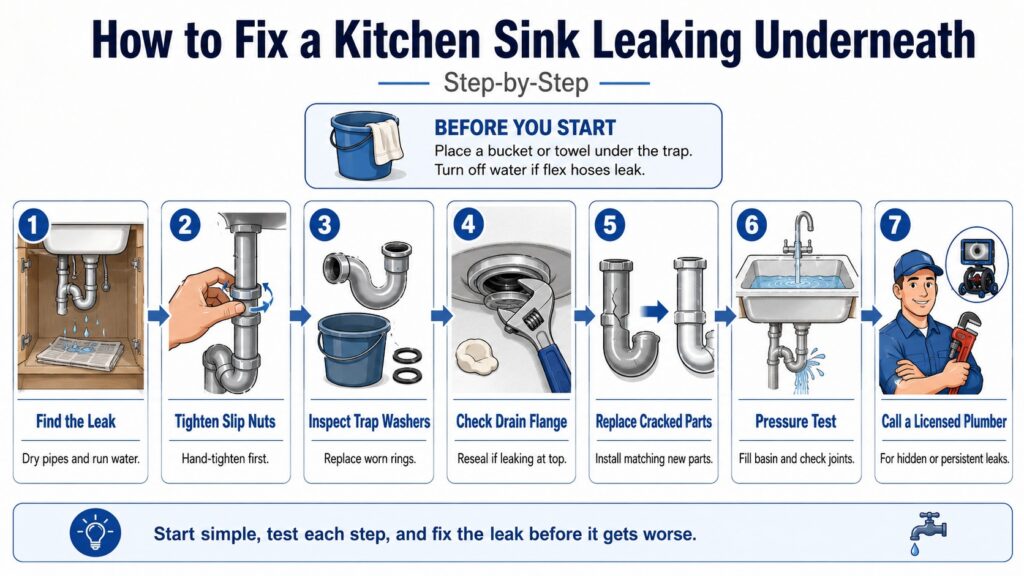
Before you start, place a bucket or towel under the trap to catch water. Turn off the water supply if the leak involves the hot or cold flex hoses. Most under-sink leaks come from the drain side, so you can leave the taps on while you work.
1. Identify the Exact Source of the Drip
Wipe all pipes dry with a cloth, then run water in the sink for 30 seconds. Watch closely or lay newspaper under each joint. The wet spot tells you whether the leak is at the trap, tailpiece, slip nut, or sink flange. Knowing the location saves you from dismantling parts that are already watertight.
2. Hand-Tighten All Slip Nuts
Grip each large plastic or metal nut and turn it clockwise by hand. Do not use pliers yet. Many leaks stop with a quarter-turn. Test again by running water and checking for drips. If the leak continues, the washer inside is probably worn or damaged.
3. Dismantle the Trap and Inspect the Washers
Unscrew the slip nuts at both ends of the P-trap and lower it into your bucket. Rinse out hair, soap scum, and debris. Check the tapered rubber or nylon rings inside each nut. If they are flat, cracked, or missing, replace them with new washers from your local hardware store. Reassemble the trap finger-tight, then snug each nut by hand.
4. Check the Tailpiece and Drain Flange
If water drips from the top of the tailpiece, the sink drain flange is leaking. You will need to remove the tailpiece, unscrew the flange locknut from above, lift out the old flange, scrape away dried putty, and install a new flange with fresh plumber’s putty or a rubber gasket. This job is easier with a basin wrench and takes about 15 minutes.
5. Replace the Entire Trap or Tailpiece if Cracked
Cracks, corrosion, and stripped threads cannot be repaired. Buy a matching P-trap or tailpiece kit, dry-fit all pieces to confirm alignment, then tighten each connection hand-tight. Test by filling the basin and releasing the water while you watch every joint. Even a slow drip will show up on newspaper within seconds.
6. Test Under Pressure and Clean Up
Fill the sink to the overflow, then pull the plug. The sudden rush of water puts more pressure on your connections than a slow trickle. If everything stays dry, wipe down the pipes, return your tools, and check again in 24 hours. If you see moisture, revisit the washers and slip nuts before the leak gets worse.
7. Call a Licensed Plumber if the Leak Persists
Some leaks hide behind cabinet walls, inside the vanity kick-board, or at the point where your drain arm enters the wall. Others involve corroded galvanised pipe that requires cutting and threading new fittings. Our team uses CCTV cameras and acoustic leak detection to find the exact fault, then presents clear options for repair or replacement. Same-day service means you do not live with a bucket under your sink for weeks.
This sequence follows the same troubleshooting method our licensed plumbers use on every call. It moves from the simplest fix to a full component replacement, so you spend the least time and money solving the problem.
Temporary Fixes: Epoxy Putty and Repair Tape for Bathroom Sink Drain Leaks
When a crack appears in a rigid pipe or a pinhole opens in a metal trap, epoxy putty and repair tape offer a short-term seal. Both products require a clean, dry surface to bond properly. You knead the two-part putty until it is uniform in colour, press it over the damaged area, and wait about 60 minutes for functional strength. Full cure takes 24 hours.
| Method | Best For | Cure Time | Durability |
|---|---|---|---|
| Epoxy Putty | Pinholes, hairline cracks in rigid pipe | 60 min functional, 24 hr full | Weeks to months |
| Repair Tape | Small leaks on straight sections | Immediate wrap, 24 hr cure | Weeks to months |
| New Washer | Slip-joint drips at trap connections | Instant | Years |
| Full Trap Replacement | Cracks, corrosion, stripped threads | 15–30 min install | Decades |
Repair tape works the same way but wraps around the pipe in overlapping layers. It stops drips and buys you time to order parts or schedule a plumber. Neither product is a permanent solution. Epoxy and tape degrade under constant moisture, vibration, and temperature swings. They also fail inspection if you are selling your home or completing a renovation. We recommend using them only as a stopgap until a licensed plumber replaces the damaged section to Australian Standards.
Common Mistakes That Make Sink Drain Pipe Leaks Worse
Fixing a leaking sink drain pipe may look simple, but small mistakes during the repair can easily make the problem worse. Issues such as stripped threads, cracked fittings, poor alignment, or reused sealing parts can turn a quick fix into a bigger plumbing repair. Understanding the most common mistakes helps homeowners approach sink drain leaks more carefully and avoid creating extra damage.
- Overtightening slip nuts: Plastic fittings can strip or crack when too much force is applied, and crushed washers may leak more than properly tightened ones.
- Reusing old washers: A washer that is flattened, brittle, or worn will not create a reliable seal, even if it still appears usable.
- Mixing metal and plastic fittings without care: Joining different materials incorrectly can contribute to corrosion or sealing issues over time.
- Ignoring alignment: Forcing a misaligned trap or pipe connection puts stress on the joints and increases the chance of cracks or leaks.
- Skipping the test: A quick water run is not enough to confirm a proper repair, because slow drips often only appear once the basin is filled and drained under pressure.
Avoiding these mistakes can make sink drain pipe repairs more effective and help prevent a small leak from turning into a more expensive issue. Careful fitting, proper sealing, and thorough testing all play a role in getting a lasting result. By taking the time to do the repair correctly, homeowners can reduce frustration and protect the plumbing system from further damage.
When to Call Antons Plumbing & Gas for Pipes Under Sink Leaking

Some leaks are straightforward. Others hide behind walls, involve corroded galvanised pipe, or point to a bigger drainage problem upstream. If you have tightened every nut, replaced every washer, and the drip keeps coming back, you need a licensed plumber to diagnose the root cause.
Our team arrives the same day across the Sydney Metro, from the Inner West to the Northern Beaches, Hills District, and Sutherland Shire. We carry replacement traps, tailpieces, washers, and flexible connectors on every van, so most repairs finish in one visit. You get upfront pricing before we start, no call-out fee from 7 am to 3 pm on weekdays, and a lifetime labour warranty on our workmanship.
We also back our labour with a lifetime warranty. If a connection we installed starts to leak because of faulty workmanship, we return and fix it at no charge. That confidence comes from 25 years of experience and a commitment to doing the job properly the first time.
Related Articles
- 5 Common Mistakes to Avoid When Dealing with Pipes Leaking
- Emergency Plumber Near You Now: Burst Pipes to Leaks
- PVC Pipe Under Sink Leaking at the Joint: Simple Repair Tips
How Much Does It Cost to Fix Pipes Under Sink Leaking in Sydney?
Repair costs vary depending on the fault, the parts required, and how accessible your plumbing is. A simple washer replacement or slip-nut adjustment often falls within a standard service call. A full trap and tailpiece replacement with new fittings takes longer and requires more materials.
We provide a fixed price before we start, so you know exactly what you will pay. There are no hidden fees, no surprise charges for weekend work, and no call-out fee from 7 am to 3 pm on weekdays. If you need emergency service outside those hours, we are available 24/7 at 0493 824 176, and we will quote the job over the phone or on-site before we begin.
Same-day service is standard across the Sydney Metro. Most under-sink repairs are completed in one visit, and you can book online or call for a fast quote. We respect your time, your home, and your budget.
Real-World Example: A Persistent Leak in an Inner West Kitchen
Sarah called us after her kitchen sink had been dripping into a bucket for two weeks. She had tightened the slip nuts, replaced the washers, and even tried epoxy putty on a hairline crack in the tailpiece. The leak slowed but never stopped.
Our plumber arrived the same morning, placed a drop sheet, and removed the entire trap assembly. He found that the sink drain flange had shifted, allowing water to run down the outside of the tailpiece before it reached the trap. The crack in the tailpiece was real, but it was not the main problem.
We replaced the flange with a new stainless unit, installed a fresh tailpiece, and fitted new washers at every connection. The repair took 45 minutes. Sarah received a fixed-price invoice, a compliance record for her strata file, and a lifetime labour warranty. Two months later, the cabinet is dry, and she no longer needs a bucket under her sink.
Why Sydney Homeowners Choose Us for Under-Sink Leak Repairs
We do not guess. We diagnose the root cause, show you the faulty part, and explain your options in plain English. You get upfront pricing, same-day service, and work that meets Australian Standards. Our vans carry the parts you need, so most jobs finish in one visit.
We are licensed, insured, and backed by 25 years of hands-on experience across the Sydney Metro. From the Eastern Suburbs to Western Sydney, Northern Beaches to Sutherland Shire, we turn up on time, respect your home, and clean up when we are done. If you need a dependable plumber who will fix your leak properly the first time, call 0493 824 176 or book online today.
Conclusion
Ignoring a leak under your sink invites mould, warps cabinetry, and risks damage to the floor and walls below. Fixing it early costs less and protects your property value. Whether you tackle it yourself or call a licensed plumber, acting now saves you money and gives you peace of mind.
Antons Plumbing & Gas specialises in leak detection and burst pipe repairs across Sydney Metro. Our licensed team diagnoses the root cause and fixes it right the first time. Get started with same-day service today.
FAQs
What Causes Pipes Under The Sink To Leak?
Pipes under the sink can leak due to various reasons, including loose connections, corrosion, wear and tear, or damage from impact. Additionally, clogs can create pressure that leads to leaks. Regular maintenance and inspections can help prevent these issues, and with over 25 years of experience, Antons Plumbing & Gas can identify and rectify the root cause of leaks effectively.
How Do You Fix A Leaking Pipe Under The Sink?
To fix a leaking pipe under the sink, first, turn off the water supply. Then, identify the source of the leak, which may involve tightening loose connections, replacing damaged washers, or even replacing the pipe section if necessary. For a reliable and long-lasting repair, consider contacting Antons Plumbing & Gas, where our qualified team can ensure the job is done right the first time.
Can I Use Tape To Fix A Leaking Pipe Under The Sink?
While using tape, such as plumber’s tape or duct tape, can provide a temporary solution for a leaking pipe, it is not a permanent fix. It’s best to address the underlying issue directly. For effective and lasting repairs, reach out to Antons Plumbing & Gas, where we prioritize your safety and compliance with plumbing standards.
When Should I Call A Plumber For A Leaking Sink Pipe?
You should call a plumber when you notice persistent leaks, significant water damage, or if the problem worsens despite temporary fixes. If you’re unsure or uncomfortable with DIY repairs, Antons Plumbing & Gas is available 24/7 for emergency services, ensuring you receive prompt and professional assistance.
How Do I Know If My Sink Pipe Is Leaking?
Signs of a leaking sink pipe include visible water stains, pooling water, dampness under the sink, or a musty smell. If you suspect a leak but can’t find the source, our expert team at Antons Plumbing & Gas can conduct a thorough inspection and provide accurate leak detection services to safeguard your home.