Planning a bathroom renovation means getting the plumbing right before you tile a single wall. Shower supply rough-in—the placement of water pipes, valves, and drains inside your walls and floor—determines whether your new shower works smoothly or causes leaks, temperature swings, and costly rework. Most Sydney homeowners discover rough-in mistakes only after the waterproofing is sealed, tiles are laid, and the damage is done.
This guide walks you through the standard dimensions, common pitfalls, and compliance requirements for shower supply rough-in work in Australian bathrooms. You will learn where to position your shower valve, how high to run your shower arm, and what clearances your drain needs to meet AS/NZS 3500 plumbing standards.
Key Takeaways
- Standard shower valve height sits at 1,000–1,200 mm above finished floor level, with the shower arm outlet at approximately 2,000–2,100 mm.
- Hot and cold supply lines are spaced 150 mm apart on centre, running behind the valve body to allow easy cartridge access.
- Shower drain rough-in requires a minimum 25 mm trap seal depth and a fall of 1:60 toward the waste line to prevent ponding.
- Compliance with AS/NZS 3500 and waterproofing standards is mandatory; inspections occur before you close walls and after membrane application.
- Professional rough-in by a licensed plumber protects your investment, ensures warranty coverage, and avoids expensive rectification work.
Understanding Shower Supply Rough-In Dimensions
Shower supply rough-in refers to the exact location of water pipes, valve bodies, and drain outlets installed inside your walls and floor before finishing work begins. These measurements matter because once your waterproof membrane is applied and tiles are fixed, moving a pipe or valve becomes a demolition job. Standard dimensions exist to balance user comfort, plumber access, and compliance with Australian plumbing codes.
The shower valve centre typically sits 1,000–1,200 mm above the finished floor. This range suits most adults and allows wheelchair users to reach controls without strain. The shower arm outlet—where your showerhead connects—is positioned at 2,000–2,100 mm, placing the spray between 1,800 and 2,000 mm depending on the fitting you choose.
Your hot supply line runs on the left when facing the wall, cold on the right, spaced 150 mm apart on centre. This spacing matches the inlet ports on most mixer valves and thermostatic cartridges sold in Australia. Pipes should be set back 50–75 mm from the finished wall surface to allow the valve body to sit flush once tiled.
| Component | Standard Height (mm) | Notes |
|---|---|---|
| Shower valve centre | 1,000–1,200 | Measured to finished floor; adjust for accessibility needs |
| Shower arm outlet | 2,000–2,100 | Suits most ceiling heights; check for sloped ceilings |
| Hot/cold supply spacing | 150 centre-to-centre | Matches mixer valve inlet ports |
| Drain outlet (floor waste) | 0–10 above subfloor | Allows for screed and tile thickness |
Shower base type affects your drain rough-in. A tiled floor waste sits flush with the subfloor, while a pre-formed acrylic base may need the drain raised 10–20 mm to connect properly. Check your base manufacturer’s installation guide before you lock in the drain height.
Step-by-Step Shower Rough-In Process
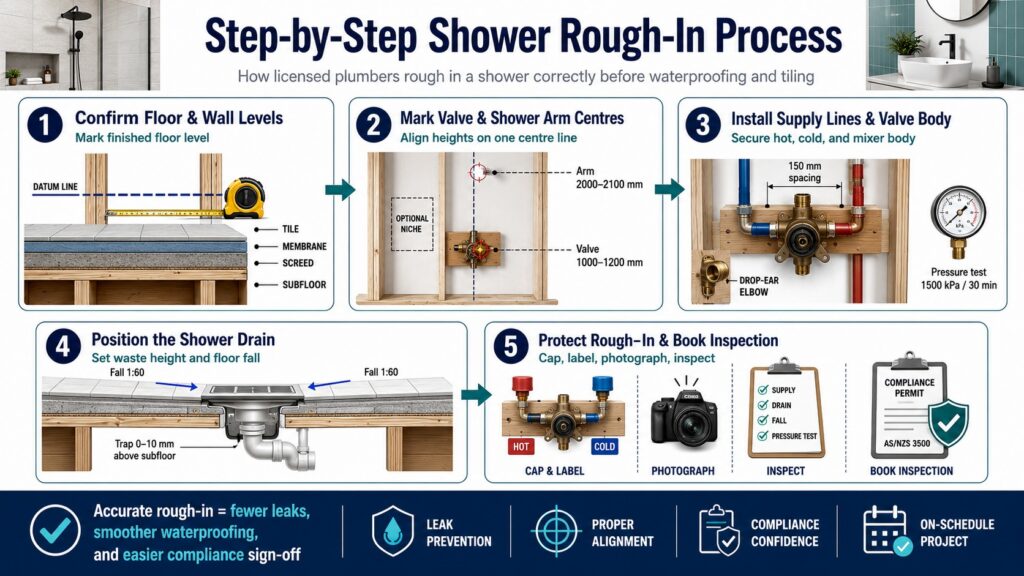
Rough-in happens in stages, coordinated with your builder, waterproofer, and tiler. Skipping steps or rushing measurements creates leaks, compliance failures, and warranty disputes. Here is how licensed plumbers approach shower supply rough-in on a typical Sydney renovation.
1. Confirm Final Floor and Wall Levels
Measure from the subfloor to the finished floor surface, accounting for screed, underfloor heating, waterproof membrane, adhesive, and tile thickness. A 10 mm miscalculation moves your valve 10 mm off target. Mark your finished floor level on the stud wall with a bold line so every trade can reference the same datum.
2. Mark Valve and Shower Arm Centres
Use a laser level or plumb bob to position the valve centre at 1,000–1,200 mm above finished floor. Mark the shower arm outlet at 2,000–2,100 mm on the same vertical line. Check that the arm outlet clears any bulkheads, ceiling slopes, or exhaust fans. If you are installing a shower niche, mark its location now to avoid clashing with supply lines.
3. Install Supply Lines and Valve Body
Run your hot and cold lines in copper, PEX, or PEX-AL-PEX, maintaining 150 mm spacing and securing them to blocking between studs. Install the valve body with the mixing cartridge facing out, ensuring the trim plate will sit flush with your finished tile. Use brass or stainless steel drop-ear elbows for the shower arm outlet, secured to solid blocking. Pressure-test the system at 1,500 kPa for at least 30 minutes before closing walls.
4. Position the Shower Drain
Centre your floor waste under the shower rose or offset it toward the wall if using a linear drain. The trap weir should sit 0–10 mm above the subfloor, allowing room for screed and tile. Set the drain to achieve a 1:60 fall across the shower floor so water flows freely without ponding. Secure the waste flange with screws or adhesive rated for wet areas.
5. Protect Rough-In and Book Inspection
Cap all outlets, label hot and cold lines, and photograph the installation for your records. Book a rough-in inspection with your certifier or local council before you apply waterproofing. The inspector checks pipe sizing, valve height, backflow prevention, and compliance with AS/NZS 3500. Only after sign-off can you proceed to membrane and tiling.
We handle every stage of shower rough-in for Sydney homeowners, from initial measurements through to final compliance sign-off. Our licensed plumbers coordinate with your builder and waterproofer, ensuring each trade works to the same reference points and standards. Same-day service means your project stays on schedule, and our lifetime labour warranty covers the installation long after the tiles are grouted.
Common Rough-In Mistakes and How to Avoid Them
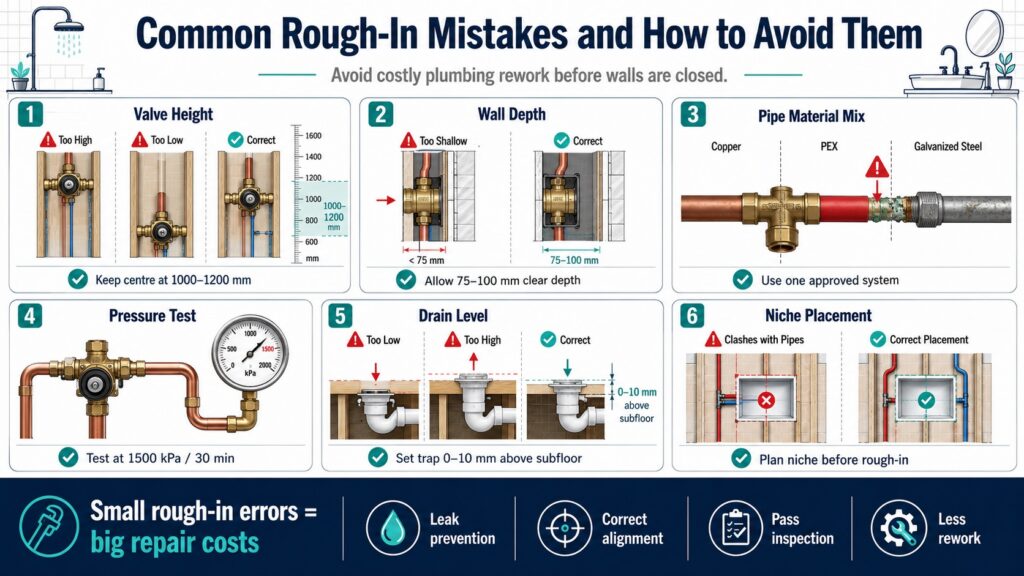
Small errors during rough-in create big problems once walls are closed. Leaks, poor water pressure, and failed inspections all trace back to rushed or incorrect pipe placement. Recognizing these pitfalls helps you avoid costly rework.
- Valve too high or too low: A valve centred at 1,400 mm forces tall users to stoop and makes wheelchair access impossible. Stick to the 1,000–1,200 mm range unless you have a specific accessibility requirement documented in your plans.
- Insufficient wall depth: Mixer valves need 75–100 mm of clear space behind the finished wall. If your stud wall is only 90 mm deep and you add 10 mm villaboard, 3 mm membrane, 10 mm adhesive, and 10 mm tile, the valve body will protrude. Use deeper studs or a recessed valve box.
- Wrong pipe material: Copper is durable but requires soldering and expands with heat. PEX is flexible and fast to install but needs proper support to prevent sagging. Mixing incompatible metals (copper and galvanized steel) causes electrolytic corrosion. Choose one system and use approved fittings throughout.
- No pressure test: Skipping the pressure test means you discover leaks only after waterproofing is applied. By then, you are cutting tiles and membranes to access the fault. Always test at 1,500 kPa for 30 minutes minimum, checking every joint and connection.
- Drain too low or too high: A drain set 20 mm below the subfloor leaves no room for screed, forcing you to build up the floor and lose ceiling height. A drain 30 mm above the subfloor creates a step or requires excessive screed thickness, adding weight and cost.
- Ignoring shower niche placement: Cutting through a supply line to fit a niche after rough-in means re-routing pipes and re-testing. Plan niche location early and route pipes around it, keeping hot lines away from soap and shampoo storage.
Homeowners often discover these mistakes only when the tiler or waterproofer refuses to proceed. By that point, your project is delayed, and you are paying for rectification work that could have been avoided with proper planning and a licensed plumber on-site from day one.
Compliance and Inspection Requirements for Shower Rough-In
All plumbing work in New South Wales must comply with AS/NZS 3500, the Plumbing Code of Australia, and local council requirements. Shower rough-in is a notifiable job, meaning your plumber must hold a current licence (like our Lic: 210933C) and arrange inspections at key stages. Skipping inspections or using an unlicensed installer voids your insurance, exposes you to fines, and makes selling your home difficult.
The first inspection occurs after rough-in is complete but before walls are closed. The inspector checks pipe sizing, valve height, backflow prevention, and water supply isolation. They confirm that hot and cold lines are correctly identified and that the system holds pressure without leaks. If you are installing a thermostatic mixer, the inspector verifies that it meets AS/NZS 3662 for temperature control and scald prevention.
The second inspection happens after waterproofing is applied but before tiling begins. The waterproofer must provide a compliance certificate showing that the membrane extends 100 mm past the shower area, laps correctly at corners, and integrates with the floor waste flange. Your plumber and waterproofer coordinate these inspections so each trade signs off on their portion of the work.
Councils across Sydney have specific requirements for wet area construction. Some require photographic evidence of membrane application. Others mandate a flood test where the shower floor is filled with water for 24 hours to check for leaks. Check with your local council early in the design phase so you budget time and cost for these steps.
We manage the entire compliance process for bathroom renovations across the Inner West, Eastern Suburbs, North Shore, and beyond. Our team books inspections, coordinates with certifiers, and provides all documentation you need for council sign-off and future property sales. You receive clear records of every test, every approval, and every standard we meet.
Choosing the Right Shower Valve and Tap Configuration
Your valve choice affects rough-in dimensions, water efficiency, and user safety. Mixer valves, thermostatic valves, and diverter systems each require different pipe layouts and wall depths. Selecting the wrong type after rough-in is complete means reworking your installation or settling for a valve that does not suit your needs.
| Valve Type | Wall Depth Required (mm) | Scald Protection | Best For |
|---|---|---|---|
| Standard mixer | 75–90 | No | Budget renovations, single-outlet showers |
| Thermostatic mixer | 100–120 | Yes (AS/NZS 3662) | Families, accessibility, consistent temperature |
| Diverter system | 120–150 | Optional | Multi-outlet showers, luxury bathrooms |
Shower taps and trim kits are not universal. Each valve body has a specific trim range, and mixing brands often means the handle will not fit or the cartridge will not seal. Choose your valve and trim together, confirm rough-in dimensions with the manufacturer’s installation guide, and order all parts before your plumber starts work.
Shower Base and Drain Coordination
Your shower base type dictates drain location, height, and waterproofing method. Tiled floors, pre-formed acrylic bases, and stone trays each have different rough-in needs. Getting this wrong means your drain will not connect, your floor will not slope correctly, or water will pond against the threshold.
Tiled shower floors use a floor waste (grated drain) set into a sloped screed bed. The waste flange sits flush with or slightly above the subfloor, and the screed is laid to create a 1:60 fall from all directions toward the drain. Waterproofing membrane laps over the flange and bonds to the screed, creating a seamless wet area. This method offers design flexibility but requires skilled screeding and waterproofing to avoid leaks.
Pre-formed acrylic or composite shower bases arrive with the drain outlet pre-positioned. You must rough-in your waste line to match the base manufacturer’s specifications exactly. Most bases require the drain stub to sit 10–30 mm above the subfloor so the base can rest on a mortar bed or adjustable feet. Check the installation guide before you lock in your drain height.
Linear drains run along one edge of the shower, creating a sleek, modern look and allowing large-format tiles with minimal cutting. Rough-in is more complex: the drain channel must be recessed into the subfloor or supported on a raised screed bed, and the floor must slope in one direction only. Linear drains require precise leveling and a compatible waterproofing system that integrates with the channel flanges.
We help Sydney homeowners choose the right shower base and drain configuration for their space, budget, and design goals. Our plumbers coordinate with your tiler and waterproofer to ensure the drain height, slope, and membrane integration all work together. Same-day service means we can assess your subfloor, recommend solutions, and start rough-in without delaying your renovation schedule.
Shower Niche Rough-In Considerations
Shower niches provide recessed storage for soap, shampoo, and razors, but they require careful planning during rough-in. Cutting into a stud wall after pipes are installed risks hitting a supply line, and adding a niche later means removing tiles and waterproofing. Plan niche size, location, and framing before rough-in begins.
Standard niche dimensions are 300 mm wide by 300–600 mm tall, fitting between two studs spaced at 450 or 600 mm centres. The bottom of the niche should sit 900–1,200 mm above the finished floor, within easy reach while standing. Avoid placing the niche directly in line with the shower rose, where water spray will flood the shelves and create cleaning problems.
Niches require a waterproof backing (villaboard or cement sheet), a sloped sill to drain water, and careful membrane detailing at all internal corners. The membrane must lap into the niche, bond to the backing, and integrate with the main wall membrane to prevent water tracking behind the tiles. Any gap or tear becomes a leak path into your wall cavity.
Keep hot water supply lines at least 100 mm away from niche locations. Heat from the pipe can crack tiles, soften adhesive, and make stored products uncomfortably warm. If your valve or supply lines run through the planned niche area, re-route the pipes or move the niche to a different bay.
Prefabricated niche units with integrated waterproofing flanges simplify installation and reduce leak risk. These units bond directly to the wall membrane and require only tile finish work. They cost more than site-built niches but save time and provide a factory-tested waterproof seal.
Hot Water System Compatibility and Pressure Requirements
Your shower rough-in must match the flow rate and pressure characteristics of your hot water system. Instantaneous gas units, electric storage tanks, heat pumps, and solar systems all deliver different flow rates and recovery times. Undersized pipes or incorrect valve sizing leads to weak pressure, long wait times for hot water, and user frustration.
Instantaneous gas systems provide endless hot water but require minimum flow rates to activate the burner. If your shower valve and outlets are too restrictive, the unit will not fire, and you will get cold water. Check the manufacturer’s minimum flow specification (usually 2–4 litres per minute) and ensure your valve and showerhead meet that threshold.
Electric storage tanks have a fixed capacity. A 125-litre tank might supply one shower comfortably but struggle with two simultaneous users. If you are renovating multiple bathrooms, calculate total peak demand and confirm your tank size is adequate. Upgrading to a larger tank or a continuous-flow system may be necessary.
Heat pump and solar hot water systems have slower recovery times than gas. If your household takes back-to-back showers, you may run out of hot water partway through the day. Installing a tempering valve at the tank outlet and mixing cold water at the shower valve maximizes the usable hot water volume.
Water pressure across Sydney varies from 250 kPa in low-lying areas to 600 kPa in elevated suburbs. High pressure causes valve wear, noise, and water hammer. Install a pressure-limiting valve at your water meter if your static pressure exceeds 500 kPa. Low pressure requires a booster pump or redesigned pipe sizing to maintain adequate flow at all outlets.
We assess your existing hot water system and water pressure during the planning phase of every bathroom renovation. Our team recommends upgrades, pressure regulation, or pipe sizing changes to ensure your new shower performs reliably. We supply and install hot water systems from trusted brands, all compliant with AS/NZS 3500 and backed by our lifetime labour warranty.
When to Call a Licensed Plumber for Shower Rough-In
Shower rough-in is not a DIY job. NSW law requires all plumbing work to be performed by a licensed tradesperson, and councils will not issue a completion certificate for unlicensed installations. Beyond legal compliance, professional rough-in protects your investment, ensures warranty coverage, and avoids expensive rectification work.
You need a licensed plumber if you are moving walls, changing shower location, upgrading to a thermostatic valve, installing multiple outlets, or working in a heritage home with old pipe systems. Any time you open walls and expose supply lines, you risk discovering corroded pipes, undersized drains, or non-compliant work from previous owners. A licensed plumber identifies these issues early, provides clear options, and completes repairs to current standards.
Homeowners who attempt rough-in themselves often discover mistakes only after waterproofing and tiling are complete. A valve installed 50 mm too high cannot be adjusted without demolishing the wall. A drain set too low creates a permanent step in the shower floor. A pipe run that crosses a niche location requires rerouting and re-testing. These errors cost thousands to fix and delay your project by weeks.
We provide same-day rough-in assessments for Sydney homeowners planning bathroom renovations. Our licensed plumbers measure your space, review your design, and identify potential clashes before work begins. We coordinate with your builder, waterproofer, and tiler to ensure every trade works to the same plan and standards. You receive clear documentation, compliance certificates, and a lifetime labour warranty on all installation work.
If you are renovating in the Inner West, Eastern Suburbs, North Shore, Northern Beaches, Hills District, or Western Sydney, our team is ready to help. Call 0493 824 176 for a fast quote or book online to lock in your rough-in appointment. No call-out fee from 7 am to 3 pm on weekdays, and 24/7 emergency support if you discover a leak or compliance issue mid-project.
Protecting Your Shower Rough-In During Construction
Once rough-in is complete and inspected, your pipes and valve bodies remain exposed until waterproofing and tiling begin. Damage during this phase is common: dropped tools, accidental impacts, and debris entering open pipes all create leaks and failures. Protecting your rough-in saves time and money.
Cap all outlets with threaded plugs or tape to prevent debris entering the system. Dust, tile adhesive, and grout can clog cartridges and aerators, reducing flow and causing valve failure. Label hot and cold lines clearly so other trades do not cross-connect or damage the wrong pipe.
Photograph your installation before walls are closed. Capture valve height, pipe routing, and any blocking or reinforcement you have added. These photos become invaluable if you need to locate a pipe later, troubleshoot a leak, or prove compliance during a building inspection.
Coordinate access with other trades. Electricians, HVAC installers, and carpenters all work in the same wall cavities. A misplaced screw or saw cut can puncture a supply line, and you will not discover the leak until water is turned on for testing. Clear communication and site management prevent these accidents.
If your renovation timeline stretches over weeks or months, consider a mid-project plumbing inspection. A quick visual check confirms that nothing has shifted, no caps have been removed, and all protective measures remain in place. This step costs little but catches problems before they become emergencies.
Cost Factors and Budgeting for Shower Rough-In
Shower rough-in costs vary depending on pipe material, valve type, site access, and compliance requirements. A straightforward replacement in an existing bathroom costs less than a new shower in a home extension or a complex multi-outlet system. Understanding these factors helps you budget accurately and avoid surprise expenses.
Labour makes up the largest portion of rough-in cost. Licensed plumbers charge fixed rates for standard installations, with additional fees for difficult access, structural modifications, or after-hours work. Expect to pay more if your walls are solid brick, if you need to reroute existing pipes, or if your site has restricted access for materials and tools.
Materials include pipes, fittings, valve bodies, drain assemblies, and mounting hardware. Copper is more expensive than PEX but lasts longer and suits heritage homes. Thermostatic valves cost more than standard mixers but provide safety and comfort benefits. Pre-fabricated shower niches and linear drains add to material cost but simplify installation and reduce leak risk.
Compliance and inspection fees are separate from plumbing labour. Your plumber arranges inspections, but you pay the certifier or council directly. Some councils charge per inspection; others bundle rough-in and final inspections into a single fee. Budget for at least two inspections: one after rough-in and one after waterproofing.
Rectification work is the hidden cost of poor planning or unlicensed installation. Moving a valve after tiling costs five to ten times more than getting it right during rough-in. Repairing a leak behind a finished wall requires demolition, waterproofing replacement, and re-tiling. Investing in a licensed plumber and proper planning eliminates these expenses.
We provide upfront, fixed-rate pricing for shower rough-in across Sydney. You receive a detailed quote covering labour, materials, inspections, and any site-specific requirements before work begins. No hidden fees, no surprise charges, and no call-out fee for assessments booked between 7 am and 3 pm on weekdays. Our lifetime labour warranty means you are covered long after the project is complete.
Conclusion
Shower supply rough-in sets the foundation for a bathroom that works reliably for decades. Correct valve height, proper pipe sizing, compliant drain installation, and coordinated inspections protect your investment and ensure every shower is comfortable, safe, and leak-free. Call 0493 824 176 or book online to discuss your renovation with our licensed Sydney plumbers today.
Antons Plumbing & Gas delivers expert shower rough-in and bathroom renovation plumbing across Sydney Metro with 25+ years’ experience. Our licensed team ensures compliant, precise installations tailored to your project. Get started with same-day service today.
Related Articles
- Unknown Plumbing Part Identification for Homeowners and DIY Beginners
- Why Your Shower Gets Cold When Other Faucet Runs
- Faucet Cartridge Extension Identification Guide for Plumbing Repairs
FAQs
What is a shower supply rough-in?
A shower supply rough-in is the hidden plumbing installed inside the wall before tiling, including the hot and cold water pipes, shower mixer or valve, and pipework leading to the showerhead.
How do you install a shower supply rough-in?
A licensed plumber installs it by marking the mixer and showerhead positions, running the hot and cold water lines, securing the shower valve at the correct depth, connecting the outlet pipe to the showerhead location, and pressure testing everything before the wall is closed.
What are the plumbing codes for shower rough-in?
Shower rough-in plumbing in NSW must be completed by a licensed plumber and comply with the Plumbing Code of Australia, relevant AS/NZS plumbing standards, approved materials, safe hot water delivery, and proper waterproofing coordination.
What is the standard height for shower supply rough-in?
A common rough-in height for a shower mixer is around 1,000 mm to 1,200 mm above the finished floor, while the showerhead outlet is usually around 1,800 mm to 2,100 mm, depending on the shower type and user needs.
How far should the shower valve be from the showerhead?
The shower valve is commonly placed about 700 mm to 1,000 mm below the showerhead, but the final distance depends on the fixture design, wall layout, tile plan, and manufacturer instructions.