
A dripping shower head can waste litres of water each day and drive up your utility bills. Many Sydney homeowners attempt a quick DIY fix, only to find the leak returns within weeks or worsens overnight. Understanding where most repairs go wrong can save you time, money, and the frustration of repeated attempts.
This guide walks you through the five most common mistakes people make when learning how to fix dripping shower issues. You’ll discover why some leaks persist despite new washers, when professional diagnosis beats guesswork, and how to decide whether a repair or replacement delivers better long-term value.
Key Takeaways
- Skipping the water shut-off step can flood your bathroom and damage ceilings below.
- Over-tightening connections often cracks internal threads and creates new leaks.
- Using the wrong tape or washer type means the drip will return within days.
- Ignoring hidden valve or pipe issues wastes time on surface-level fixes that fail.
- Attempting complex mixer repairs without training risks scalding injuries and non-compliance.
1. Forgetting to Turn Off the Water Supply Before You Start
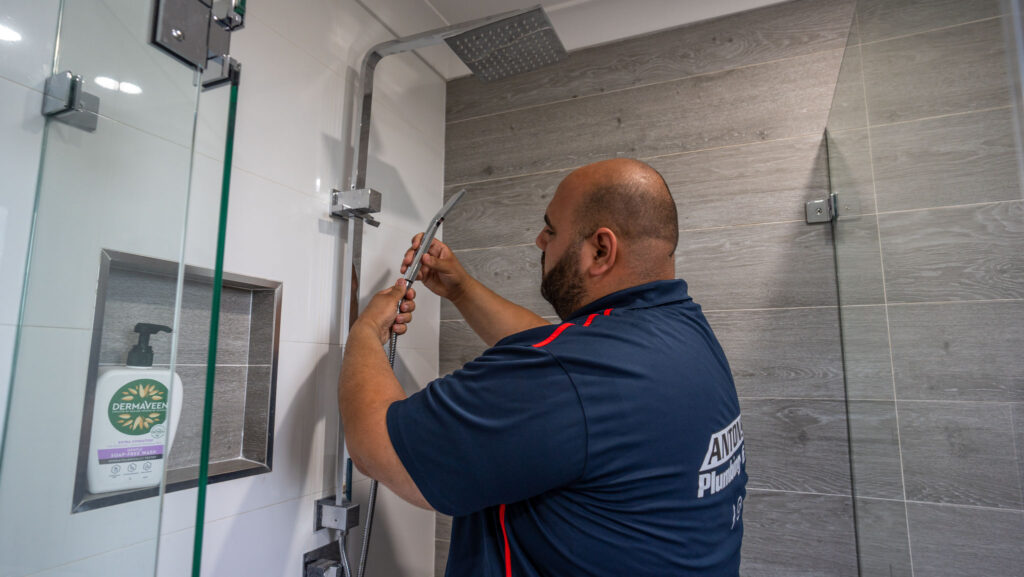
This sounds obvious, yet it remains the single most common error when homeowners learn how to fix a leaking shower head. The moment you unscrew the shower rose or loosen the arm connection, pressurised water can spray across tiles, soak electrical fixtures, and seep into wall cavities. In multi-storey homes, ceiling damage to rooms below can cost thousands to repair.
Sydney’s mains pressure typically sits between 350 and 500 kPa. Even a brief burst can saturate plasterboard and timber framing. Mould growth follows within 48 hours if the cavity stays damp.
| Shut-Off Point | Location | When to Use |
|---|---|---|
| Shower isolation valve | Wall-mounted near shower arm | Standard repairs (rose, arm, hose) |
| Main stopcock | Front boundary or meter box | No local valve, or full mixer service |
| Hot water tempering valve | Near hot water unit | Scalding or temperature faults |
If you’re unsure which valve controls your shower, our team can map your plumbing layout during a same-day service call. We label shut-off points and provide a simple diagram so future repairs are faster and safer.
2. Ignoring Mineral Build-Up Inside the Shower Arm
Sydney’s water hardness varies by suburb, but calcium and magnesium deposits can build up inside any shower arm over time. Even if the shower head looks fine on the outside, mineral scaling can reduce the internal diameter of the arm and disrupt normal water flow. That restriction often contributes to performance issues that homeowners mistake for a faulty shower head.
When you remove the shower rose, inspect the shower arm’s internal bore for white or orange crusty deposits. This build-up restricts flow and creates back-pressure that can force water past seals, leading to ongoing dripping or leaks. To clean it, soak the arm in white vinegar for 30 minutes, then scrub the inside with a bottle brush before reinstalling.
3. Choosing the Wrong Replacement Parts for Your Shower Type
Not all washers, cartridges, and seals are interchangeable. A standard 12 mm fibre washer won’t seal a European mixer that requires a 14 mm silicone O-ring. Mixing metric and imperial fittings is another frequent trap—threads may engage but never seat properly, leaving a persistent drip.
Shower systems fall into several broad categories, each with unique service parts. Single-handle mixers use ceramic disc cartridges that must match the brand and model. Dual-handle taps rely on spindle washers and jumper valves sized to the seat diameter. Thermostatic mixers contain wax elements and check valves that require specialised tools and training to replace safely.
Before you shop for parts, photograph the existing components and note any stamped codes on the valve body. Many hardware retailers stock generic kits that claim universal fit but fail under Sydney’s mains pressure. Branded spares from the original manufacturer ensure dimensional accuracy and material compliance.
Our plumbers carry an extensive range of genuine parts for Caroma, Dorf, Methven, and other common brands installed across Sydney. Same-day service means we can diagnose the issue, source the correct cartridge or seal, and complete the repair in a single visit—no guesswork, no return trips.
4. Overlooking Hidden Issues That Cause a Leaking Shower Head
Surface drips can be misleading, because the real cause of a leaking shower head is often hidden behind tiles and inside the wall cavity. Small faults like cracked brass, corroded threads, or pressure imbalance can quietly soak framing long before visible stains appear. Catching these issues early helps prevent mould growth, ceiling damage, and expensive rebuild work.
Cracked Valve Body Behind the Wall
A hairline crack in the valve body can weep slowly into the wall cavity while only a few drops appear at the shower rose.
Corroded Pipe Threads Inside the Wall Cavity
In older homes, internal thread corrosion can cause the pipe to twist or snap when the shower arm is removed, leading to a sudden cavity flood.
Faulty Tempering Valve Upstream
A failing tempering valve can create a pressure imbalance that forces water past seals downstream, sometimes only showing up when the hot tap is open.
Incorrect Pipe Slope or Trapped Air
Sagging pipe runs can trap residual water, causing persistent dripping after shutoff until the line is re-pitched correctly.
Cross-Connection Between Hot and Cold Lines
A failed non-return or backflow device can allow cross-flow between hot and cold lines, triggering drips across multiple fixtures and requiring proper pressure testing.
Hidden shower leaks don’t just waste water—they can quietly rot timber, damage ceilings, and turn a simple repair into a structural fix. That’s why we use calibrated pressure gauges and thermal imaging to locate faults accurately before any cutting starts. When needed, CCTV inspection helps confirm what’s happening inside wall cavities so the repair is targeted, compliant, and not guesswork.
5. Attempting Complex Mixer Repairs Without Training or Tools
Modern thermostatic and pressure-balancing mixers are built with precision parts that aren’t forgiving if they’re handled incorrectly. Without the right tools and torque specifications, DIY disassembly can damage seals, misalign internal components, or disable the anti-scald function. The outcome is often a leak that won’t stop—or a mixer that suddenly runs dangerously hot.
- Modern mixer valves include precision cartridges, wax thermostats, and spring-loaded check valves that can be easily damaged during DIY disassembly.
- Without the correct spanner set, cartridge puller, and torque guidance, seals can tear, threads can strip, and components can seat incorrectly.
- AS/NZS 3500.4 sets maximum outlet temperature limits to reduce scald risk, especially for households with children and elderly residents.
- Incorrectly removing or reassembling a tempering element can create a compliance breach and a serious safety hazard.
- Scalding-related insurance claims may be denied if unlicensed or non-compliant work is identified.
- Mixer cartridges require compatible lubricants—petroleum-based products can swell EPDM/silicone seals and cause premature failure.
- Licensed plumbers use food-grade silicone grease and approved O-ring lubricants that won’t degrade seals over time.
- Many manufacturers void warranties when unauthorised repairs are attempted.
If a mixer is leaking or fluctuating in temperature, the safest approach is to diagnose it properly before pulling it apart. A licensed plumber can confirm whether the fault sits in the cartridge, tempering control, check valves, or upstream pressure issues—without turning it into a bigger repair. That means safer water temperatures, compliant workmanship, and a fix that lasts.
When to Call a Licensed Sydney Plumber Instead of DIY

Some leaks are straightforward—like a loose shower rose or a worn washer that most homeowners can replace in minutes. Others point to hidden faults that require diagnostic tools, specialised parts, and proper compliance knowledge to fix safely. Knowing when to stop DIY can save you money, prevent water damage, and avoid turning a small drip into a bigger claim.
Call a licensed plumber if the leak continues after replacing washers and tape, if you spot water stains on the ceiling below, or if the mixer handle feels stiff or gritty. Noises like hissing, banging, or whistling when adjusting temperature can also signal valve or pressure issues that need expert assessment. Antons Plumbing & Gas provides same-day service across Sydney Metro (Inner West, Eastern Suburbs, North Shore, Northern Beaches, Hills District, and South-Western Sydney), with upfront pricing, no call-out fee, and a fixed-rate model—plus 24/7 support at 0493 824 176, lifetime labour warranty, and compliance with AS/NZS 3500 standards.
Conclusion
A dripping shower isn’t just an annoyance—it’s a signal that something in your plumbing system needs attention. Left unchecked, even a slow leak can waste thousands of litres per year, spike your water bill, and saturate building materials until mould or structural damage appears. The five mistakes covered here account for the majority of failed DIY repairs we’re called to fix.
Antons Plumbing & Gas brings 25+ years of experience fixing leaky taps and showers across Sydney. Our licensed plumbing services include same-day repairs with upfront pricing. Get started with a call today.
Related Articles
- Why Do Shower Drains Smell? Common Causes and Solutions
- Top 5 Reasons Your Shower Head Is Dripping and How to Fix It
FAQs
What Causes A Shower To Drip?
A shower may drip due to worn-out washers, damaged O-rings, or mineral buildup in the faucet. Over time, these components can deteriorate, leading to leaks. Regular maintenance and inspections by a professional, like Antons Plumbing & Gas, can help prevent these issues.
How Do You Fix A Dripping Shower Head?
To fix a dripping shower head, start by turning off the water supply. Remove the shower head and check for any worn washers or O-rings; replacing these can often solve the problem. If you’re unsure, our experienced team can quickly and effectively address the issue for you.
Can You Fix A Dripping Shower Faucet Yourself?
Yes, you can fix a dripping shower faucet yourself if you have the right tools and some basic plumbing knowledge. However, if you’re not confident in your skills, it’s best to contact Antons Plumbing & Gas for a reliable and professional fix.
What Tools Do I Need To Fix A Dripping Shower?
Common tools needed include an adjustable wrench, screwdriver, and replacement parts like washers or O-rings. If you prefer a hassle-free experience, our fully qualified team can handle the job with precision and expertise.
How Much Does It Cost To Fix A Dripping Shower?
The cost to fix a dripping shower can vary based on the complexity of the issue and the parts needed. At Antons Plumbing & Gas, we offer upfront pricing and no call-out fee, ensuring you know what to expect before we start the work.
 February 2026