Standing water in your yard after every storm is more than just an eyesore. It can damage foundations, kill grass, and create breeding grounds for pests. Installing a drainage system solves these problems by redirecting water away from vulnerable areas. The challenge is knowing which system suits your property and whether you should tackle it yourself or call in professionals.
This guide walks you through the essentials of yard drainage installation, from choosing the right system to understanding slope requirements and material selection. You’ll also learn when DIY makes sense and when expert help protects your investment.
Key Takeaways
- Proper slope is critical for all drainage systems, typically requiring 1–2% grade to ensure water flows correctly.
- French drains, channel drains, and in-ground systems each solve different drainage problems depending on your yard’s layout.
- Incorrect installation can lead to foundation damage, pipe collapse, and water pooling in new areas.
- Sydney’s clay soil and tree roots demand careful planning to avoid blockages and structural issues.
- Licensed plumbers bring compliance knowledge, diagnostic tools, and lifetime labour warranties that DIY projects can’t match.
Understanding How to Install a Drainage System
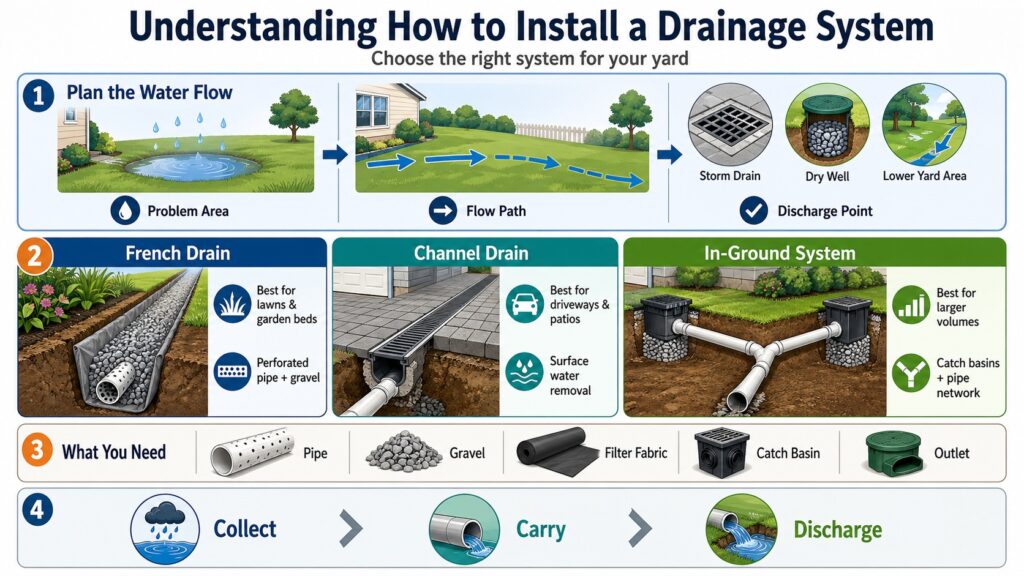
Installing a drainage system starts with identifying where water collects and where it needs to go. You’ll need to map the flow path from problem areas to a safe discharge point, whether that’s a stormwater drain, dry well, or lower section of your property. The system type you choose depends on the source of water, the volume you’re managing, and the layout of your yard.
Three common systems handle most residential drainage issues. French drains work well for broad, shallow pooling across lawns or garden beds. Channel drains suit paved areas like driveways and patios where surface water needs quick removal. In-ground systems with catch basins and perforated pipe handle larger volumes and multiple collection points.
Each system requires different materials and installation techniques. French drains use perforated PVC pipe surrounded by gravel and filter fabric. Channel drains need concrete forms and sloped trenches with solid connections to outlet pipes. In-ground systems combine catch basins, Y-fittings, and fabric-wrapped tubing to create a network that moves water underground.
Many homeowners also overlook discharge planning. Dumping water against a neighbor’s fence or into an area without proper drainage just moves the problem. Check local council regulations about stormwater discharge before you dig.
Step-by-Step: How to Install a French Drain
French drains are the workhorse of residential yard drainage. They handle shallow groundwater, soggy lawn areas, and water that seeps toward foundations. The system is essentially a gravel-filled trench with a perforated pipe at the bottom, all wrapped in filter fabric to keep soil out.
Start by marking your drain path with spray paint. The trench should begin at the wettest area and slope downward to a safe discharge point. Calculate your slope: for a 20-foot run, you’ll need at least 2 inches of drop (1 inch per 10 feet) to maintain 1% grade.
1. Excavate the Trench
Dig a trench 9 inches wide and 18–24 inches deep, depending on how much water you’re managing. Make the trench 6 inches wider than your pipe to allow room for gravel on all sides. Start digging from the discharge end and work upward to maintain proper slope.
2. Line With Filter Fabric
Lay filter fabric along the bottom and sides of the trench, leaving enough excess to fold over the top later. This fabric prevents soil from migrating into the gravel and clogging the system. Overlap seams by at least 6 inches to avoid gaps.
3. Add Gravel Bedding
Pour 2–3 inches of clean gravel (20mm or ¾-inch size works well) into the bottom of the trench. This creates a stable base for the pipe and allows water to flow freely underneath. Level the gravel to maintain your slope.
4. Lay Perforated Pipe
Place the perforated PVC pipe on top of the gravel with holes facing down. This orientation lets water enter from below while preventing debris from falling directly into the holes. Connect pipe sections with slip couplings or solvent-weld fittings for a secure joint.
5. Cover and Wrap
Add 3–4 inches of gravel over the pipe, then fold the filter fabric over the top to create a complete wrap. Fill the remaining trench depth with soil or decorative rock. Keep the surface slightly crowned so water doesn’t pool above the drain.
How to Install a Drainage Channel for Paved Areas
Channel drains (also called trench drains) collect surface water from driveways, patios, and other hard surfaces. They consist of a sloped channel with a grate on top and an outlet pipe that connects to your stormwater system. Installation requires more precision than French drains because the channel must sit flush with the surrounding pavement.
Before you dig, call 1100 (Dial Before You Dig) to locate underground utilities. Cutting into a gas line or electrical conduit turns a drainage project into an emergency. Once you’ve confirmed the area is clear, mark your channel path and calculate slope.
Trench Preparation
Dig a trench wide enough to accommodate the channel plus 4 inches of concrete on each side. For driveway installations, you’ll also need 4 inches of concrete underneath for structural support. The trench should slope at least 1% (1 inch per 8 feet) toward the outlet.
Set the Channel
Place the channel in the trench and verify slope with a level. Adjust the base with sand or gravel until the grade is consistent. The top of the channel should sit flush with the finished surface level, whether that’s concrete, pavers, or asphalt.
Pour Concrete Forms
Mix and pour concrete around and under the channel, making sure it fills all voids. Use a trowel to create smooth transitions between the channel and surrounding pavement. Let the concrete cure for at least 24 hours before driving on it.
Connect Outlet Pipe
Attach the outlet fitting to the end of the channel using silicone sealant or the manufacturer’s recommended adhesive. Run solid PVC pipe from this fitting to your discharge point, maintaining slope throughout. Test the system by running water through the channel and checking for leaks at all connections.
Installing an In-Ground Drainage System With Catch Basins
In-ground systems handle larger volumes and multiple collection points across your property. They use catch basins (also called drain boxes) connected by perforated pipe to create a network that intercepts water before it reaches problem areas. This approach works well for properties with multiple low spots or complex drainage patterns.
- Dig basin holes: Excavate holes deep enough to place the basin with its grate flush to ground level. Add 6 inches of gravel to the bottom and drill drainage holes in the basin floor to prevent standing water.
- Trench between basins: Dig trenches connecting each basin, maintaining 1% slope toward the final discharge point. Make trenches wide enough for pipe plus surrounding gravel.
- Install pipe with Y-fittings: Use Y-fittings to connect perforated pipe between basins. Wrap pipe in filter fabric or use pre-sleeved pipe to prevent soil infiltration. Sydney’s clay soil makes this step essential.
- Cover with gravel: Surround all pipes with at least 3 inches of gravel on all sides. This rock layer provides drainage capacity and prevents pipe collapse under soil weight.
- Wrap in landscape fabric: Fold fabric over the gravel to create a complete envelope. This keeps fine soil particles from washing into the system during heavy rain.
- Backfill and level: Fill trenches with soil, tamping every 6 inches to prevent settling. Keep the basin grates level with the surrounding ground so water flows in easily.
Plan your basin locations first. Place them at the lowest points where water naturally collects, spacing them no more than 50 feet apart for best performance. Each basin needs a gravel base and proper depth to function correctly.
When to Call a Licensed Sydney Plumber

DIY drainage projects can work for simple, small-scale problems. But many situations demand professional expertise to avoid costly mistakes or code violations. Knowing when to call for help saves time, money, and future headaches.
Sydney’s unique conditions create challenges that homeowners often underestimate. Clay soil shifts and compacts differently than sandy or loamy ground, affecting pipe stability and drainage capacity. Tree roots from native species like eucalyptus and figs aggressively seek water sources, invading even new drainage systems within a few years.
Complex Layouts and Multiple Discharge Points
Properties with steep slopes, multiple buildings, or existing underground utilities need professional planning. Incorrect pipe routing can redirect water into foundation footings or create erosion problems. We use CCTV drain inspection to map existing pipes and avoid conflicts before we dig.
Compliance and Council Requirements
Stormwater drainage often requires council approval, especially if you’re connecting to street infrastructure or altering natural water flow. Our work complies with AS/NZS 3500 plumbing standards and NSW Fair Trading requirements (Lic: 210933C). We handle permit applications and provide documented plans that satisfy council inspectors.
Foundation Protection and Structural Concerns
Drainage systems near building foundations demand precise placement and slope to prevent undermining. Poor installation can cause settling, cracking, or water infiltration into basements and crawl spaces. We assess soil conditions, calculate load requirements, and install systems that protect structural integrity long-term.
Integration With Existing Systems
Connecting new drainage to existing stormwater pipes, sewer lines, or irrigation systems requires diagnostic tools and code knowledge. We use acoustic leak detection and pressure testing to verify connections won’t create backflow or cross-contamination issues. Our lifetime labour warranty covers installation defects, giving you confidence the system will perform as designed.
For homeowners across Sydney, from the Inner West to the Sutherland Shire, we provide same-day service for drainage assessments and emergency repairs. Call 0493 824 176 to discuss your drainage challenges with our qualified team.
Conclusion
Proper drainage protects your property from water damage, foundation issues, and landscape erosion. Whether you choose a French drain, channel system, or in-ground network, correct slope and quality materials determine long-term performance. For complex projects or Sydney’s challenging soil conditions, professional installation with compliance documentation and warranty coverage delivers peace of mind. Call 0493 824 176 to discuss your drainage needs with our licensed team.
Antons Plumbing & Gas brings 25+ years of expertise to every drainage installation and repair across Sydney. Our licensed team ensures compliant, long-lasting systems tailored to your property. Get started with a no call-out fee consultation today.
Related Articles
- Why Installing a Drainage System in Your Yard Is Essential for Your Property
- Compliance Matters: Codes a Drainage Plumber Follows
- How to Build a Drainage System: Essential Tips for Homeowners
FAQs
What Are The Steps To Install A Drainage System?
To install a drainage system, start by assessing the area to determine where water collects. Next, mark the layout for the drainage trenches, ensuring they slope away from your home. Dig the trenches to the appropriate depth, then lay down gravel and perforated piping. Cover the pipes with more gravel and soil, ensuring the surface is level. Finally, test the system by running water to ensure it drains properly. If you prefer professional assistance, Antons Plumbing & Gas is here to ensure it’s done right the first time.
How Much Does It Cost To Install A Drainage System?
The cost to install a drainage system can vary based on factors such as the size of the area, the type of system needed, and the complexity of the installation. For an accurate estimate tailored to your specific situation, we recommend contacting Antons Plumbing & Gas for a consultation. Our upfront pricing ensures no surprises.
What Type Of Drainage System Is Best For My Yard?
The best drainage system for your yard depends on the specific conditions, such as soil type, slope, and water accumulation patterns. Common options include French drains, surface drains, and dry wells. Our experienced team at Antons Plumbing & Gas can assess your yard and recommend the most effective solution tailored to your needs.
Can I Install A Drainage System Myself?
While it’s possible to install a drainage system yourself, it requires careful planning and execution to ensure effectiveness and compliance with local regulations. Improper installation can lead to further drainage issues. If you’re unsure, our qualified professionals at Antons Plumbing & Gas are ready to help you achieve the best results safely and efficiently.
How Deep Should A Drainage System Be?
The depth of a drainage system typically depends on the type of system and the specific needs of your yard. Generally, trenches should be at least 6 to 12 inches deep. However, for optimal performance, we recommend consulting with our experts at Antons Plumbing & Gas to determine the best depth for your particular situation.