Water pooling in your yard after heavy rain is more than an inconvenience. It signals a drainage problem that can damage your foundation, kill your lawn, and turn your property into a breeding ground for mosquitoes. Installing a drainage system in your yard protects your home from costly structural repairs and keeps outdoor spaces usable year-round.
This guide explains why yard drainage matters for Sydney homeowners, the risks of ignoring it, and how professional installation delivers long-term results. You’ll learn about common drainage solutions, what to expect during installation, and when to call a licensed plumber for help.
Key Takeaways
- Poor yard drainage can cause foundation cracks, soil erosion, and landscape damage.
- French drains, channel drains, and rainwater harvesting systems are proven solutions for Sydney properties.
- Correct slope and pipe placement are critical for effective water flow.
- DIY installation may save money upfront but often leads to costly repairs later.
- Professional plumbers ensure compliance with Australian Standards and long-term performance.
Why Installing a Drainage System in Your Yard Prevents Property Damage
Water follows the path of least resistance. When your yard lacks proper drainage, rainwater collects in low spots, saturates the soil, and migrates toward your home’s foundation. Over time, this moisture causes cracks in concrete slabs, shifts in brick walls, and subsidence that can cost tens of thousands of dollars to repair.
Sydney’s clay-heavy soils compound the problem. Clay expands when wet and contracts when dry, creating constant pressure on foundations and underground pipes. Without a drainage system to redirect stormwater, your property faces ongoing movement and stress.
Erosion is another concern. Heavy rainfall washes away topsoil, exposes tree roots, and creates channels that funnel water toward structures. Retaining walls, driveways, and garden beds suffer accelerated wear when water isn’t managed properly.
Common Drainage Solutions for Sydney Yards
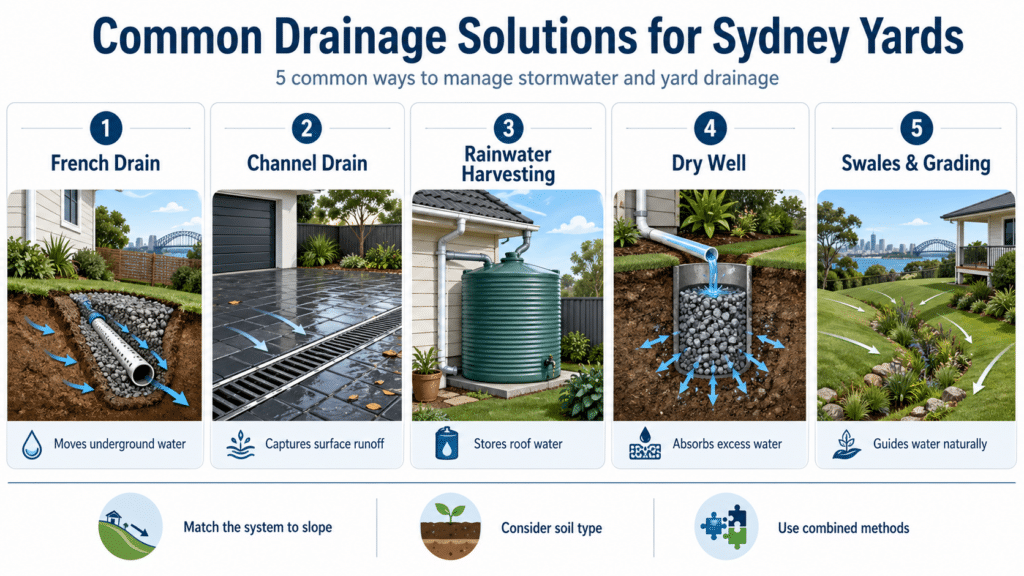
Several drainage systems address different water management challenges. The right choice depends on your property’s slope, soil type, and the volume of water you need to redirect. Most Sydney homes benefit from a combination of methods tailored to specific problem areas.
French drains, channel drains, and rainwater harvesting systems are the most common solutions. Each has distinct advantages and installation requirements.
French Drains Redirect Subsurface Water
A French drain consists of a perforated pipe surrounded by gravel, installed in a sloped trench. Water enters through the perforations, flows through the pipe, and exits at a lower point away from your home. This system works well for areas with poor soil drainage or where water collects underground. The trench should be about 18 inches deep and 9-12 inches wide, with a slope of at least 1 percent to maintain gravity-driven flow. Bunnings drainage pipe options include PVC and corrugated varieties, though professional-grade materials offer better longevity.
Channel Drains Capture Surface Runoff
Channel drains, also called trench drains, sit at ground level and collect water flowing across paved surfaces like driveways, patios, and walkways. A grated cover allows water to enter while blocking debris. These drains connect to underground pipes that carry water to a discharge point. They’re ideal for sloped areas where surface water moves quickly and needs immediate capture.
Rainwater Harvesting Systems Store and Reuse Stormwater
A rainwater harvesting system collects roof runoff via gutters and downpipes, directing it into storage tanks for later use. This approach reduces stormwater volume entering your yard, lowers water bills, and provides irrigation during dry periods. Bunnings irrigation supplies can support basic setups, but larger systems require professional design to ensure tank sizing, pump selection, and plumbing integration meet your needs. Rainwater harvesting also helps meet BASIX requirements for new builds and renovations in NSW.
Dry Wells Absorb Excess Water Underground
A dry well is a gravel-filled pit that receives water from downspouts or drainage pipes. Water percolates into the surrounding soil rather than pooling on the surface. This solution works best in areas with permeable soil and low water tables. Dry wells require adequate depth and proper sizing to handle peak rainfall events.
Swales and Grading Redirect Water Using Landscape Contours
Swales are shallow, vegetated channels that slow and direct water flow across your property. Proper grading ensures water moves away from structures and toward designated drainage points. This method is cost-effective for large yards but requires careful planning to avoid creating new problem areas.
How to Assess Your Yard’s Drainage Needs Before Installation
Effective drainage starts with understanding where water comes from, where it goes, and where it causes problems. A thorough assessment identifies high-risk zones and informs system design. You can perform a basic evaluation yourself, but a licensed plumber provides detailed analysis and compliance guidance.
Start by observing your yard during and after heavy rain. Note where water collects, how long it takes to drain, and whether it flows toward your home or other structures.
1. Identify Low Spots and Pooling Areas
Walk your property after a storm and mark areas where water stands for more than 24 hours. These low spots need drainage intervention. Use stakes or flags to map problem zones for later reference.
2. Check Soil Permeability with a Simple Test
Dig a hole about 12 inches deep and fill it with water. If the water drains within a few hours, your soil has reasonable permeability. If it remains for a day or more, you’re dealing with heavy clay or compacted soil that requires subsurface drainage.
3. Evaluate Existing Gutters and Downpipes
Clogged or poorly positioned downpipes dump large volumes of water near your foundation. Ensure gutters are clear and downpipes extend at least two meters away from the house. If they discharge into garden beds or paved areas, you’ll need to integrate them into your drainage plan.
4. Measure Slope and Grade Around Your Home
Your yard should slope away from the foundation at a minimum grade of 1 percent (one inch of drop per 10 feet of distance). Use a long level and measuring tape to check. If the ground slopes toward your house, regrading or a drainage system is necessary.
5. Inspect for Erosion and Soil Movement
Look for exposed tree roots, channels in garden beds, and sediment deposits near fences or driveways. These signs indicate uncontrolled water flow that will worsen over time without intervention.
6. Consider Underground Pipe Condition
Older Sydney homes often have clay stormwater pipes that crack or collapse. If you notice sinkholes, slow-draining yard drains, or recurring wet patches, underground pipe damage may be contributing to your drainage issues. A CCTV drain inspection reveals blockages, root intrusion, and structural defects without excavation.
7. Consult Local Regulations and Stormwater Requirements
Sydney councils regulate stormwater discharge to protect public infrastructure and waterways. Some areas require on-site detention systems or restrict direct connection to street drains. Check with your local council before finalizing your drainage plan to ensure compliance.
Steps for Installing a Drainage System in Your Yard
Installing a drainage system in your yard involves careful planning, precise excavation, and correct pipe placement. While DIY approaches may seem straightforward, mistakes in slope, material selection, or outlet positioning often lead to system failure and costly rework. Professional installation ensures long-term performance and compliance with Australian Standards.
Here’s what a proper installation entails, whether you’re tackling it yourself or hiring a licensed plumber.
1. Plan Your Drainage Layout and Outlet Point
Determine where water will exit your system. Common discharge points include street gutters, council stormwater drains, or low areas on your property where water can safely disperse. Measure the distance from problem areas to the outlet and map your pipe route. Avoid running pipes under structures or through areas where future excavation may be needed.
2. Dig Trenches to the Correct Depth and Slope
Trenches for French drains should be about 18 inches deep and 9-12 inches wide. Maintain a slope of at least 1 percent (one inch per 10 feet) to ensure gravity-driven flow. Use a long level or laser level to check slope as you dig. Deeper trenches may be required if you’re connecting to existing stormwater lines or crossing under paths.
3. Lay a Gravel Base and Install Perforated Pipe
Place a 2-3 inch layer of crushed gravel at the bottom of the trench to promote water absorption. Lay perforated pipe with holes facing downward to allow water entry from below. Bunnings water pipe options include flexible corrugated and rigid PVC, but professional-grade slotted agricultural pipe offers superior flow rates and durability. Wrap the pipe in geotextile fabric to prevent soil and sediment from clogging perforations over time.
4. Surround the Pipe with Gravel and Cover
Fill the trench with more gravel, covering the pipe completely and leaving a few inches below ground level for topsoil. The gravel layer acts as a filter and provides pathways for water to reach the pipe. Compact the gravel lightly to prevent settling, then cover with landscape fabric and topsoil. Restore grass or garden beds as needed.
5. Connect to Downpipes and Surface Drains
If you’re integrating roof runoff, install Y-fittings where downpipes meet your drainage line. Use solid pipe for sections carrying high volumes of water to prevent sediment buildup. Connect surface drains or catch basins in paved areas to capture runoff before it reaches problem zones.
6. Test the System Before Final Backfilling
Run water through the system using a hose to verify flow and check for leaks or blockages. Watch the outlet point to confirm water exits as expected. Adjust pipe slope or clear obstructions as needed before covering trenches completely.
7. Document Your Installation for Future Reference
Take photos of pipe routes, fittings, and outlet points before backfilling. Record depths, materials used, and connection points. This documentation helps with future maintenance, repairs, or property modifications.
Our team at Antons Plumbing & Gas handles every step of drainage installation, from initial assessment to final testing. We use professional-grade materials, ensure correct slope and sizing, and provide clear documentation of all work. Same-day service is available across Sydney, and our lifetime labour warranty protects your investment for years to come. Call 0493 824 176 to schedule an assessment.
Why Professional Installation Delivers Better Long-Term Results
DIY drainage projects appeal to budget-conscious homeowners, but they often result in systems that underperform or fail within a few years. Incorrect slope, inadequate pipe sizing, and poor outlet placement are common mistakes that lead to recurring water problems. Professional installation addresses these issues from the start and ensures compliance with local regulations.
Licensed plumbers bring specialized knowledge and equipment that DIY approaches can’t match. Here’s what you gain by hiring a professional.
- Accurate slope and grading: Laser levels and surveying tools ensure consistent fall across the entire pipe run, preventing low spots where water stagnates.
- Proper material selection: We specify pipe diameter, gravel size, and fabric type based on soil conditions and expected water volume, not just what’s available at Bunnings.
- Compliance with AS/NZS 3500: Australian Standards govern stormwater drainage design, installation, and connection to public infrastructure. Non-compliant work can result in council fines and mandatory removal.
- Integration with existing systems: We connect new drainage to your home’s stormwater network without compromising existing pipes or creating backflow risks.
- Long-term performance guarantees: Our lifetime labour warranty covers installation defects, giving you confidence that the system will function as designed.
Professional installation also saves time and reduces physical strain. Digging trenches, moving gravel, and laying pipe is labour-intensive work that can take weekends to complete. Our team completes most residential drainage projects in a single day, minimizing disruption to your property.
Common Mistakes That Cause Drainage Systems to Fail
Even well-intentioned DIY drainage projects can fail if key principles are overlooked. Understanding these common errors helps you avoid them, whether you’re installing the system yourself or evaluating a contractor’s work. Many of these mistakes aren’t obvious until the system is tested by heavy rain.
Here are the most frequent issues we encounter when repairing failed drainage systems.
Insufficient Slope Leads to Standing Water in Pipes
Pipes must maintain a minimum 1 percent slope to ensure water flows by gravity. Flat or reverse-sloped sections create low spots where water pools, sediment accumulates, and flow stops. Over time, these areas clog completely and require excavation to repair. Always check slope with a level during installation, not just by eye.
Incorrect Pipe Orientation Blocks Water Entry
Perforated pipe should be installed with holes facing downward, not upward. This allows water to enter from the gravel bed below while preventing sediment from falling into the pipe from above. Upward-facing holes clog quickly and reduce system capacity.
Inadequate Gravel Coverage Reduces Filtration
Gravel surrounding the pipe serves as a filter and flow path for water. Skimping on gravel or using the wrong size reduces effectiveness. Use clean, crushed rock (not rounded pebbles) in 10-20mm size for best results. The gravel layer should extend at least three inches above and below the pipe.
Missing or Poor-Quality Geotextile Fabric Allows Sediment Intrusion
Geotextile fabric prevents soil from migrating into the gravel and clogging the system. Cheap or improperly installed fabric fails quickly, especially in clay soils. Use heavy-duty, non-woven fabric and overlap seams by at least 12 inches to maintain integrity.
Undersized Pipes Can’t Handle Peak Flow
Pipe diameter must match the volume of water you’re managing. A 100mm pipe may suffice for a small garden bed, but downpipes and large paved areas require 150mm or larger. Undersized pipes overflow during heavy rain, defeating the purpose of the system.
Poorly Positioned Outlets Create New Problems
Discharging water onto a neighbor’s property, into a septic field, or too close to another structure shifts the problem rather than solving it. Outlets must be located where water can safely disperse or connect to approved stormwater infrastructure. Council regulations often dictate acceptable discharge points.
Lack of Maintenance Access Prevents Future Repairs
Drainage systems require occasional inspection and cleaning. Installing pipes without access points or cleanouts makes future maintenance difficult and expensive. Include inspection pits or removable grates at key junctions to simplify upkeep.
When to Call a Licensed Plumber for Drainage Issues
Some drainage problems require professional diagnosis and repair. While minor adjustments like extending downpipes or adding surface drains may be within DIY capability, complex issues involving underground pipes, foundation proximity, or council infrastructure need licensed expertise. Attempting these repairs yourself can result in property damage, non-compliance, and safety hazards.
Contact a licensed plumber if you notice any of the following signs.
- Water pooling near your foundation after rain: This indicates inadequate grading or failed drainage that threatens structural integrity.
- Sinkholes or depressions in your yard: These often signal collapsed underground pipes or voids caused by water erosion.
- Persistent wet patches or muddy areas: Chronic moisture suggests subsurface water movement that surface solutions won’t fix.
- Cracks in walls, floors, or driveways: Foundation movement from water damage requires immediate assessment to prevent further deterioration.
- Foul odors or sewage backup: These symptoms may indicate stormwater and sewer line cross-contamination, a serious health and compliance issue.
- Erosion or sediment deposits: Uncontrolled water flow accelerates property damage and may violate council stormwater regulations.
We respond to drainage emergencies 24/7 across Sydney with no call-out fee from 7am to 3pm on weekdays. Our team uses CCTV drain inspection to identify underground issues without excavation, then presents clear options for repair or replacement. Whether you need pipe relining, new drainage installation, or integration with existing systems, we deliver compliant, long-lasting solutions. Call 0493 824 176 for same-day service.
Protecting Your Investment with Ongoing Maintenance
A properly installed drainage system requires minimal maintenance, but periodic inspection and cleaning extend its lifespan and ensure reliable performance. Neglected systems accumulate sediment, develop root intrusion, and lose capacity over time. Simple maintenance tasks prevent costly repairs and keep water flowing as designed.
Inspect surface drains and catch basins after heavy rain to remove leaves, debris, and sediment. Clear blockages promptly to maintain flow capacity. Check outlet points to ensure water exits freely and doesn’t back up into the system.
Flush underground pipes every few years using a garden hose or pressure washer. This removes sediment buildup and identifies slow-draining sections that may need attention. If you notice reduced flow or standing water, schedule a CCTV inspection to assess pipe condition and locate blockages.
Tree roots are a common cause of drainage system failure, especially in older Sydney properties with established vegetation. Roots infiltrate pipes through joints and cracks, creating blockages that worsen over time. Regular inspection catches root intrusion early, when pipe relining or targeted root removal can restore function without full replacement.
We offer scheduled maintenance plans for residential and commercial properties across Sydney. Our team inspects, cleans, and documents your drainage system’s condition, providing recommendations before small issues become major problems. Lifetime labour warranty coverage gives you confidence that our work will perform as expected for years to come.
Conclusion
Installing a drainage system in your yard protects your property from water damage, erosion, and foundation issues that cost far more to repair than prevention. Professional installation ensures compliance, correct slope, and long-term performance. Call Antons Plumbing & Gas at 0493 824 176 for same-day service across Sydney.
Antons Plumbing & Gas brings over 25 years of expertise in drainage solutions and CCTV inspections across Sydney. Our licensed team protects your property with compliant, tailored systems backed by a lifetime warranty. Contact us today to learn more.
Related Articles
- How a Drain Blockage Plumber Helps Keep Your Water System Hygienic
- Compliance Matters: Codes a Drainage Plumber Follows
- How to Install a Drainage System in Your Yard the Right Way
FAQs
What Are The Steps To Install A Drainage System In Your Yard?
Installing a drainage system typically involves assessing your yard’s drainage needs, planning the layout, excavating trenches, installing the drainage pipes, connecting to the main drainage system, and backfilling the trenches. Our experienced team at Antons Plumbing & Gas can guide you through each step to ensure a reliable solution tailored to your property.
How Much Does It Cost To Install A Drainage System In Your Yard?
The cost of installing a drainage system can vary based on the size of your yard, the type of system required, and the complexity of the installation. At Antons Plumbing & Gas, we provide upfront pricing and work within your budget to deliver effective drainage solutions.
What Type Of Drainage System Is Best For My Yard?
The best drainage system for your yard depends on factors like soil type, yard layout, and water flow patterns. Common systems include French drains, surface drains, and dry wells. Our expert team can assess your property and recommend the most effective drainage solution for your specific needs.
Can I Install A Drainage System Myself?
While it is possible to install a drainage system yourself, it can be complex and requires careful planning to avoid future issues. Hiring professionals like Antons Plumbing & Gas ensures that the system is installed correctly and complies with local regulations, giving you peace of mind.
How Do I Know If I Need A Drainage System In My Yard?
Signs that you may need a drainage system include standing water after heavy rain, soggy soil, and water pooling in specific areas of your yard. If you notice these issues, our team at Antons Plumbing & Gas can perform an assessment and recommend the best drainage solutions for your property.